Try these hands-on mother-daughter crafts for Mother’s Day to create keepsakes, celebrate your bond, and enjoy crafting together.
You might be thinking about doing something simple with your mom this Mother’s Day, nothing too big, just something you can sit down and make together.
But once you start looking for ideas, it quickly becomes frustrating. The crafts either feel too childish for you, or too complicated for a younger child to follow along with.
And if you’ve ever tried one of those ideas before, you already know how it goes.
You start out together, but somewhere along the way, you end up taking over certain parts just to make it “turn out right,” while the child slowly steps back. It stops feeling like something you made together.
What you probably want is something that feels a bit more balanced. Something you can enjoy as an adult, while a child can still take part without struggling or losing interest.
A craft that allows everyone to be involved in a natural way, without pressure.
That’s what you’ll find here. These ideas are simple, but they don’t feel empty. You can sit with your mom, or with a younger child, and create something side by sides.
In a quiet way, some of these crafts even help put feelings into form, especially the ones that are not always easy to say out loud.
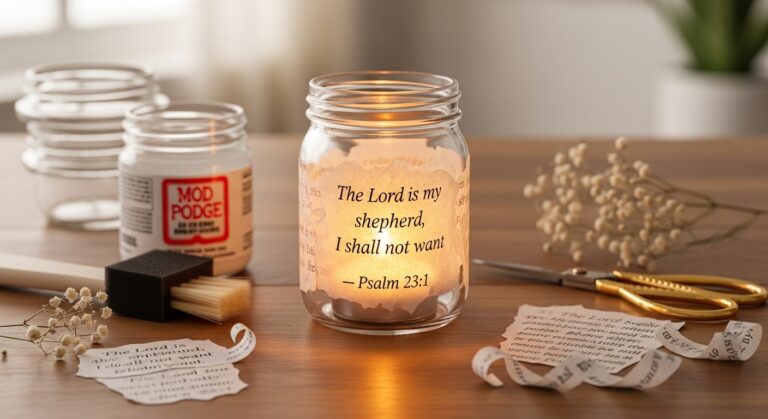
When looking for thoughtful ways to bless your mom this year, you can find inspiration in Meaningful Christian DIY Gifts for Mom on Mother’s Day, which offer heartfelt, faith-centered ideas.
Table of Contents
- 1 Cute and Easy Mother-Daughter Crafts Kids Can Actually Do
- 1.1 2. Painted Handprint Bouquet
- 1.2 3. Mini Memory Matchbox Gifts
- 1.3 4. DIY Pressed Flower Bookmarks
- 1.4 5. Mother-Daughter Matching Canvas Art
- 1.5 6. DIY Scented “Love Notes” Sachets
- 1.6 Simple Ways to Help Kids Enjoy the Process (Without Taking Over)
- 1.7 Making the Moment Special (Not Just the Craft)
- 1.8 Conclusion
- 1.9 Related
How to Set Up a Stress-Free Mother–Daughter Craft Time

A calm setup can make a big difference in how the craft experience feels. When things are simple and organized, you spend less time fixing problems and more time enjoying the moment together.
Here’s a simple way to prepare:
- Pre-cut anything that might slow things down
Some parts of a craft, like cutting shapes, threading small pieces, or measuring, can be frustrating, especially for younger kids. Preparing those parts ahead of time helps everything flow better.
It allows both of you to stay focused on the creative part instead of getting stuck halfway. - Lay out your tools in the order you’ll use them
Place materials where you can easily reach them, paper, markers, glue, decorations.
Keeping things in order reduces interruptions and makes the process feel calm and organized. It also helps a child follow along without confusion. - Create a simple “mess zone”
Use an old cloth, table mat, or even a specific corner of the table where it’s okay to make a mess.
When there’s no pressure to keep everything perfect, both of you can relax and enjoy the process more.
To add charm and personalization to her home, consider projects from DIY Mother’s Day Home Decor Gifts She’ll Display All Year that transform ordinary spaces into lasting memories.
Let the conversation happen naturally
While your hands are busy, talking becomes easier. This is often where the real connection happens.
You might find that a child opens up more during these quiet moments, sharing thoughts, little stories, or feelings they wouldn’t usually say directly.
Focus on the experience, not perfection
The goal isn’t to create something flawless. It’s to spend time together and allow each person to contribute in their own way.
When a child feels involved and capable, it builds confidence and encourages them to express themselves more freely.
Planning a creative night with friends or family? The Adult Birthday Craft Night Party: Themes, Ideas, and How to Pull It Off post gives unique ideas that make gatherings fun and memorable.
Cute and Easy Mother-Daughter Crafts Kids Can Actually Do
1. Open When” Message Bracelets

This is a simple craft, but it carries a lot of meaning. Instead of just making a bracelet, you’re creating something your mom can turn to in different moments, whether she needs comfort, encouragement, or a reminder of your love.
Each bracelet can come with a small tag that says things like:
- “Open when you feel tired”
- “Open when you need a smile”
- “Open when you miss me”
It gives a child a gentle way to express feelings, even if they don’t always have the words for it.
What you’ll need:
- Elastic string or stretch cord (easy for small hands to work with)
- Medium to large beads (avoid very tiny ones for younger kids)
- Letter beads (optional, for adding short words like “LOVE” or “MOM”)
- Small pieces of cardstock or thick paper (for the tags)
- Hole punch
- Markers or pens
- Tape or small ribbon
How to make it:
- Cut the elastic string to a comfortable wrist size, leaving extra length for tying.
- Let the child thread beads onto the string. There’s no need for a perfect pattern, this is where their creativity shows.
- Tie the ends securely once finished (you can help with this part if needed).
- Write a short “open when” message on a small piece of paper and punch a hole at the top.
- Attach the tag to the bracelet using ribbon or by looping it onto the string.
Capturing emotions in a simple gift is easy with Mother’s Day Memory Jar Gift Ideas That Will Make Her Cry Happy Tears, perfect for preserving cherished moments.
2. Painted Handprint Bouquet
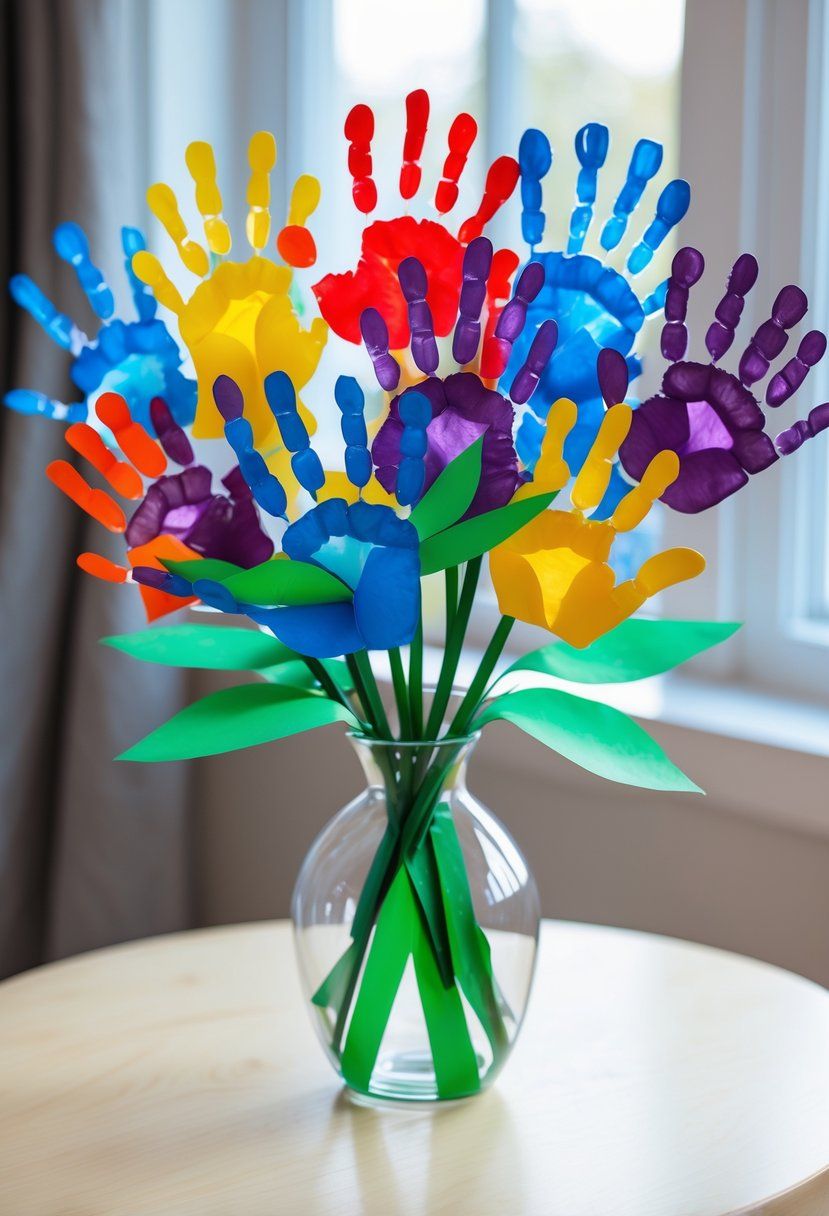
This idea takes the classic handprint craft and turns it into something that feels grown-up, meaningful, and lasting, perfect for a mother-daughter craft for Mother’s Day that both of you can enjoy together.
Instead of just making a few prints on plain paper, you can layer handprints to create a full bouquet. Each print becomes a petal, and when combined with painted stems and leaves, it looks like a real floral arrangement.
The child gets to participate actively, and you the adult can help guide the layering and details, making it collaborative without taking over.
What you’ll need:
- Non-toxic washable paints (different colors for petals and leaves)
- Heavyweight paper or cardstock
- Paintbrushes or sponges
- Pencil for sketching stems
- Wrapping paper or craft paper for display
- Markers or pens for a short note
How to make it:
- Let your child paint their hands in the colors you’ve chosen for the flowers.
- Press each handprint onto the paper, layering them slightly so they form petals around a central point.
- Use a pencil or green paint to draw stems connecting the flowers. Add leaves for extra detail.
- Once dry, carefully wrap the artwork with wrapping paper or craft paper for a gift-ready bouquet look.
- Add a small note with a personal message or a short poem about your time together.
For pampering that feels personal and hands-on, check out 12 DIY Mother’s Day Spa Gift Baskets She’ll Absolutely Love, which combine creativity with indulgence.
3. Mini Memory Matchbox Gifts
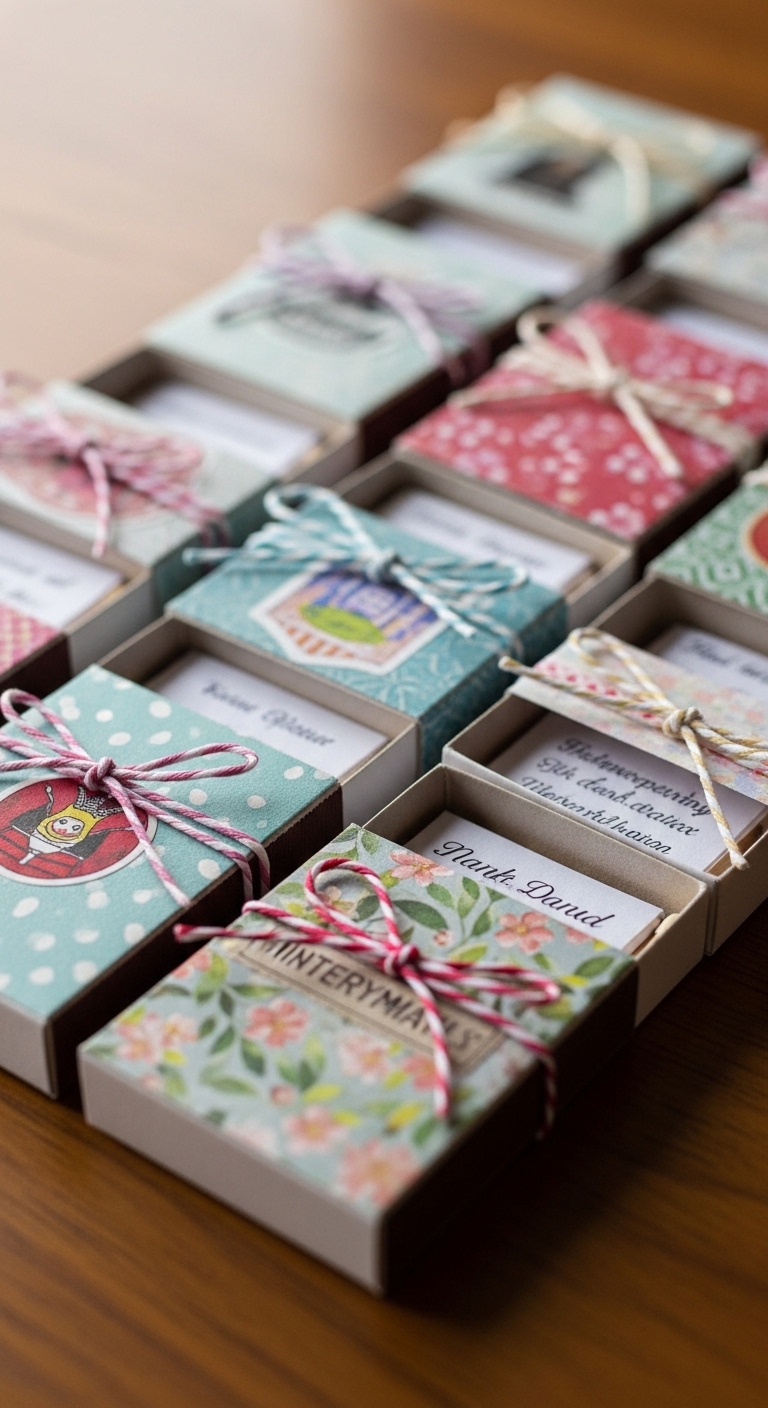
This craft turns tiny boxes into a mini treasure collection of memories and love. Each box can hold a drawing, a note, or a small symbol representing a special moment with your mom.
It’s simple for kids to do, yet meaningful enough for an adult to enjoy, making it a keepsake you can revisit anytime.
What You’ll Need:
- Small boxes (matchboxes, jewelry boxes, or recycled tiny boxes)
- Colored paper or cardstock
- Pens, markers, or colored pencils
- Tiny stickers or small decorative items (optional)
- Glue or double-sided tape
How to Make It:
- Cover the outside of each box with colored paper or craft wrap to make it feel special.
- Let your child add a tiny drawing, word, or simple note for each box. Adults can also contribute messages or symbols to make it collaborative.
- Place the drawings or notes inside the boxes.
- Decorate the boxes with stickers, ribbons, or small embellishments as desired.
- Arrange all the boxes together and present them as a memory collection.
For a living gift that grows with love, consider projects featured in DIY Mother’s Day Flower Garden Kit She Will Absolutely Love, perfect for interactive, lasting presents.
4. DIY Pressed Flower Bookmarks
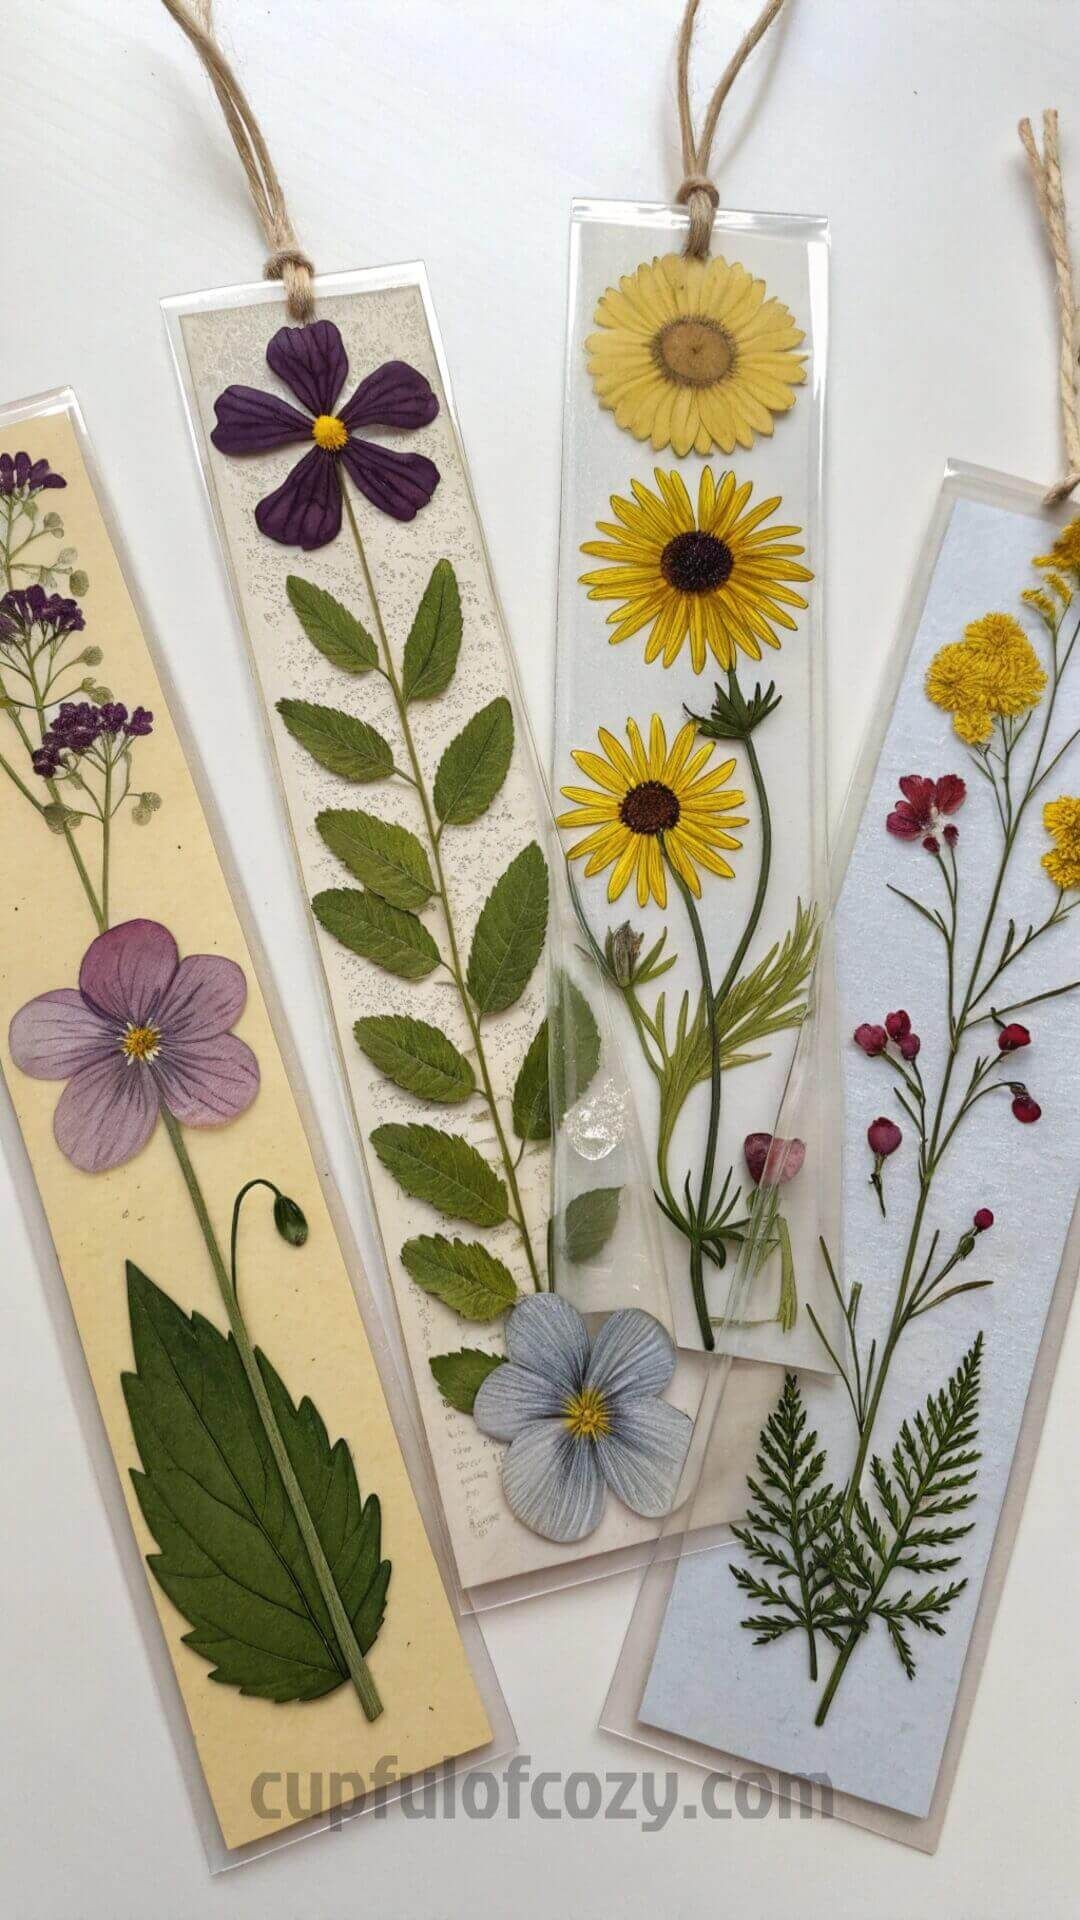
The DIY Pressed Flower Bookmarks turn simple flowers into a keepsake your child can create with you. It’s a craft that teaches patience, attention to detail, and an appreciation for nature, while producing something functional.
Each bookmark becomes a little piece of art your mom can use daily, reminding her of the shared time and care that went into making it.
What You’ll Need:
- Fresh, small flowers or leaves
- Heavyweight paper or cardstock
- Clear tape or contact paper
- Scissors
- Markers or pens (optional, for decorating)
How to Make It:
- Flatten the flowers in a book for a day or two, or use already-pressed flowers.
- Arrange the flowers on a strip of cardstock to create the design you like.
- Cover with clear tape or contact paper to seal and protect the flowers.
- Trim the edges neatly to create a bookmark shape.
- Optionally, decorate with markers, write a small note, or add the date.
To give friends something genuinely personal, explore Crafts to Make for Friends: Meaningful DIY Gift Ideas They’ll Actually Love, perfect for connection and celebration.
5. Mother-Daughter Matching Canvas Art
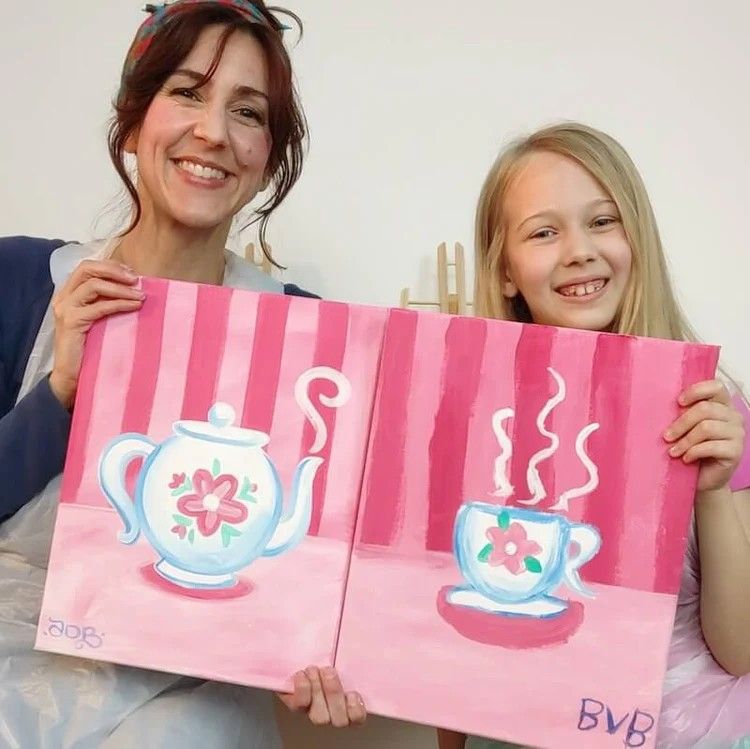
This craft is a perfect example of mother-daughter crafts for Mother’s Day that emphasize connection over perfection. You take a canvas and split it in half, one side painted by you, the other by your child.
The goal isn’t to create a flawless painting, but to share the experience of creating something together. The final piece becomes a meaningful artwork you can proudly display at home, reminding you both of the time spent side by side.
What You’ll Need:
- Canvas (any size you like)
- Acrylic or washable paints
- Paintbrushes or sponges
- Palette or paper plate for mixing colors
- Protective covering for your workspace
How to Make It:
- Place the canvas in a comfortable workspace and divide it visually into two halves.
- Let your child paint their half freely, while you create on the other side.
- You can coordinate colors or shapes if you like, but don’t worry about exact matching, the charm is in the differences.
- Allow the painting to dry fully.
- Display it somewhere visible, like a wall, shelf, or framed area, as a shared keepsake.
Quick, fun, and kid-friendly ideas can be found in Easter Bunny Crafts For Kids That Take Less Than 30 Minutes, perfect for busy schedules or last-minute celebrations.
6. DIY Scented “Love Notes” Sachets
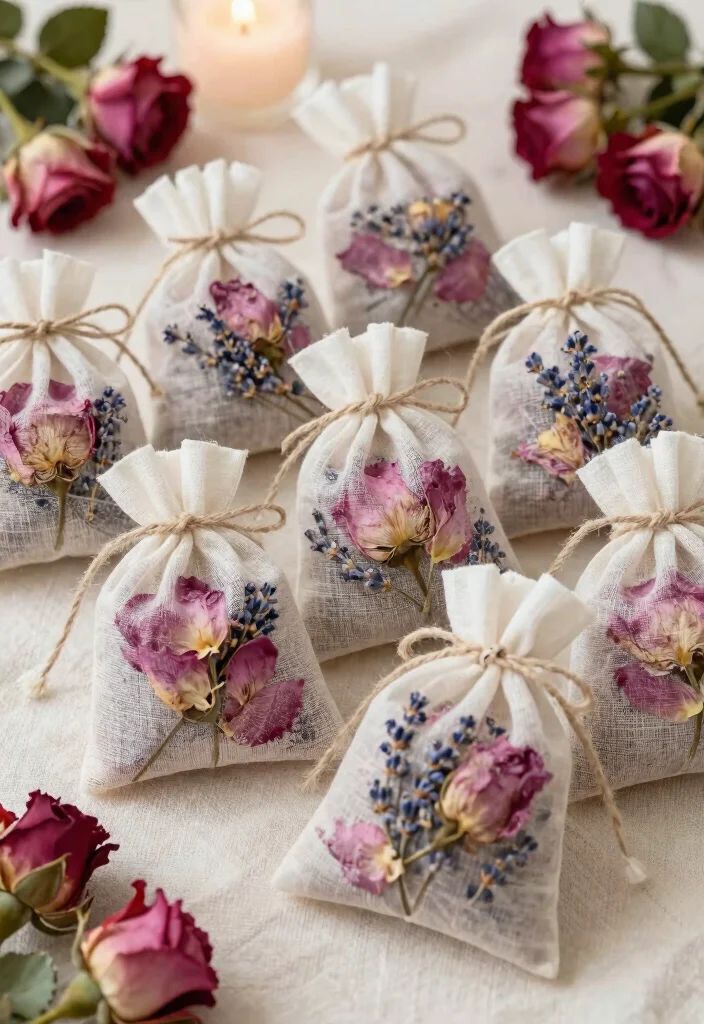
This craft transforms small pouches into a multi-sensory gift that engages sight, touch, and smell. Each sachet can be filled with dried herbs, flowers, or other natural scents, and tucked inside is a tiny note with a message of love or appreciation.
It’s a simple but meaningful activity that children can help with, and adults can enjoy personalizing. The end result is a small, fragrant keepsake that brings a smile every time it’s opened.
What You’ll Need:
- Small fabric or paper pouches
- Dried herbs, petals, or scented materials (lavender, rose petals, rosemary, etc.)
- Small slips of paper for notes
- Pens or markers
- Optional: ribbon or string to tie the pouch
How to Make It:
- Write a short message or note on a small slip of paper.
- Fill the pouch with dried herbs, petals, or fragrant materials.
- Place the note inside the pouch along with the herbs.
- Close the pouch securely and decorate with a ribbon or string if desired.
- Optionally, make a few different scented sachets to create a little collection.
When planning a meaningful evening of faith and creativity, the ideas in Women’s Christian Craft Night: 15 Easy Ideas for Women’s Ministry offer approachable projects that inspire connection and community.
Simple Ways to Help Kids Enjoy the Process (Without Taking Over)

When you’re doing mother-daughter crafts for Mother’s Day, it can be tempting to jump in and “fix” things or take control, but that can quickly take the fun away for a child.
Here are some ways to make the experience enjoyable, relaxed, and truly collaborative:
- Let them make “mistakes.” Mistakes are part of the learning process and often lead to creative surprises. Resist the urge to correct every little thing, they’ll feel more confident exploring their own ideas.
- Praise effort, not outcome. Celebrate their focus, creativity, and problem-solving rather than how “perfect” the craft looks. This keeps the experience positive and encourages them to try new things.
- Give choices instead of instructions. Let kids decide colors, shapes, or placement whenever possible. This keeps them engaged and allows them to feel ownership over the project.
By using these strategies, mother-daughter crafts for Mother’s Day become more than a finished product, they become a shared experience where connection, learning, and joy are the real rewards.
Hosting a remote gathering is effortless with tips from How to Plan a Virtual Craft Night Party with Friends (DIY Girls Night Guide), helping you create interactive, fun experiences even from a distance.
Making the Moment Special (Not Just the Craft)

Crafting isn’t just about the finished project, it’s about the time you spend together. You can turn mother-daughter crafts for Mother’s Day into memories that last far longer than the glue dries.
- Play music. Pick a favorite playlist to make the space feel relaxed and joyful. Music helps everyone feel more creative and engaged.
- Take photos during the process. Capturing the laughs, messy hands, and concentration turns the activity into a story you can look back on for years.
- Turn it into a yearly tradition. Doing the same craft, or a variation, every Mother’s Day creates a rhythm of bonding that your child will remember fondly.
- Let the child present the gift in their own way. Whether it’s wrapping it themselves, making a card, or giving a short explanation, allowing them to share the craft adds emotional depth to the gift.
Focusing on the experience rather than just the final product makes the craft meaningful, fun, and memorable for both mother and child.
To keep teen girls engaged in hands-on activities, explore Spring Craft Night Party for Teen Girls: 7 Creative DIY Experiences They’ll Actually Remember, full of projects that spark creativity and memories.
Conclusion
These crafts aren’t about creating perfect art, they’re about moments that bring you closer, laughter shared across paint and paper, and memories that last long after the craft is finished.
Each project is simple enough for a child to take part in, yet meaningful enough to become a keepsake that your mom will treasure.
Take a moment to choose one of these ideas, sit down together, and enjoy the process. The gift itself will be special, but the connection you build while making it is what truly makes it unforgettable.
FAQs About Mother-Daughter Crafts for Mother’s Day
1. What if I don’t have many craft supplies at home?
Many crafts can be adapted using household items, old boxes, paper scraps, fabric remnants, and even recycled jars can work. Focus on creativity and personalization rather than fancy tools. A thoughtful project doesn’t require expensive supplies.
2. How do I manage mess without stressing out?
Set up a “mess zone” using old cloths, table mats, or a washable surface. Have wipes, paper towels, and aprons handy. Make cleaning part of the fun, or let it be a quick, separate activity afterward.
3. Can these crafts work for kids of all ages?
Yes! Crafts can be scaled: younger kids can focus on simple placement or coloring, while older kids can handle layering, painting, or writing notes. Choose tasks that match the child’s ability so they feel proud of their contribution.
4. How long should a mother-daughter craft session last?
Keep sessions short and flexible, usually 30–60 minutes works best for younger kids. Older kids may enjoy longer projects. The key is to keep it enjoyable, not exhausting.
5. How do I preserve crafts made with natural materials?
For items like pressed flowers or herb sachets, use protective materials like contact paper, laminating sheets, or small boxes. Store keepsakes away from direct sunlight and moisture to extend their life.
6. How can I make Mother’s Day crafts a recurring tradition?
Pick one or two crafts each year and slightly change the design, materials, or message. Taking photos and keeping past creations can turn this into a cherished annual ritual.
7. How can I encourage creativity if my child is hesitant or perfectionist?
Model experimentation yourself, show that mistakes are part of the fun. Offer choices, gentle guidance, and celebrate effort. Sometimes pairing a structured activity (like a template or example) with open-ended decoration works well.
8. Are these crafts suitable for long-distance families?
Absolutely! Many crafts, like mini memory boxes, DIY bookmarks, or scented sachets, can be made and mailed. Include a note explaining the process and the memory behind it to keep the emotional connection alive.
This post talked on: Mother-Daughter Crafts for Mother’s Day Your Kids Can Actually Do.