Most adult birthdays follow the same script because it’s easy. You book a place, show up, eat, laugh a little, and go home. No risk, no effort but also no real imprint and that’s exactly what a birthday craft night avoids.
The problem is, people don’t remember passive experiences. They remember moments where they participated.
Where they created something, said something meaningful, or felt unexpectedly seen.
That’s what a craft night does it quietly shifts the energy. Suddenly, people aren’t just attendees. They’re part of the night.
And if you’re craving memory-making birthday craft night party ideas, this is the difference.
‘You’re not hosting for aesthetics or obligation you’re creating a space where people slow down, engage, and leave with something that reminds them, ‘that night meant something.’
If you’re still working out the logistics, this guide on how to host a craft night party for any age and any occasion walks you through every detail.
Table of Contents
- 1 Why a Birthday Craft Night Party Hits Different(And Why It’s Overdue)
- 2 Before You Start Planning Your Craft Night
- 3 Category One: Set the Vibe — Birthday Craft Night Party Starters for Mixed Groups
- 4 Category Two: Make Something Beautiful — Crafts With a Little More Intention
- 5 Category Three: Give a Gift They’ll Never Throw Away — The Legacy Tier
- 6 Making Birthday Craft Night Party Themes a Tradition
- 7 FAQ — Birthday Craft Night Questions Answered
- 8 One Year From Now, Someone Will Still Have What They Made
Why a Birthday Craft Night Party Hits Different(And Why It’s Overdue)

Most adult birthdays blur together and that’s exactly why a birthday craft night party works.
Nobody made a decision, nobody created anything, nobody did anything that required them to actually show up mentally. The night asks nothing of you and gives nothing back that lasts.
A craft party flips that. It asks people to participate. To try something, fail a little, laugh about it, try again.
That low-stakes creative pressure is surprisingly bonding it gives people something to talk about that isn’t small talk, and it gives the birthday person something to watch: the people they love, doing something together, in the same room, at the same time.
There’s also something quietly powerful about making a thing with your hands at a birthday party. It marks the day differently.
A year from now, your friend will open a cabinet and find the ceramic mug she painted at your birthday dinner, and she’ll remember that Tuesday in October when everyone crammed around your kitchen table and laughed until someone knocked over the paint water.
That’s what an occasion can’t buy you. That’s what a craft night gives you for free.
Before You Start Planning Your Craft Night
Before You Start Your Birthday Craft Night Party: A Few Things That Actually Matter
-
- Cap the guest list at 8–12 people. Craft nights work best when everyone fits around one or two tables. Bigger than that and it starts feeling like a workshop, not a party.
- Pre-portion all supplies. Give each guest their own tray or kit so nobody’s reaching over each other or waiting on materials.
- Do a test run on the craft. Especially for resin, candle pouring, or watercolor it saves you from the most common crafting mistakes beginners make and keeps the night running smoothly.
- Set the ambient mood early. A good playlist and some candles on the table do more for the vibe than any decoration budget.
Think of yourself less as a “host” and more as the person holding the space together.
Category One: Set the Vibe — Birthday Craft Night Party Starters for Mixed Groups
These are your crowd-pleasers. They’re accessible for non-crafters, fast enough that no one feels stuck, and just hands-on enough to spark real conversation. Start here if you have a mixed group or a birthday person who wants the energy light and fun.
1. Paint-Your-Own Pottery Mug Bar
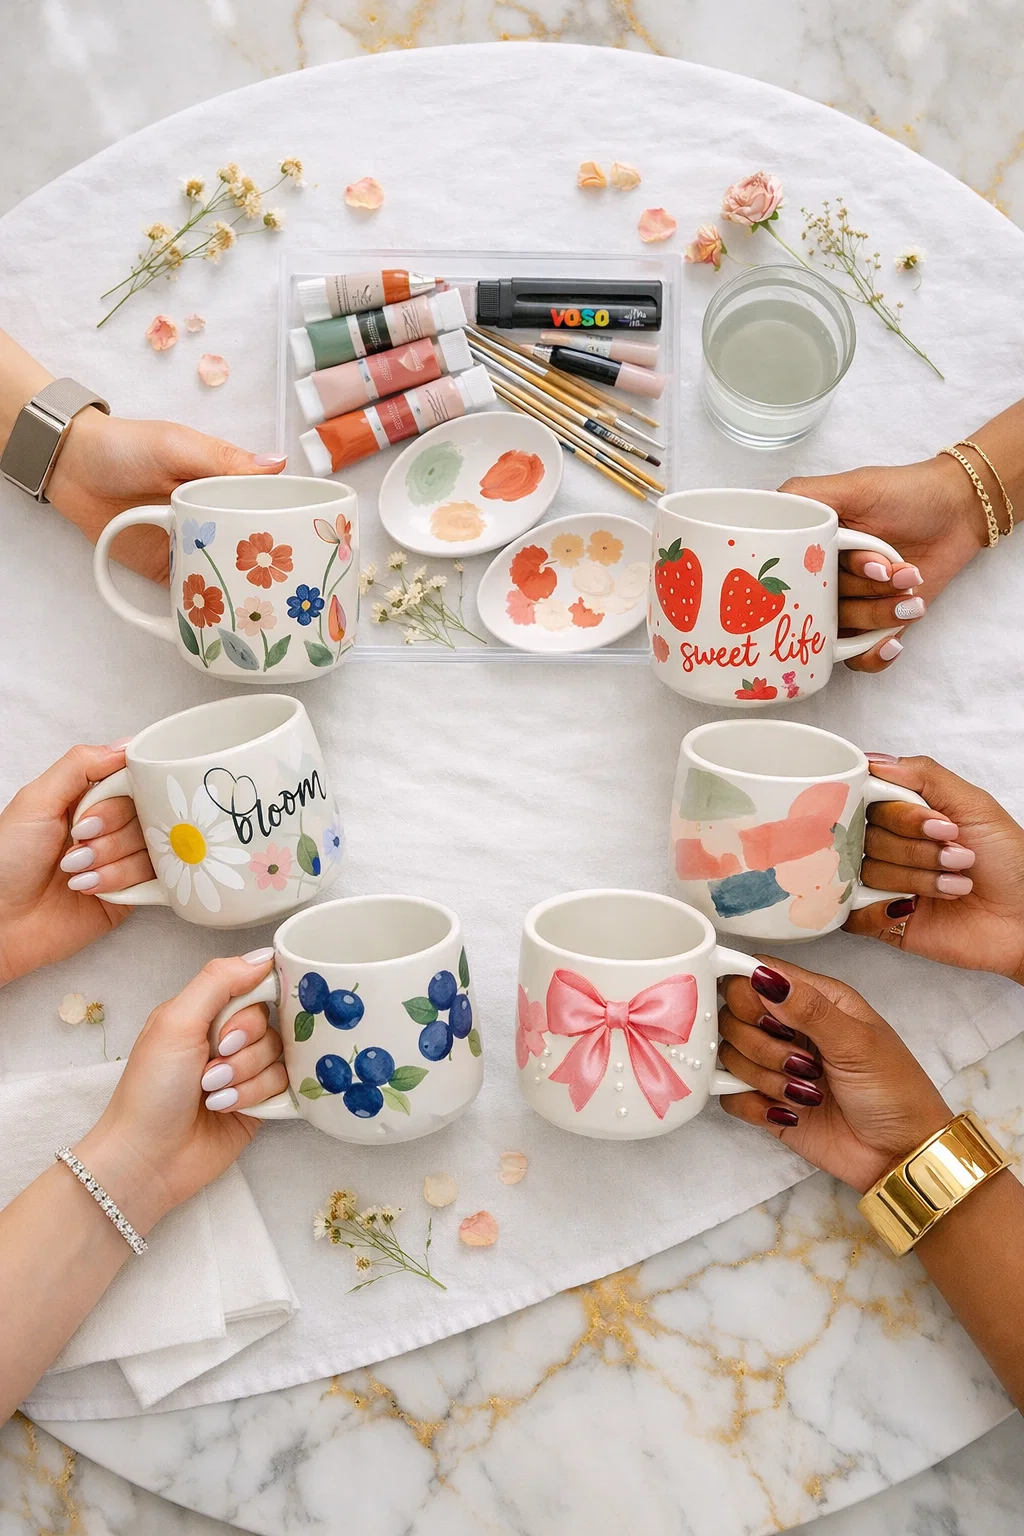
Guests decorate a plain ceramic mug with food-safe ceramic paint, then use it for coffee or tea at the party itself.
This one has a secret weapon: the finished mugs become a daily reminder of the night. Every morning coffee is a small birthday memory, and that kind of lasting touchpoint is exactly what makes craft birthdays worth doing.
What you need:
- Plain white ceramic mugs (one per guest plus a few extras)
- Food-safe ceramic paint in 6–8 colors
- Fine and medium paintbrushes
- Cups of water and paper towels per station
- Oven for curing (or air-dry ceramic paint as an alternative)
Before you head to the store, check out this list of must-have craft tools for DIY projects so you’re not missing anything on party day.
How to Do It
- Set out mugs and paint stations before guests arrive so everything is ready on entry.
- Let guests sketch a light pencil design before painting if they want a guide.
- Apply paint in thin layers, letting each color dry slightly before adding the next.
- Cure finished mugs in the oven at 350°F for 30 minutes (or follow paint instructions).
- Rinse and fill with the party’s coffee or tea bar for immediate use.
I’ve done this one three times now, and without fail, the person who said “I’m not artistic” always ends up with the most interesting mug at the table. There’s something about low expectations that frees people up completely.
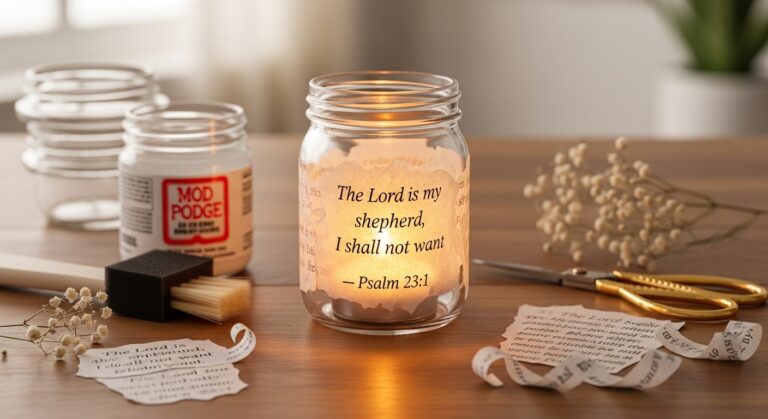
2. Candle Blending & Scent Bar
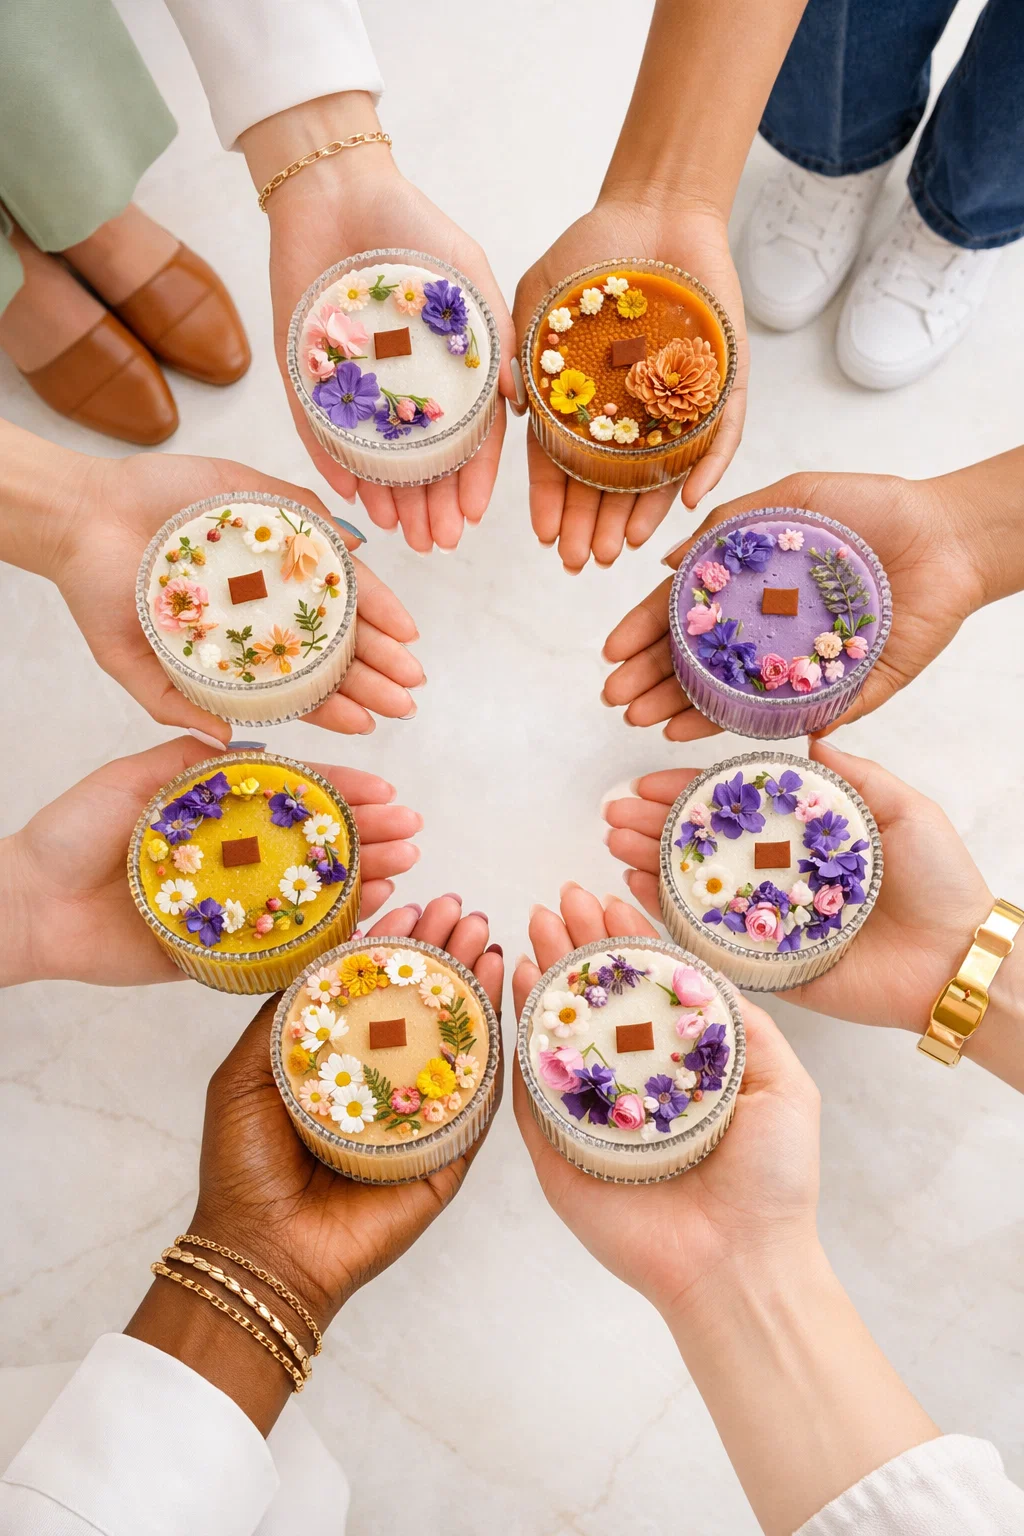
Guests blend fragrance oils to create their own signature scent, then pour and label a small soy candle to take home.
Scent is deeply personal and weirdly emotional watching people smell combinations and argue about whether “vanilla cedar” or “citrus sage” is better is genuinely hilarious and always leads to actual conversation.
What you need:
- Soy wax flakes and a double boiler or pour pot
- Pre-tabbed candle wicks in small tins or jars
- 6–10 fragrance oil options (florals, woods, citrus, warm spices)
- A scent blending guide printed for each guest
- Custom labels with blank lines for naming their scent
How to Do It
- Melt wax in advance and keep it at pouring temperature (around 140°F) in a pour pot.
- Let each guest smell and blend fragrance oils in a small test cup before committing.
- Have guests measure their chosen fragrance blend at the recommended ratio (typically 6–10% of wax weight).
- Add fragrance to warm wax, stir for two full minutes, then pour into labeled containers.
- Allow candles to cure undisturbed for at least one hour before handling.
The naming moment is underrated — when someone calls their candle “Sunday at Grandma’s” because of how the blend smells, you realize how much sensory memory people carry around. This craft goes deeper than it looks.
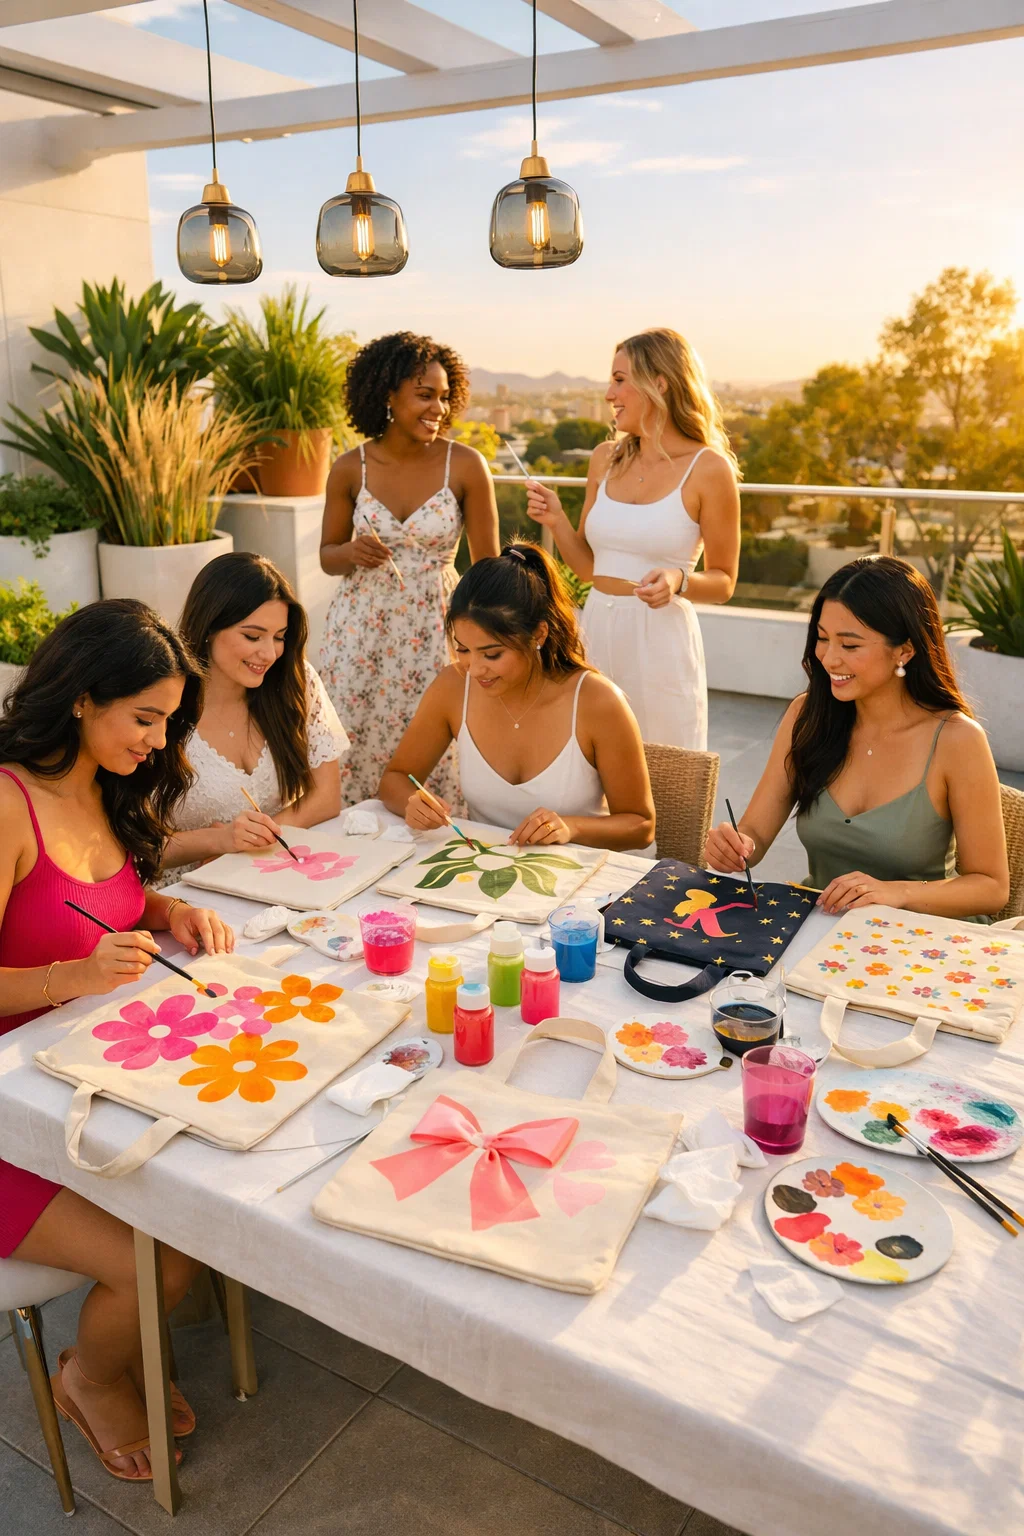
3. Tie-Dye Tote Bag Design Lab (Ice-Dye Method)
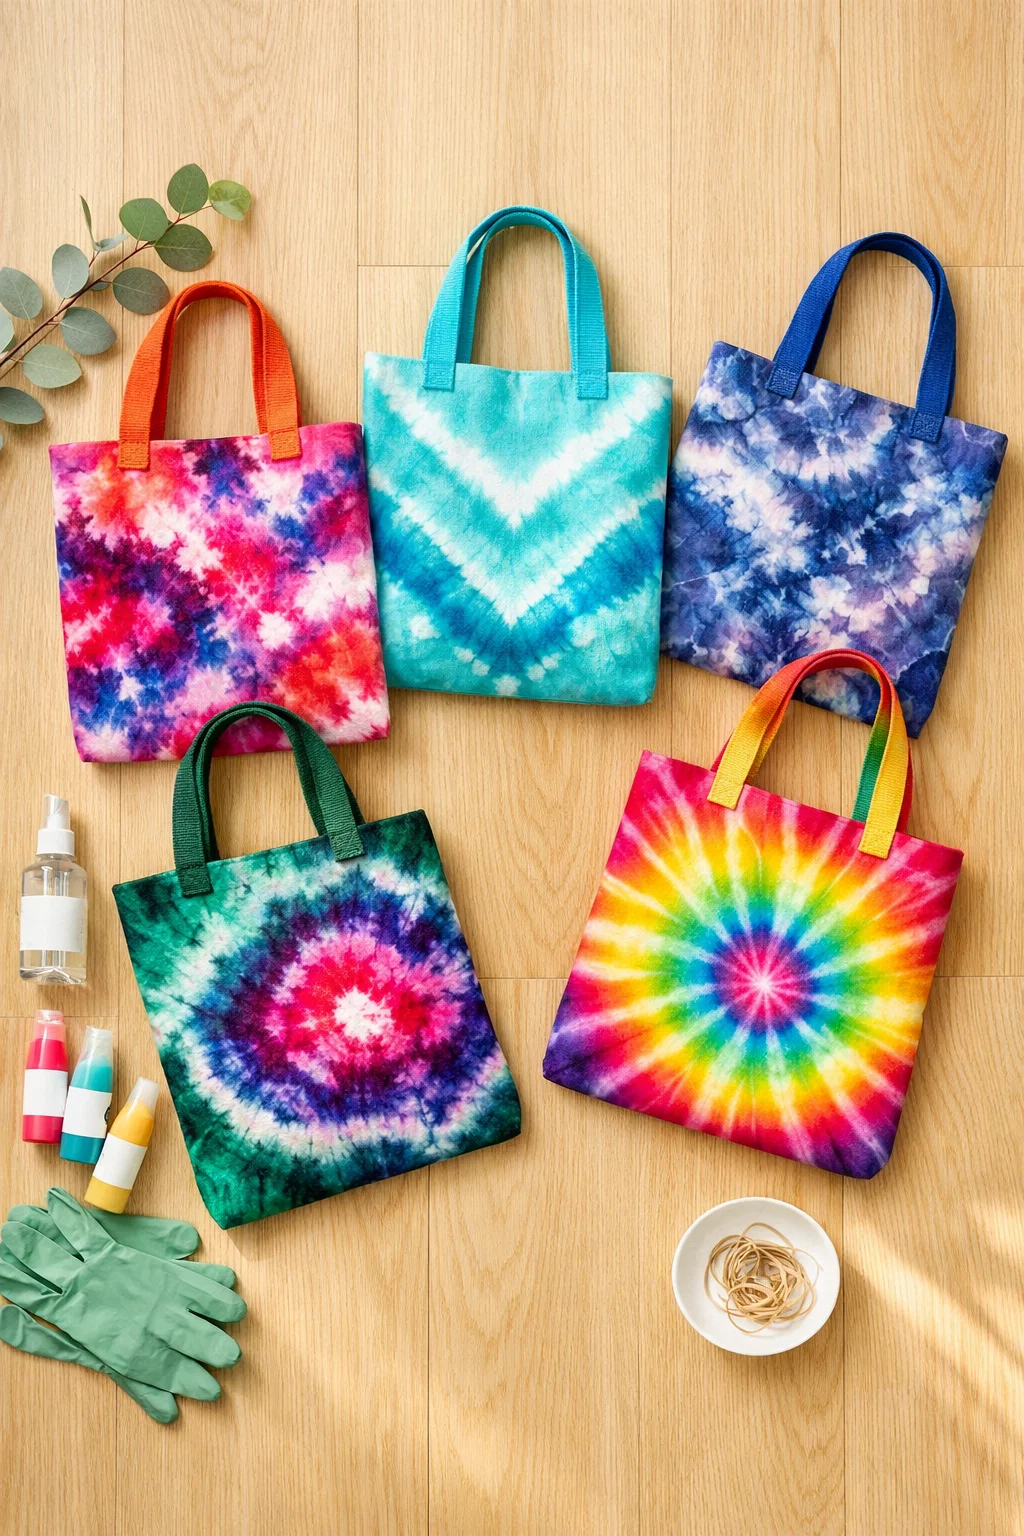
Guests design a tote bag using ice-dye technique a cold-water method that produces painterly, watercolor-like patterns rather than traditional spiral tie-dye.
Most people expect basic tie-dye and are genuinely surprised by how sophisticated the ice-dye results look. The unpredictability is part of the appeal every bag is completely different and impossible to replicate.
What you need:
- Plain cotton canvas tote bags (prewashed)
- Fiber reactive dye in 4–6 colors
- A bag of ice per 2–3 guests
- Wire racks set over trays or bins
- Gloves and plastic wrap for transporting bags home
How to Do It
- Dampen tote bags and scrunch or fold them loosely onto wire racks over catch trays.
- Pack ice generously over the top of each folded bag.
- Sprinkle powdered fiber reactive dye directly onto the ice in chosen colors.
- Allow ice to melt fully at room temperature this takes 2–4 hours, so do this step before the party and reveal results together.
- Rinse bags in cold water, then warm water, until runoff runs clear, and hang to dry.
Set these up at the very start of the party so guests can reveal their bags at the end of the night the suspense is genuinely fun and it bookends the event beautifully.
4. Ribbon & Wire Wreath Sculpting
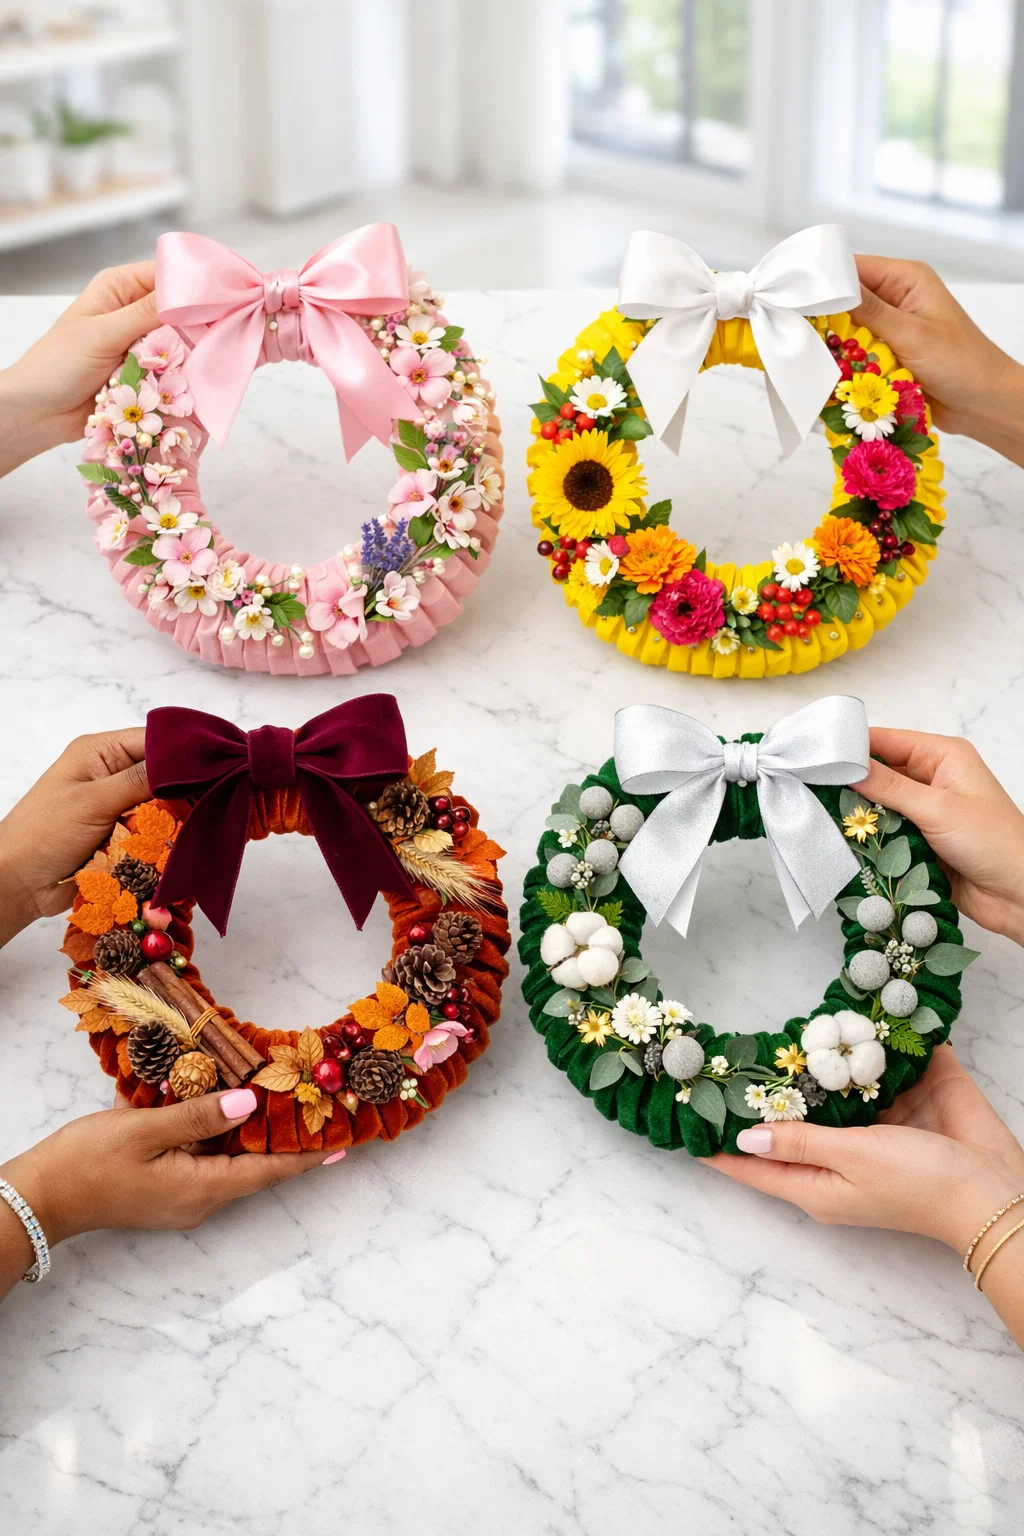
Each guest builds a small seasonal wreath using a wire base, ribbon, and decorative elements same materials, wildly different results.
The beauty of this one is how clearly individual personality comes through. Give ten people the same supplies and you’ll get ten completely different wreaths. It becomes a conversation piece on its own.
What you need:
- Small wire wreath frames (8–10 inch)
- Assorted ribbon in coordinating seasonal colors
- Floral picks, small ornaments, or dried botanicals
- Floral wire and wire cutters
- Hot glue guns and sticks
How to Do It
- Fold and loop ribbon pieces onto wire frame sections, pulling snug as you go.
- Continue layering ribbon until the entire frame is covered evenly.
- Add floral picks and decorative elements, securing with floral wire or a small dot of hot glue.
- Create a hanging loop at the top using a ribbon bow or wire loop.
- Hold finished wreaths up for a group reveal before guests leave.
Hot glue guns at a birthday party always create at least one dramatic moment. Keep a bowl of ice water on the table. Trust me.
Category Two: Make Something Beautiful — Crafts With a Little More Intention
These projects take slightly more focus but deliver results that genuinely impress. They’re for groups that want to feel accomplished, not just entertained.
5. Pressed Flower Resin Coaster Night
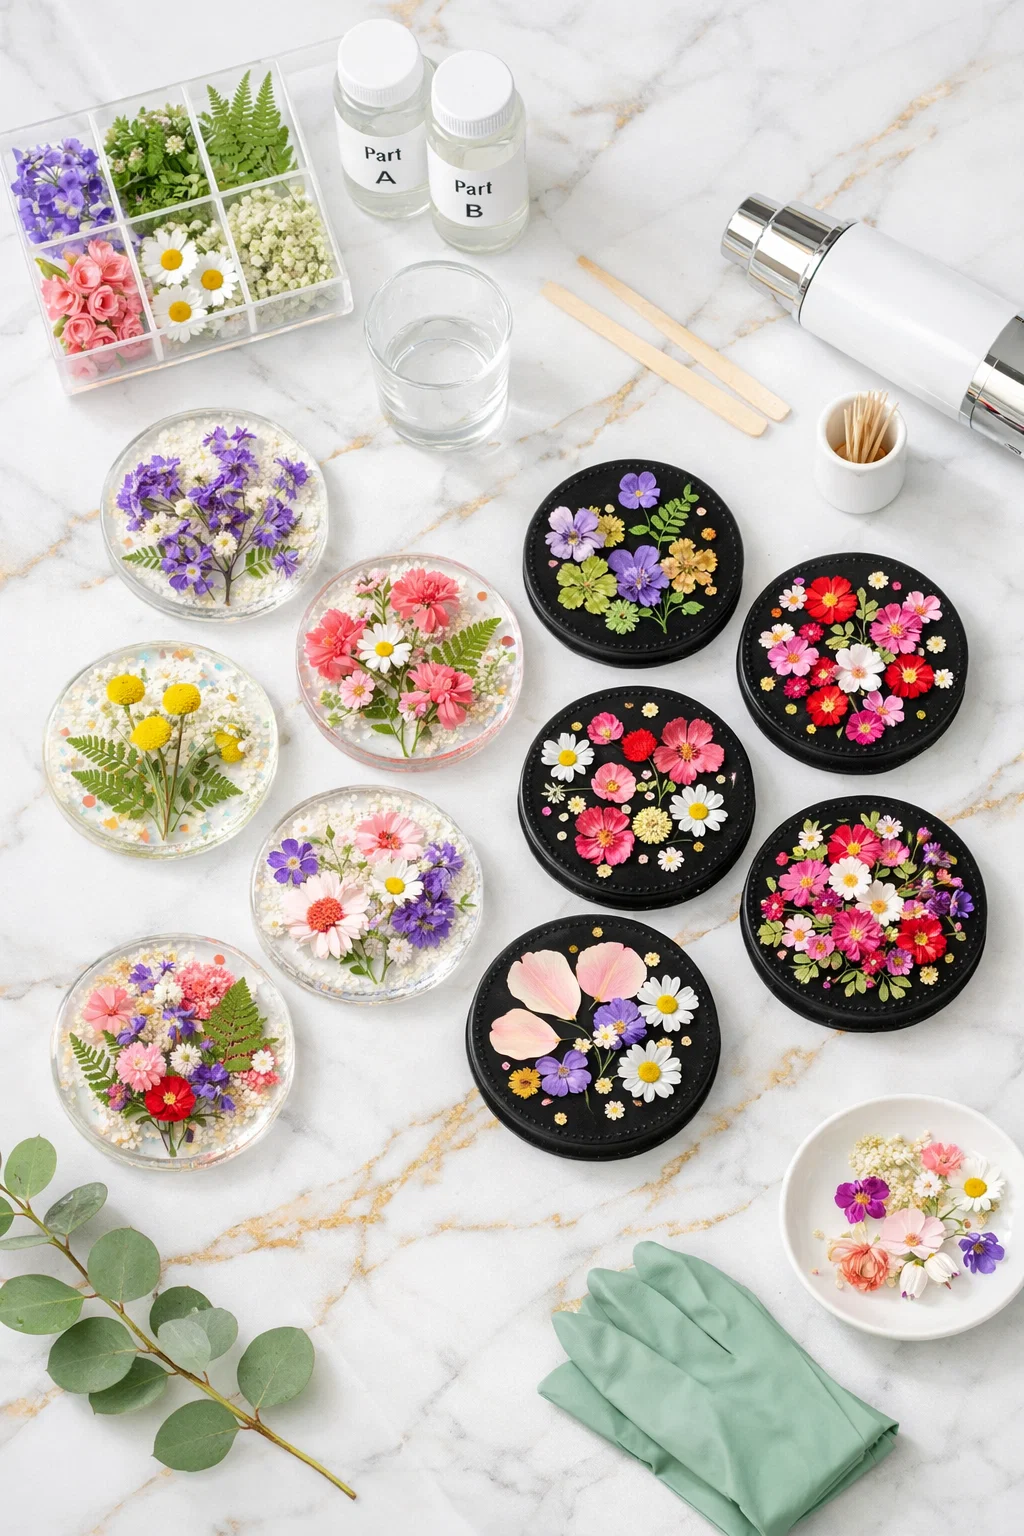
Guests arrange dried pressed flowers inside silicone coaster molds, then pour a clear resin layer to seal and preserve them.
The finished coasters look like something from a boutique gift shop and guests made them in two hours at a birthday party. The gap between effort and result is satisfying in a way that’s hard to manufacture with any other craft.
What you need:
- Pre-dried pressed flowers and leaves (prepare 1–2 weeks ahead)
- Silicone coaster molds
- Two-part epoxy resin and mixing cups
- Wooden stir sticks and nitrile gloves
- A heat gun or lighter for popping surface bubbles
How to Do It
- Arrange pressed flowers in the bottom of silicone molds in a pleasing layout before adding resin.
- Mix resin parts A and B according to package ratios, stirring slowly for three full minutes.
- Pour a thin base layer of resin over the flower arrangement and use a toothpick to adjust positioning.
- Pass a heat gun or lighter quickly over the surface to pop any air bubbles without scorching.
- Allow to cure undisturbed for 24–48 hours — guests take molds home and pop coasters out the next day.
Press the flowers at least a week before the party or buy pre-pressed botanicals online nothing derails a resin project faster than flowers with residual moisture.
Once your coasters are fully cured, make sure you’re using the best sealant for crafts to protect the finish before gifting or displaying them.
6. Botanical Watercolor Card Studio

Guests paint a small watercolor botanical illustration and turn it into a physical greeting card for someone they love.
The act of making a card for someone specific mid-party, surrounded by friends turns this from a craft activity into a kind of collective act of care. It’s quieter than the other crafts, and that shift in energy is always welcome.
What you need:
- Watercolor paper cut to card size (A2 or A6)
- Watercolor pans in botanical colors (greens, pinks, warm yellows)
- Fine and medium round brushes
- Reference cards showing simple botanical shapes (leaves, stems, small blooms)
- Envelopes and stamps if guests want to mail them immediately
How to Do It
- Start with the lightest colors and loosest shapes — a single leaf or stem as an anchor.
- Build layers slowly, letting each wash dry before adding the next color on top.
- Add fine details like veins or small dots with a size-0 brush once the base is dry.
- Write a message inside once the painted front is completely dry.
- Address and stamp envelopes at the party if guests want to send them the same night.
I always put a reference card at each station because the blank paper intimidates people immediately. Give them one simple example and they take off in their own direction within minutes.
7. Leather Stamp Bookmark Making
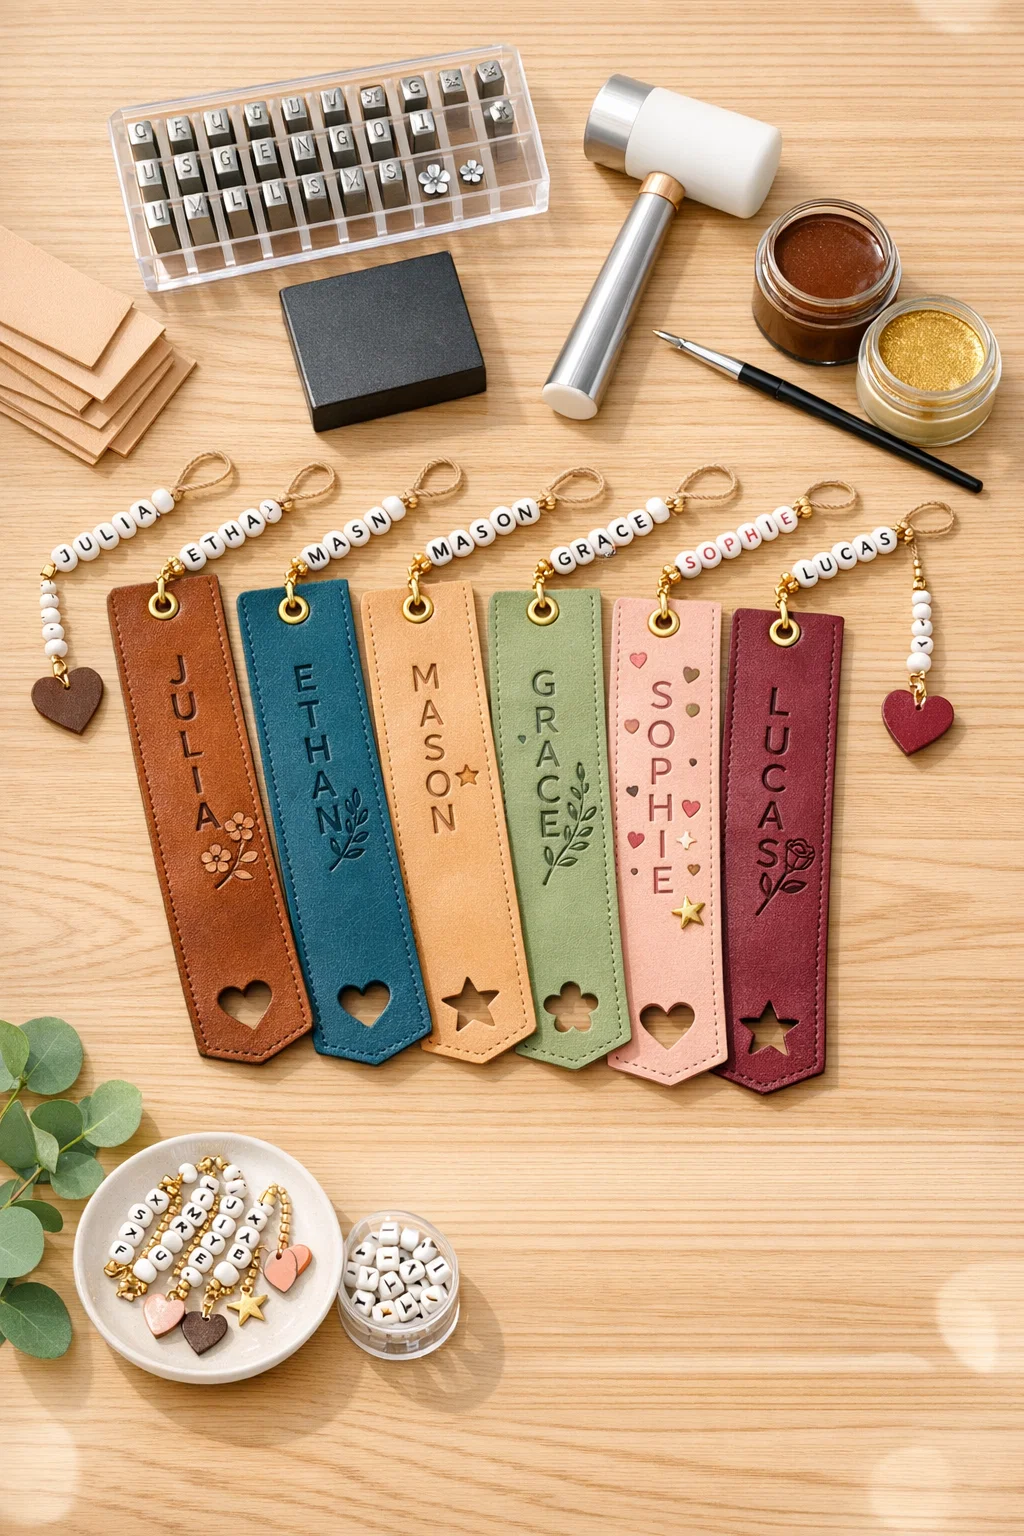
Guests hand-stamp a set of leather bookmarks using alphabet stamps, floral stamps, and ink to create personalized, durable bookmarks.
Leather stamping sounds intimidating but is genuinely approachable and the results look artisanal and professional in a way that surprises everyone. Readers at the party lose their minds over this one.
What you need:
- Pre-cut vegetable-tanned leather strips (1.5″ x 7″)
- Letter and floral leather stamps
- A stamping mallet and small anvil or hard surface
- Leather ink or acrylic paint in metallic and earth tones
- Hole punch and ribbon or tassel for finishing
How to Do It
- Lightly dampen leather strips with a sponge damp leather takes stamps more cleanly than dry.
- Plan the stamp layout loosely on paper before committing to the leather.
- Position stamps firmly and strike once with a mallet — one clean hit produces a cleaner impression than multiple taps.
- Apply ink or paint with a small brush or sponge applicator and allow to dry fully.
- Punch a hole at the top and thread ribbon or a tassel through for finishing.
The people who come in saying they’re “not creative” become completely absorbed by this one. Stamping is rhythmic and satisfying in a way that quiets the part of your brain that worries about whether you’re doing it right.
Category Three: Give a Gift They’ll Never Throw Away — The Legacy Tier
These are the crafts that outlast the birthday craft night party. They’re personal, intentional, and built around the birthday person in a way the other categories aren’t. If you want the night to mean something for years, start here.
8. Embroidered Portrait Hoop Night
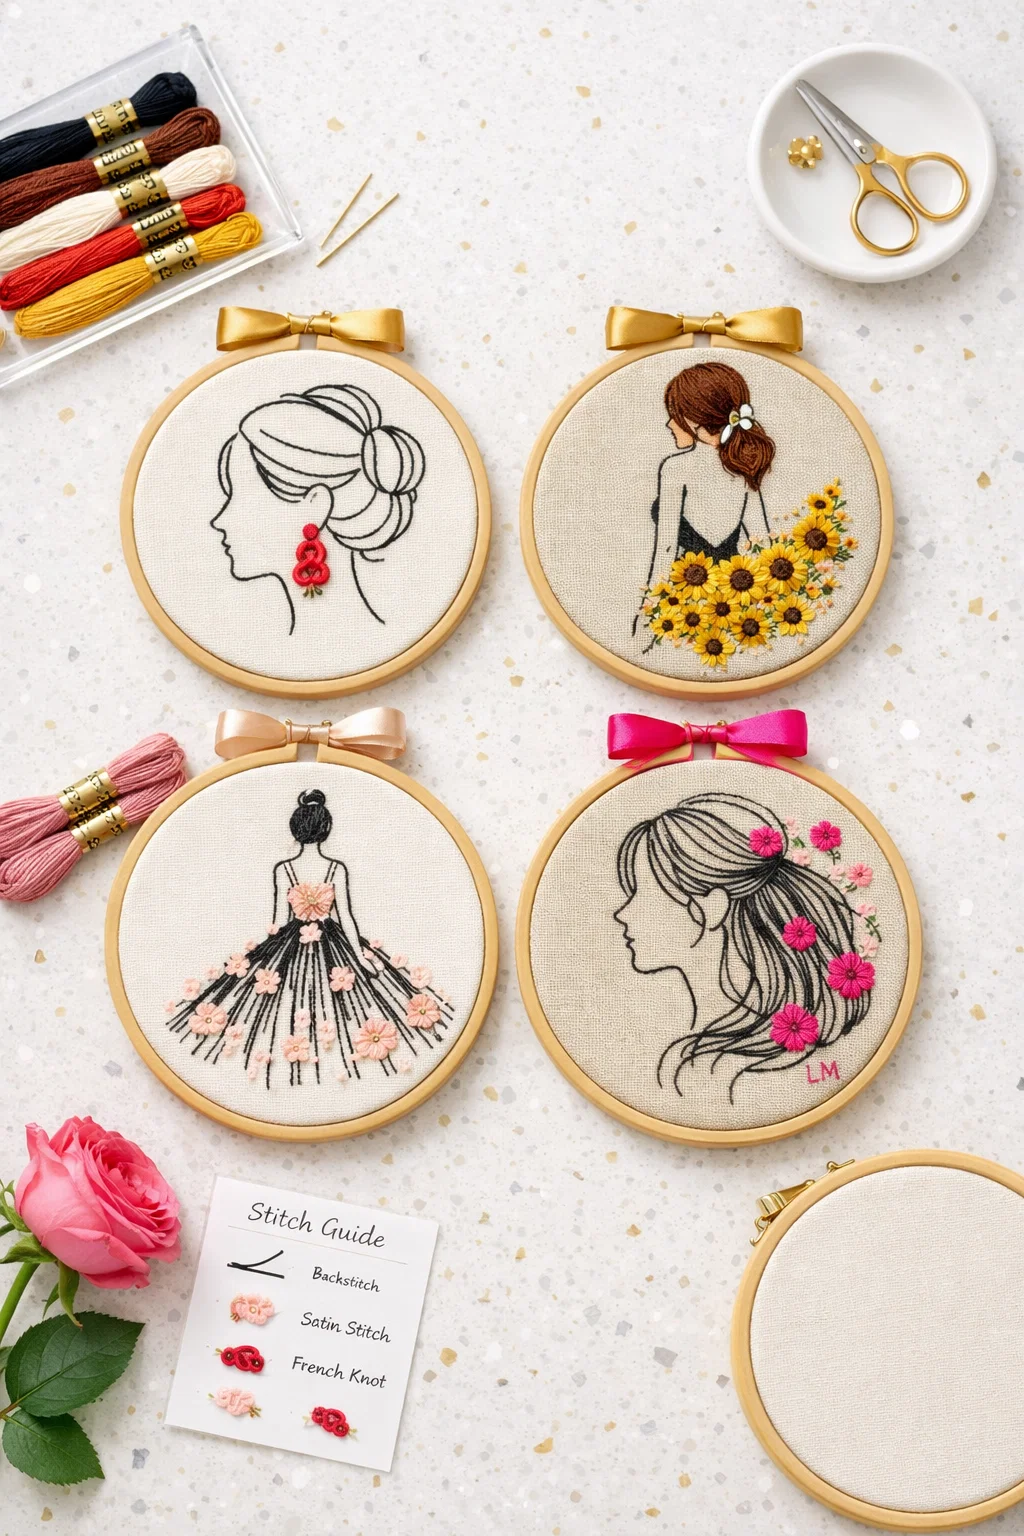
Using a simple line-art pattern of the birthday person’s silhouette, guests each stitch a small embroidered portrait on fabric in an embroidery hoop.
This one is stunning in concept and genuinely touching in execution. Imagine the birthday person leaving the party with eight small embroidered portraits of themselves, each one slightly different, made by eight people who love them. There is no better birthday gift than that.
What you need:
- Pre-printed fabric with the birthday person’s simple line portrait (use a free vector portrait tool online)
- 5-inch embroidery hoops, one per guest
- Embroidery floss in a coordinating color palette
- Embroidery needles and small scissors
- A basic stitch guide card at each station
How to Do It
- Pre-mount fabric in hoops before the party so guests start immediately without setup frustration.
- Thread needles with chosen floss colors and knot the end.
- Use a backstitch or split stitch to follow the portrait lines the reference card shows the technique in three steps.
- Add fill stitches in hair, clothing, or background areas for anyone who wants more texture.
- Trim fabric edges neatly and present finished hoops to the birthday person as a collection at the end of the night.
When the birthday person sees all the hoops lined up together, there is always a moment. Every single time. It’s the kind of thing that gets kept forever not in a box, but on a wall.
9. Hand-Lettered Birthday Keepsake Book
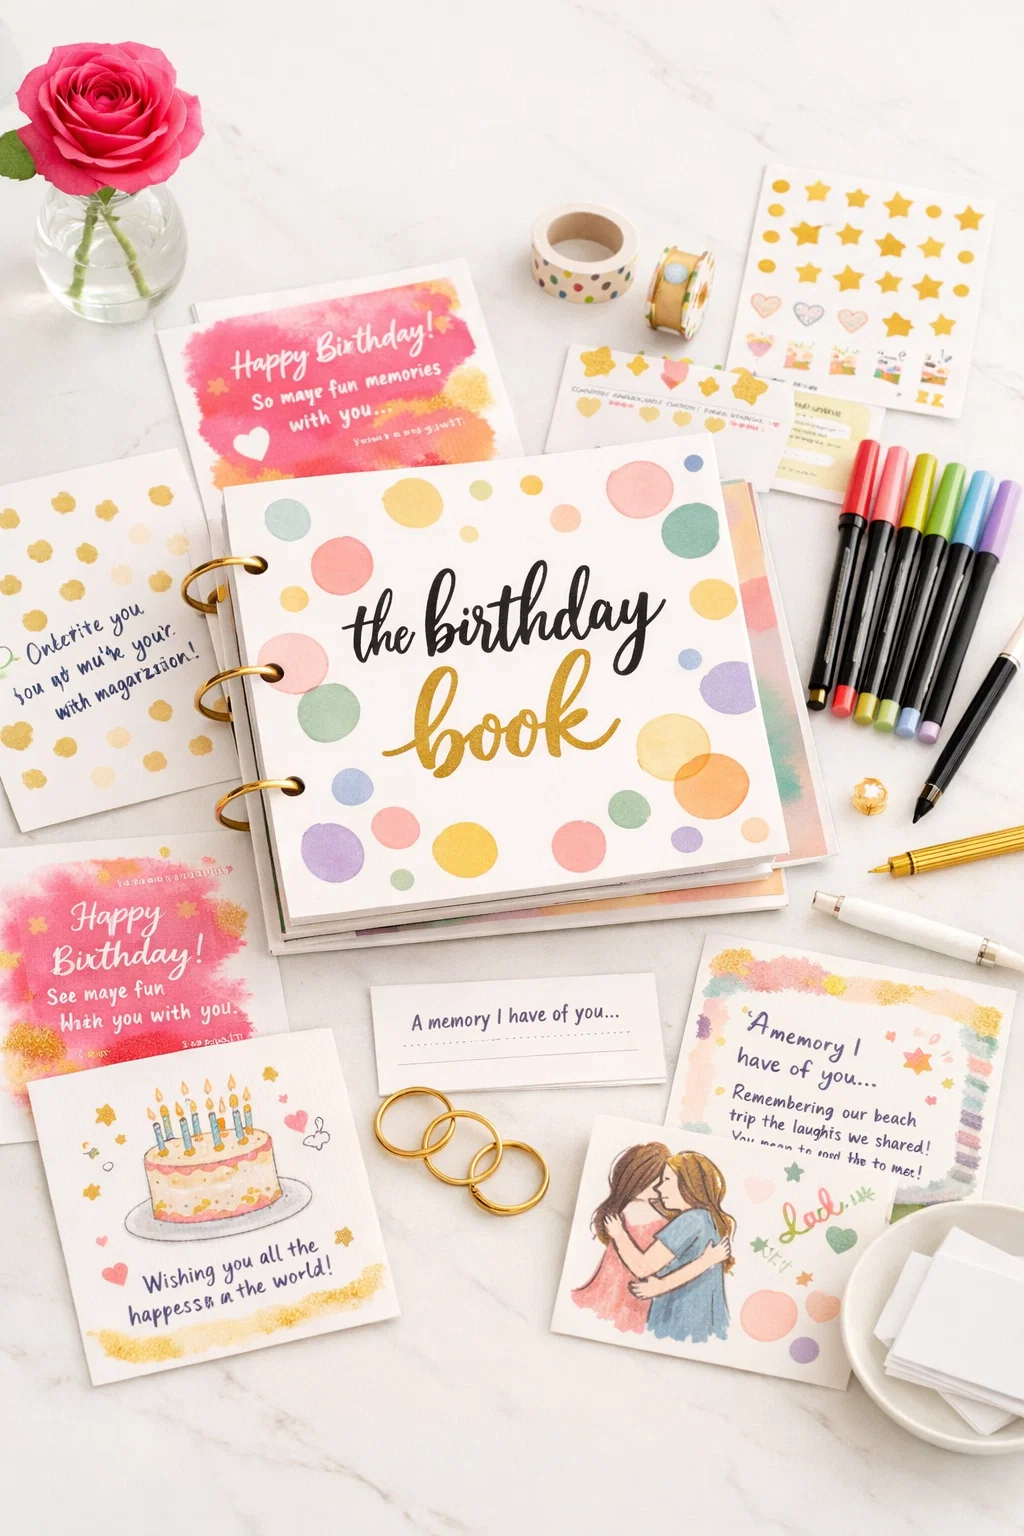
Each guest hand-letters or handwrites a full page a memory, a wish, a drawing, a quote that gets bound together into a book the birthday person keeps.
In a world where everything is digital and instantly forgotten, a handmade book is almost shockingly meaningful.
It’s the kind of gift people mention years later and if making things by hand for the people you love is your thing, this roundup of crafts to make for friends that they’ll actually love is worth bookmarking too
What you need:
- Cardstock pages, one per guest (pre-hole-punched with three holes)
- A decorated cover page with the birthday person’s name and year
- Markers, colored pens, watercolor brush pens, and stickers
- Binding rings or ribbon for assembly
- A writing prompt card at each station (“A memory I have of you…” / “What I want for you this year…”)
How to Do It
- Set out one page and a prompt card per guest at the start of the party.
- Let guests decorate and write throughout the evening — no pressure to finish immediately.
- Collect pages quietly near the end of the night without making it a formal moment.
- Assemble pages in a random or intentional order and bind with rings or ribbon.
- Present the finished book to the birthday person as a group gift at the end of the night.
Give people a prompt, not a blank page. “Write whatever you want” sounds generous but actually freezes people. A simple prompt even just a sentence starter unlocks something real.
10. Vintage Recipe Card Illustration Night
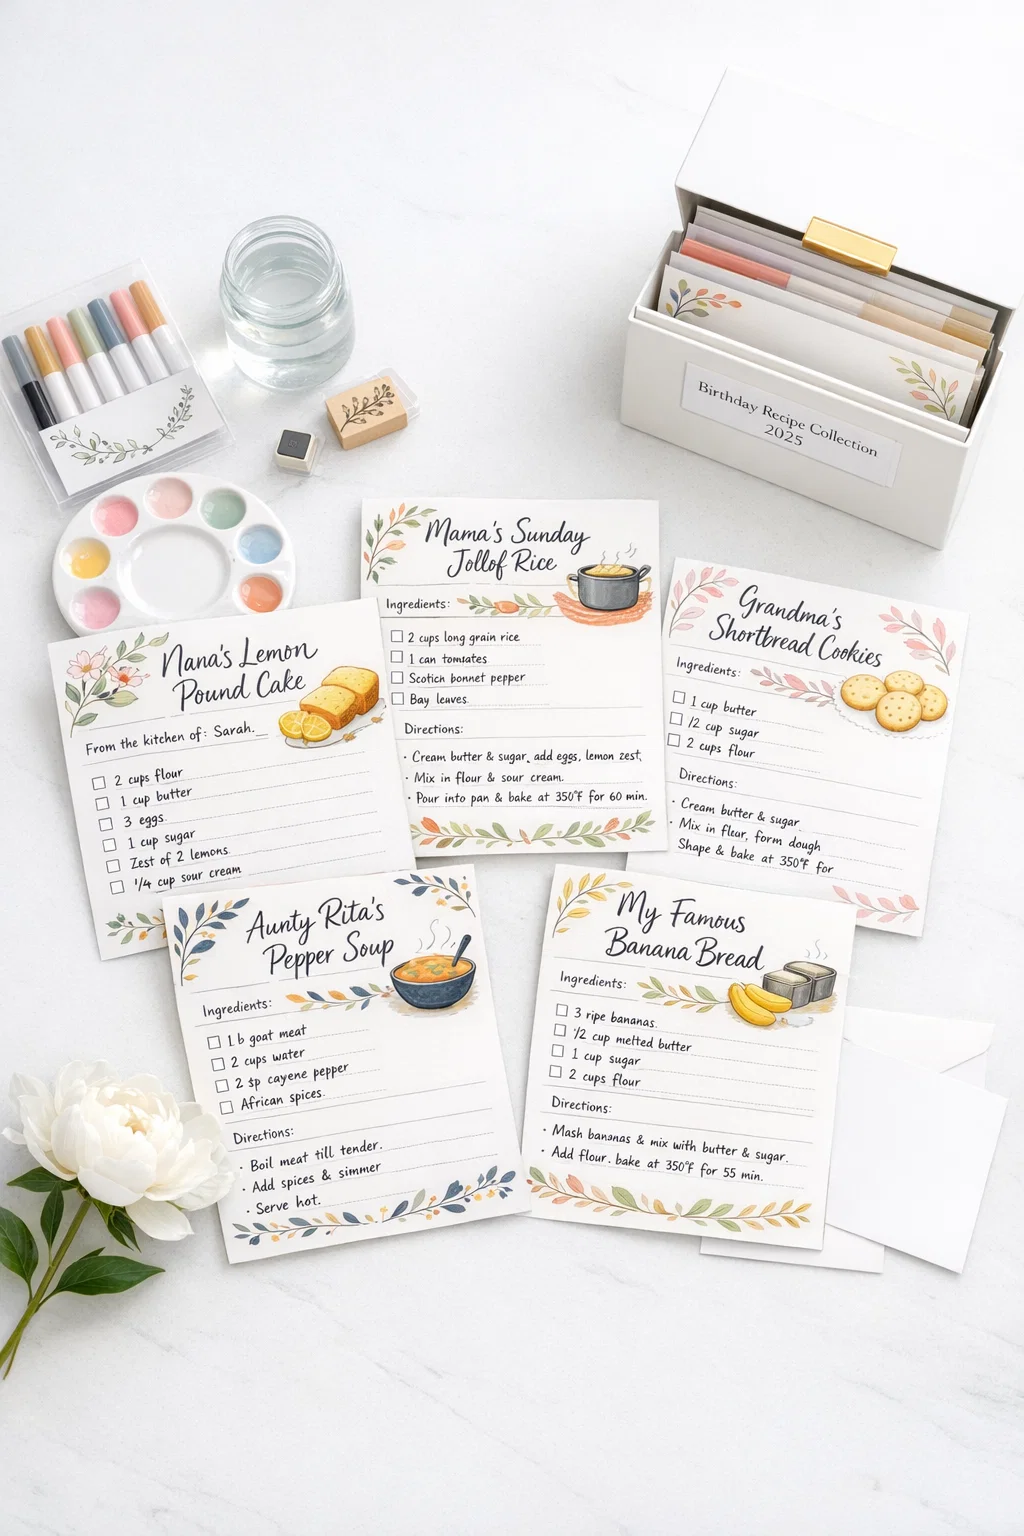
Each guest illustrates and handwrites their favorite recipe onto beautiful card stock, building the birthday person a one-of-a-kind illustrated recipe box.
Food is memory. When someone writes out their grandmother’s cookie recipe in their own handwriting and illustrates it with a small drawing, that card becomes an heirloom before it even gets used. This is the craft for the birthday person who loves to cook or who lost someone who did.
What you need:
- Thick card stock cut to 4×6 or 5×7 recipe card size
- Fine-tip pens in black and a few colors
- Small illustration prompts or botanical border stamps for decoration
- A beautiful recipe box or folder to collect all the cards
- Envelopes for guests who want to add a private note on the back
How to Do It
- Write the recipe title at the top in large, clear lettering — this becomes the visual anchor of the card.
- Add ingredients in a clean list down the left side or in a decorative column.
- Write instructions in clear steps below, keeping handwriting consistent throughout.
- Illustrate the finished dish or a key ingredient in one corner using simple line art.
- Decorate borders with stamps, small drawings, or watercolor wash and allow to dry before collecting.
Ask guests to choose a recipe that means something not just a favorite, but one with a story. The cards that come from that prompt are entirely different from the ones that don’t. That distinction is everything.
Making Birthday Craft Night Party Themes a Tradition
The first time you host something like this, it might feel like an experiment.
But here’s what I’ve noticed once people experience a night where they actually connect, they don’t want to go back to surface-level celebrations.
The real gift of a birthday craft night party isn’t any single project, you just have to create space for people to show up differently.
If you want this to last, keep a small box of supplies and rotate the craft each year and if your crew is spread across different cities, here’s exactly how to plan a virtual craft night party with friends so nobody has to miss out.
Let the birthday person choose it makes the night feel personal.
Over time, you’re not just celebrating. You’re building something shared.
The birthdays that stick? They’re the ones where people made something even if it wasn’t perfect.
FAQ — Birthday Craft Night Questions Answered
How far in advance should I prepare craft supplies for a birthday craft party?
→ Gather everything at least two weeks ahead, especially items that need shipping. For prepped materials like dried flowers, start about a week early to avoid last-minute stress.
What’s the best birthday craft night party idea for a large group?
→ Go for simple, low-mess crafts like candle blending or tote decorating. For 15+ guests, choose activities that are easy to set up, require minimal supervision, and don’t rely on perfect timing.
Do guests need crafting experience to enjoy a craft birthday party?
→ Not at all. These ideas are designed to be beginner-friendly, so anyone can jump in and enjoy without feeling lost or pressured.
How do I keep the party feeling like a party and not a craft class?
→ Keep music, drinks, and snacks flowing. Let the craft sit in the background while people talk, laugh, and move at their own pace.
What should the birthday person actually do at their own craft birthday party?
→ Just participate. Let someone else handle logistics so you can relax, create, and actually enjoy the moment.
One Year From Now, Someone Will Still Have What They Made
The dinner will be forgotten. The drinks will be forgotten. But the small ceramic mug in someone’s cabinet, or the embroidered hoop on their wall, or the handmade recipe book on their shelf that stays.
That’s what a birthday craft night party gives you that no reservation can. Not just a good night, but a good object. Proof that the people you love showed up and made something together.
Save this post for the next birthday on your calendar. Pin it for the friend who deserves more than just another dinner out.