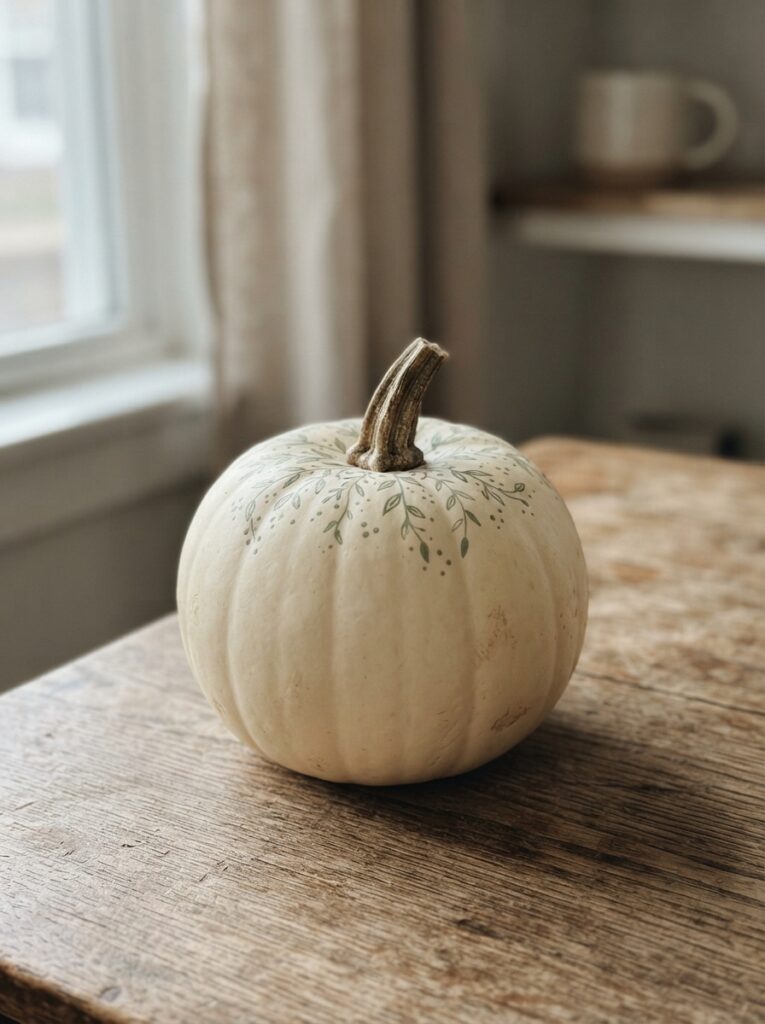
A pumpkin doesn’t have to rot within a week. These DIY pumpkin decorating ideas skip the carving and stay beautiful.
A pumpkin is almost 90% water. That’s why it looks solid on the outside but breaks down so fast once you cut it open.
The knife lets in air and bacteria, and that starts the rot straight away. Within five to ten days, most carved pumpkins are sunken, soft, and smelling bad. That’s often before Halloween even arrives .
An uncarved pumpkin doesn’t have this problem. Its skin is a natural shield. Left whole, it can stay fresh for 8 to 12 weeks. That’s the real difference between a pumpkin that dies in a week and one that lasts the whole season.
Carving is also messy and risky, especially with kids around a sharp knife.
This guide gives you 11 easy pumpkin decorating ideas that skip the knife completely. Each one takes under an hour, looks better than a basic jack-o’-lantern, and can stay beautiful for weeks longer.
You’ll also learn simple steps to help any pumpkin, carved or not, last as long as possible.
For festive decorating inspiration, see 25 DIY Halloween Party Decorations on a Budget That Turn Any Space Into Something Spooky.
Table of Contents
- 1 DIY Pumpkin Decorating Ideas
- 2 2. Hot Glue Relief + Spray Paint
- 3 3. Washi Tape Resist Painting
- 4 4. Caulk Swirl Technique
- 4.1 Why it works:
- 4.2 Materials:
- 4.3 How To Do:
- 4.4 How long it lasts:
- 4.5 5. Thrifted Sweater or Fabric Wrap
- 4.6 Why it Works:
- 4.7 Materials:
- 4.8 How To Do:
- 4.9 How long it lasts:
- 4.10 6. Boho Dried Botanical Wrap
- 4.11 Why it works:
- 4.12 Materials:
- 4.13 How To Do:
- 4.14 How long it lasts:
- 4.15 7. Metallic Leaf Gilding
- 4.16 Why it works:
- 4.17 Materials:
- 4.18 How To Do:
- 4.19 How long it lasts:
- 4.20 8. Temporary Tattoo Application
- 4.21 Why it works:
- 4.22 Materials:
- 4.23 How To Do:
- 4.24 How long it lasts:
- 5 9. Chalk Paint Ombré
- 6 10. Embroidery Hoop or Framed Silhouette
- 7 11. Stem Detail Painting
- 8 How to Make Any No-Carve Pumpkin Last All Fall
DIY Pumpkin Decorating Ideas
1.Shibori/Mudcloth-Inspired Dye Wrap
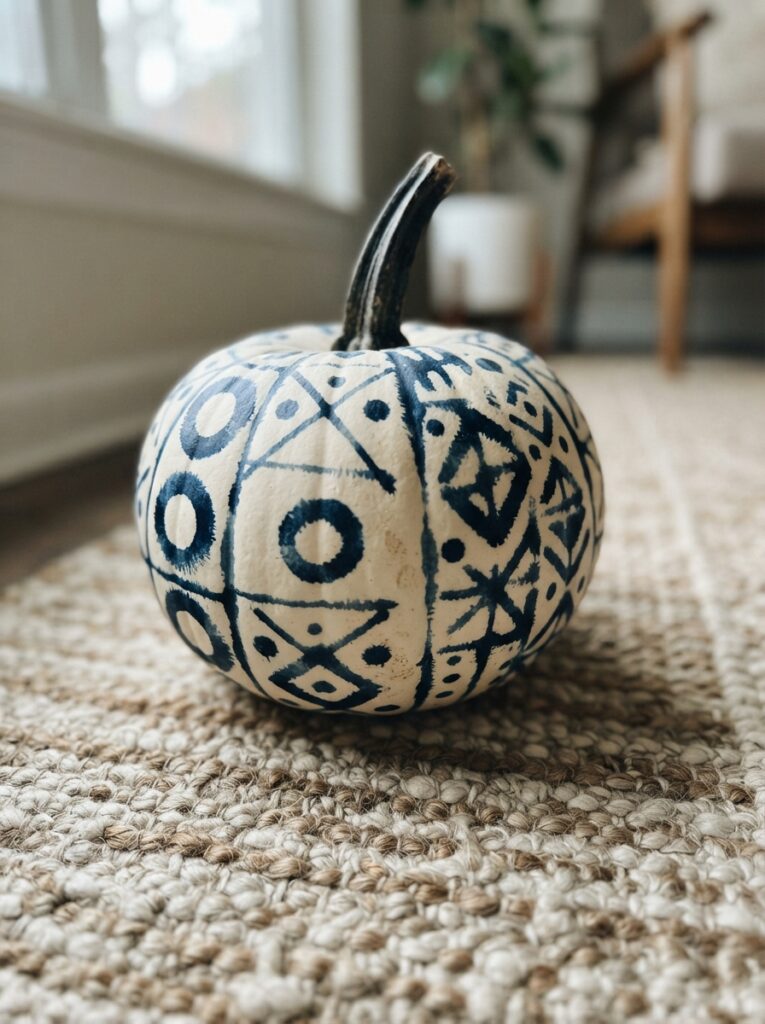
A pattern technique borrowed from two dyeing traditions, shibori (Japanese fabric folding and dyeing) and mudcloth (West African resist-dyed textile art).
On a pumpkin, you recreate the look using paint and simple resist tools instead of actual dye, giving you bold, irregular geometric patterns that feel handcrafted rather than store-bought.
Most painted pumpkins use one flat color. This technique uses a resist (rubber bands, string, or stencils) to block certain areas from paint, so when you remove the resist, you’re left with crisp negative-space patterns, circles, lines, or geometric shapes, against a solid background. It reads as intentional and artisanal, not like a craft project.
Materials:
- A pumpkin (real or faux)
- Rubber bands or twine, for the shibori effect
- Painter’s tape or a simple cardboard stencil, for the mudcloth effect
- Matte acrylic or chalk paint in two contrasting colors (indigo and white/cream is the classic shibori pairing; black and warm white for mudcloth)
- A foam brush or small roller
- Clear matte sealant
How-to do:
- Clean and dry the pumpkin fully.
- Paint the base color first and let it dry completely.
- For shibori: wrap rubber bands or twine tightly around sections of the pumpkin in an irregular pattern.
- For mudcloth: use painter’s tape to mark off geometric shapes — triangles, thin stripes, or diamond grids.
- Paint the second color over the whole surface, then remove the bands or tape while the paint is still slightly tacky.
- Let it dry fully, then seal with a clear matte spray to protect the finish.
How long it lasts:
Because the pumpkin is never cut, this technique holds up for the full 4 to 6 weeks, the same as any no-carve method. The sealant coat adds an extra layer of moisture protection on top of that.
2. Hot Glue Relief + Spray Paint
A dimensional decorating technique where you use a hot glue gun to “draw” a raised design directly onto the pumpkin’s surface, then spray paint over the whole thing.
Once painted, the glue lines catch light and shadow, giving you a textured, almost ceramic or ironwork look instead of flat paint.
Why it works:
Spray paint alone can look flat, no matter how nice the color is. Adding a raised line underneath changes the whole effect, it creates real shadow and dimension, so simple shapes like vines, dots, or geometric patterns suddenly look intentional and expensive, not like a craft project.
Materials:
- A pumpkin (real or faux)
- A hot glue gun (low-temp is safer if kids are helping with easy shapes)
- Spray paint in one solid color, matte or metallic
- Painter’s tape, if you want a clean edge around the stem
How-to do:
- Clean and dry the pumpkin fully.
- Sketch your design lightly first if you’re not confident freehanding it, using a pencil.
- Trace the design with the hot glue gun in one steady, continuous motion. Simple shapes work best: spirals, vines, dots, or geometric lines.
- Let the glue cool and fully harden, at least 15–20 minutes.
- Spray paint the entire pumpkin in even, light coats, holding the can 10–12 inches away to avoid drips.
- Let dry between coats, usually 15–20 minutes per coat.
How long it lasts:
Since there’s no cutting involved, this holds the full 4 to 6 weeks. The spray paint layer also acts as a light seal, which helps protect the surface from moisture.
3. Washi Tape Resist Painting
A tape-and-paint technique where washi tape blocks off sections of the pumpkin before painting, so when you peel it away, you’re left with crisp, graphic lines, stripes, plaid, or geometric shapes, with none of the freehand shakiness of painting a straight line by hand.
Why it works:
Straight lines are hard to paint freehand, and most people give up on graphic patterns because of it. Tape solves that problem completely.
It also means zero commitment: because washi tape is removable, you can reposition it before painting or peel the whole design off later and start over on a faux pumpkin.
Materials:
- A pumpkin (real or faux)
- Washi tape in one or two widths
- Acrylic or chalk paint in your chosen color
- A foam brush
- Clear matte sealant
How-to do:
- Clean and dry the pumpkin fully.
- Apply washi tape in your pattern, straight vertical lines, a crosshatch for plaid, or a geometric shape. Press down firmly so paint can’t seep underneath.
- Paint over the taped sections and the exposed pumpkin surface evenly.
- While the paint is still slightly wet to the touch (not fully dry), peel the tape away slowly at a 45-degree angle.
- Let the paint cure fully, then seal with a clear matte spray.
How long it lasts:
No carving means this holds up for 4 to 6 weeks. Because washi tape leaves a light, even paint coat rather than a heavy one, the sealant step matters more here to protect against moisture.
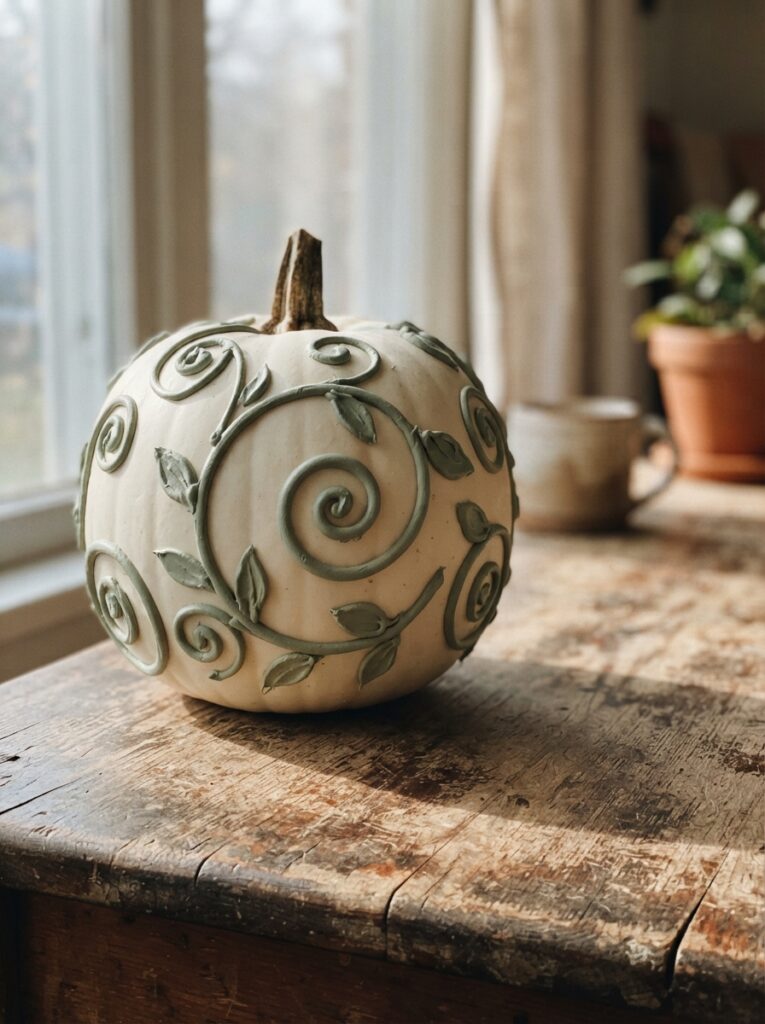
4. Caulk Swirl Technique

A raised, textured design technique using paintable caulk piped from a caulk gun, similar to how you’d pipe icing.
It’s used to create swirls, vines, or botanical shapes that stand up off the pumpkin’s surface, then get painted over for a carved-looking, almost embossed finish, without a single cut.
Why it works:
Caulk gives you a thicker, more sculptural line than hot glue, which makes it better suited to bigger, flowing designs like vines or florals rather than fine detail.
Because it’s paintable caulk, it takes paint evenly and won’t crack the way some craft materials do once it’s fully cured.
Materials:
- A pumpkin (real or faux)
- A tube of paintable caulk and a caulk gun
- Acrylic or spray paint in your chosen color
- A damp cloth or your finger, for smoothing lines as you go
How To Do:
- Clean and dry the pumpkin fully.
- Sketch your design lightly in pencil if you want a guide, vines, swirls, or leaf shapes work well.
- Load the caulk gun and pipe the design slowly along your sketch lines, keeping steady pressure for an even line.
- Smooth any rough edges with a damp finger or cloth while the caulk is still wet.
- Let the caulk cure fully, usually 24 hours, before painting.
- Paint over the entire pumpkin, letting the raised caulk lines catch a slightly different shade or sheen if you want extra dimension.
How long it lasts:
This one holds the full 4 to 6 weeks since there’s no cutting involved. Caulk cures hard and holds paint well, so it tends to be one of the more durable techniques on this list, even with light handling or outdoor display.
Creating a festive environment? Pair these activities with 20 Halloween Decor Ideas for Assisted Living That Are Festive, Safe, and Resident-Approved.
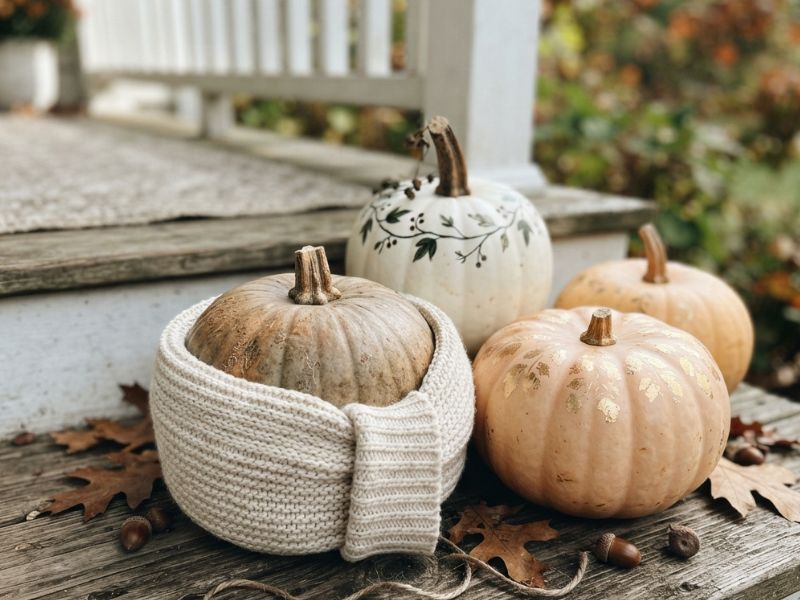
5. Thrifted Sweater or Fabric Wrap
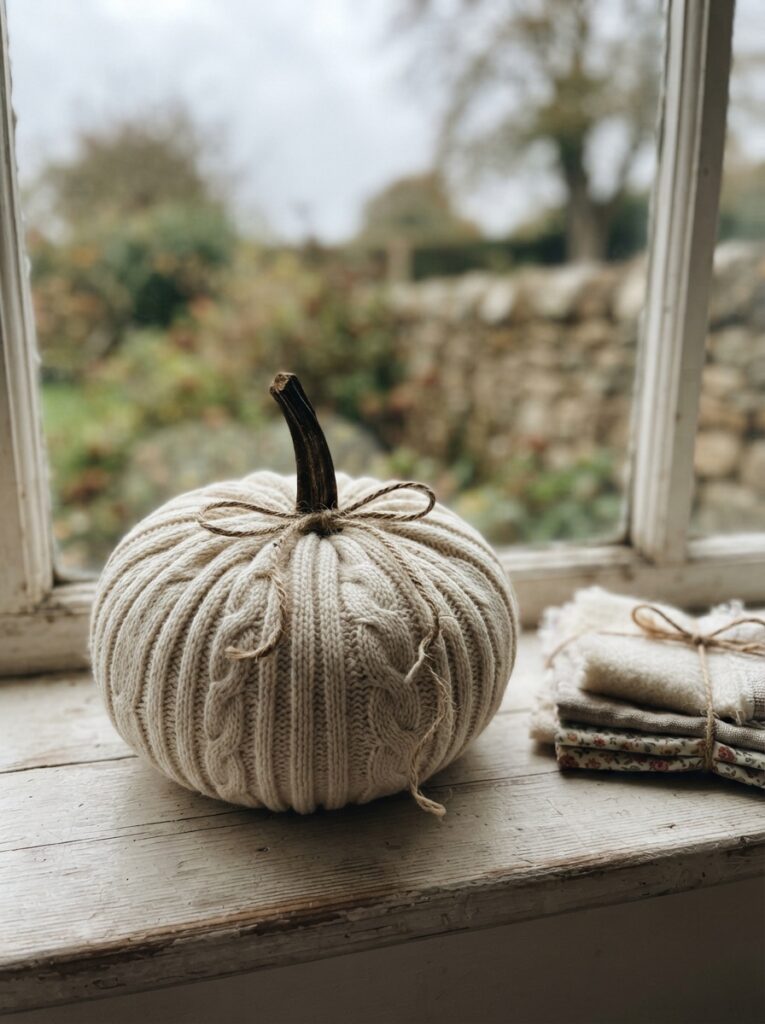
One of the easiest DIY pumpkin decorating ideas on this list because there’s no paint, no glue gun, and no drying time.
You simply wrap a faux pumpkin in an old sweater, a scarf, or scrap fabric, giving it a soft, cozy texture that fits right into a fall display without looking like a craft project.
Why it Works:
Texture does a lot of visual work that paint can’t. A knit or woven fabric adds warmth and dimension next to smooth pumpkins or candles, and because there’s zero mess involved, it’s the fastest idea to pull off when you’re short on time.
It also gives a thrifted piece a second life instead of letting it sit in a donation pile.
Materials:
- A faux pumpkin (fabric holds better on faux than real, since there’s no moisture underneath)
- An old sweater, scarf, or fabric scrap
- Scissors
- Hot glue or safety pins to secure the fabric
How To Do:
- Cut the sweater sleeve (or a piece of fabric) to roughly the height of the pumpkin.
- Slide it over the pumpkin like a sock, working it down over the ridges.
- Gather the excess fabric at the bottom, near the base, and secure it with a dab of hot glue or a few stitches.
- Trim any loose threads and tuck the raw edge underneath so it’s hidden.
How long it lasts:
Since it’s on a faux pumpkin with no paint or glue on the pumpkin itself, this one isn’t just seasonal, you can pack it away and reuse it every fall.
If you’re working through your own thrift pile for this project, this is a natural next step after learning how to write thrifted clothing descriptions that sell, the same eye for texture and reuse applies here too.
Looking for more age-friendly Halloween activities? Explore 25 Halloween Crafts for Seniors in Assisted Living That Work for Every Ability Level.
6. Boho Dried Botanical Wrap
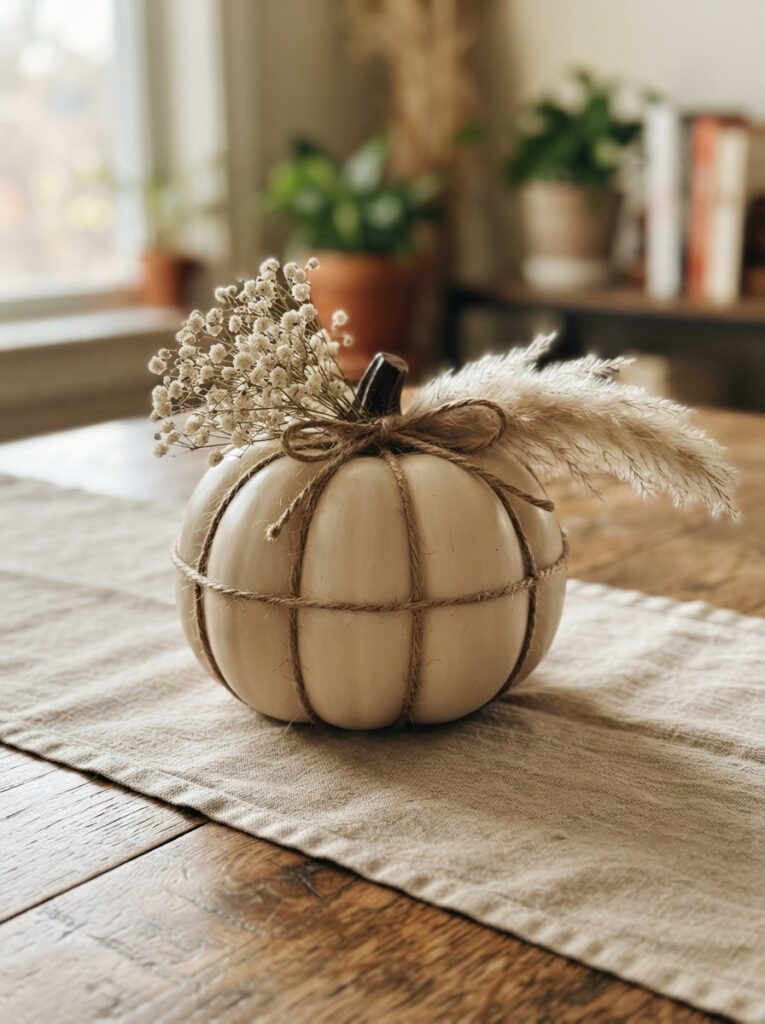
A natural, neutral-toned display piece built by layering twine, dried flowers, and pampas grass directly onto the pumpkin.
It’s less “decorated pumpkin” and more small floral arrangement, which makes it one of the more elegant DIY pumpkin decorating ideas for a front porch or table centerpiece.
Why it works:
Dried botanicals don’t compete with the pumpkin’s natural color the way bright paint can. Instead, they add texture and softness, and because everything is dried rather than fresh, the whole piece holds its look for weeks without wilting.
Materials:
- A pumpkin (real or faux)
- Natural jute twine
- Dried flowers (dried baby’s breath, wheat stalks, or eucalyptus all hold up well)
- A small bundle of dried pampas grass
- Hot glue or floral wire
How To Do:
- Wrap the twine around the pumpkin a few times, crossing it near the stem to create a natural anchor point.
- Tuck the stems of your dried flowers under the twine, working around the stem in small clusters rather than one large bunch.
- Add the pampas grass last as the tallest, most dramatic piece, securing it with a small dab of hot glue or a twist of floral wire.
- Fill in any gaps with smaller dried stems until the arrangement looks full but not overcrowded.
How long it lasts:
Because dried botanicals are already moisture-free, this arrangement holds its look for the full 4 to 6 weeks on an uncarved pumpkin, and often longer if you’re using a faux base.
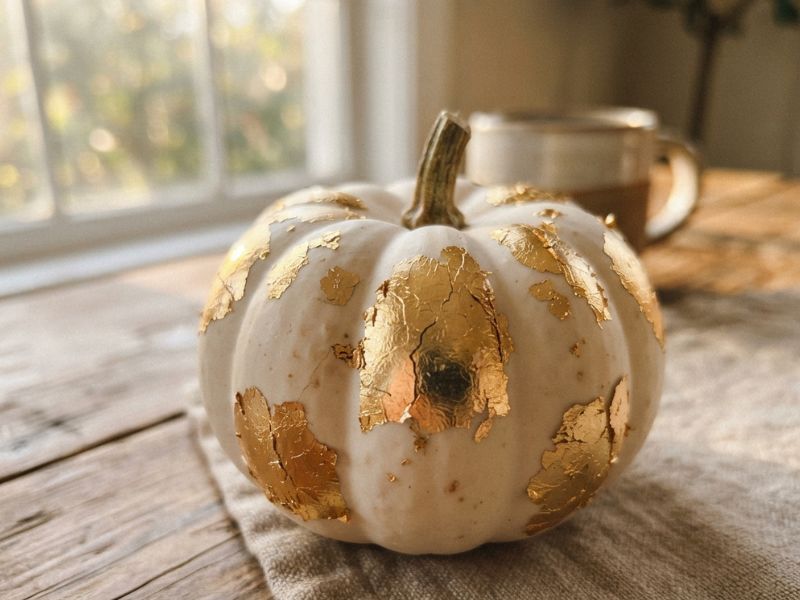
7. Metallic Leaf Gilding
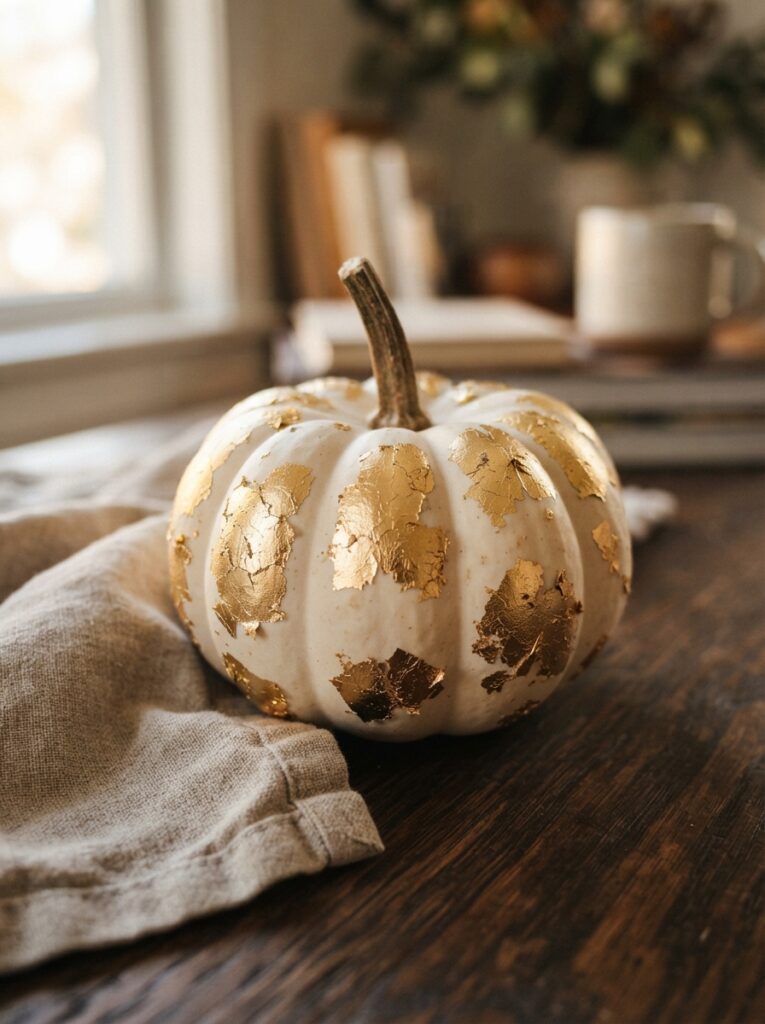
A gilding technique using gold or copper leaf applied in a broken, organic pattern rather than a full solid coat.
It’s one of the most striking DIY pumpkin decorating ideas on this list because it looks high-end and hand-finished, despite needing almost no artistic skill.
Why it works:
Metallic leaf catches light in a way paint simply can’t, giving the pumpkin a subtle shimmer rather than a flat shine.
Applying it in broken, irregular patches (rather than covering the whole surface) also means small mistakes are part of the look, so there’s very little room to “mess it up.”
Materials:
- A pumpkin (real or faux)
- Gold or copper leaf sheets
- Gilding adhesive (sold specifically for leafing)
- A soft, dry paintbrush
- Clear matte sealant
How To Do:
- Clean and dry the pumpkin fully.
- Brush gilding adhesive onto the pumpkin in random, irregular patches, avoiding full coverage.
- Wait until the adhesive turns tacky, usually 15–20 minutes, check the product label for exact timing.
- Press the metallic leaf onto the tacky areas, then use a soft dry brush to gently smooth it down and brush away excess flakes.
- Once the whole pumpkin is leafed to your liking, seal with a clear matte spray to prevent the leaf from lifting or tarnishing.
How long it lasts:
This holds up for the full 4 to 6 weeks on an uncarved pumpkin. The sealant step is especially important here, it protects the metallic leaf from humidity, which can cause it to dull or lift over time.
8. Temporary Tattoo Application

A press-on decorating method using temporary tattoo sheets, the same kind used on skin, applied directly to a pumpkin’s surface.
It gives you fine, intricate detail (lace patterns, florals, filigree) that would take real skill to paint by hand, in a fraction of the time.
Why it works:
Freehand painting fails most people at the same point: intricate detail. A steady painted line is hard enough on paper, let alone on a curved, ridged surface.
Temporary tattoos sidestep that problem entirely, since the design is already printed and just needs to be transferred, so the outcome looks the same whether it’s your first pumpkin project or your fifteenth.
Materials:
- A pumpkin (real or faux, though real works slightly better since the surface has a bit of give)
- Temporary tattoo sheets (choose designs sized to fit your pumpkin’s curve, smaller motifs wrap better than large ones)
- A damp cloth or sponge
- Scissors, if you need to trim designs to fit
How To Do:
- Clean and dry the pumpkin fully, any dust or residue will stop the tattoo from adhering properly.
- Cut out your design, leaving a small margin around the edges.
- Peel the plastic backing off, position the design where you want it, and press it firmly against the pumpkin.
- Hold a damp cloth against the paper backing for about 30 seconds, keeping steady pressure so it transfers evenly across the curve.
- Slowly peel the paper away, starting from one corner, and smooth down any edges that lifted.
How long it lasts:
Because nothing is cut into the pumpkin, this holds for the full stretch of 4 to 6 weeks. The tattoo itself is a thin transfer layer, so it holds up well outdoors as long as it isn’t exposed to heavy rain.
Add meaningful hands-on activities with 20 Simple Halloween Crafts for Dementia Patients That Feel Festive Not Frightening.
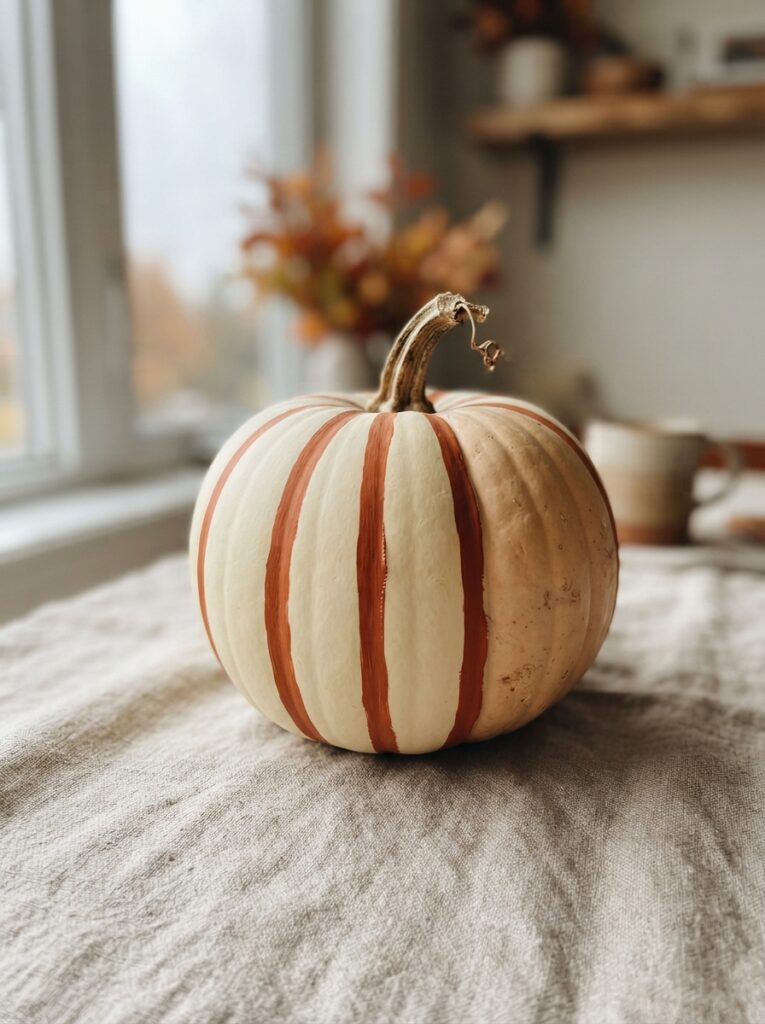
9. Chalk Paint Ombré
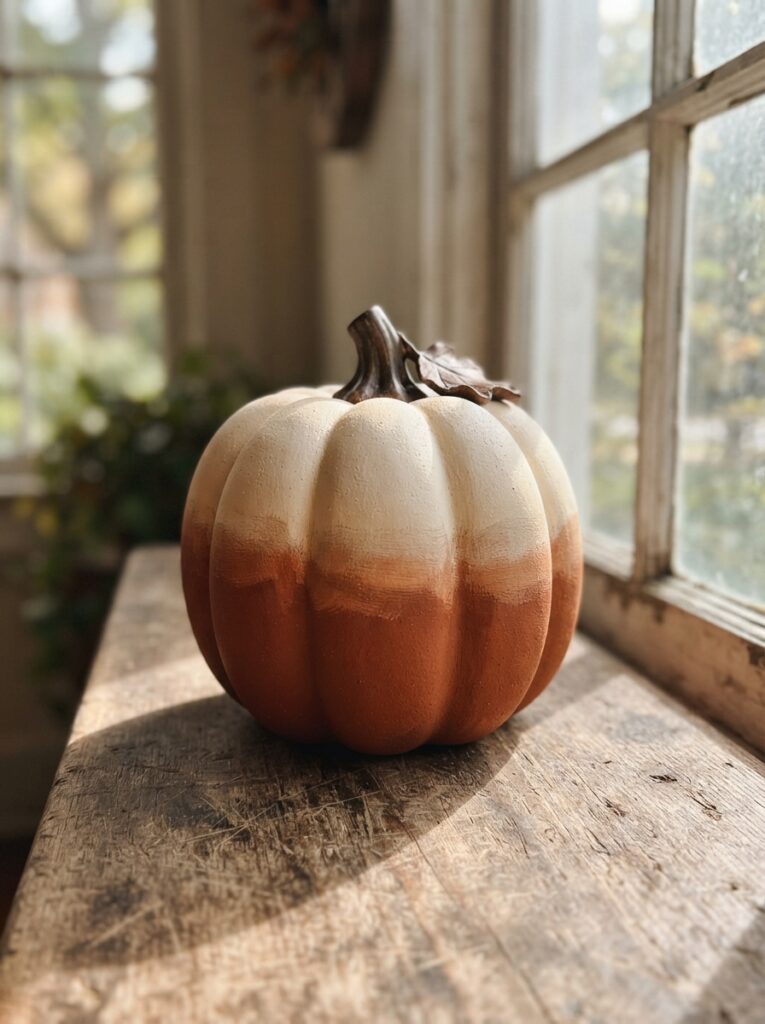
A blended, two-tone paint finish where one color gradually fades into another, most often dark at the base and lighter toward the top, using chalk paint instead of standard acrylic.
Why it works:
Chalk paint has a slightly thicker, more matte finish than regular acrylic, which makes blending two colors together look soft and gradual rather than streaky.
It also dries with a natural sealing quality, so unlike some other paints, it forms a light protective layer on the pumpkin’s surface as it cures, without needing a separate sealant step first.
Materials:
- A pumpkin (real or faux)
- Chalk paint in two colors, ideally close on the color wheel so the blend looks intentional (a deep rust fading into a warm cream, for example)
- A wide, soft-bristle brush
- A separate dish for blending the two colors
How To Do:
- Clean and dry the pumpkin fully.
- Paint the base of the pumpkin with your darker color, working about a third of the way up.
- Paint the top section with your lighter color, working down about a third from the stem.
- In the middle section, blend the two colors together using overlapping brush strokes, mixing a bit of each color as you go to soften the line between them.
- Let it dry fully, checking for any streaks once dry and touching up if needed.
How long it lasts:
This holds for the full 4 to 6 weeks on an uncarved pumpkin.
Chalk paint’s natural finish gives it slightly more built-in protection against light moisture than standard craft paint, though a light sealant coat can extend that further if you’re displaying it somewhere exposed to weather.
10. Embroidery Hoop or Framed Silhouette
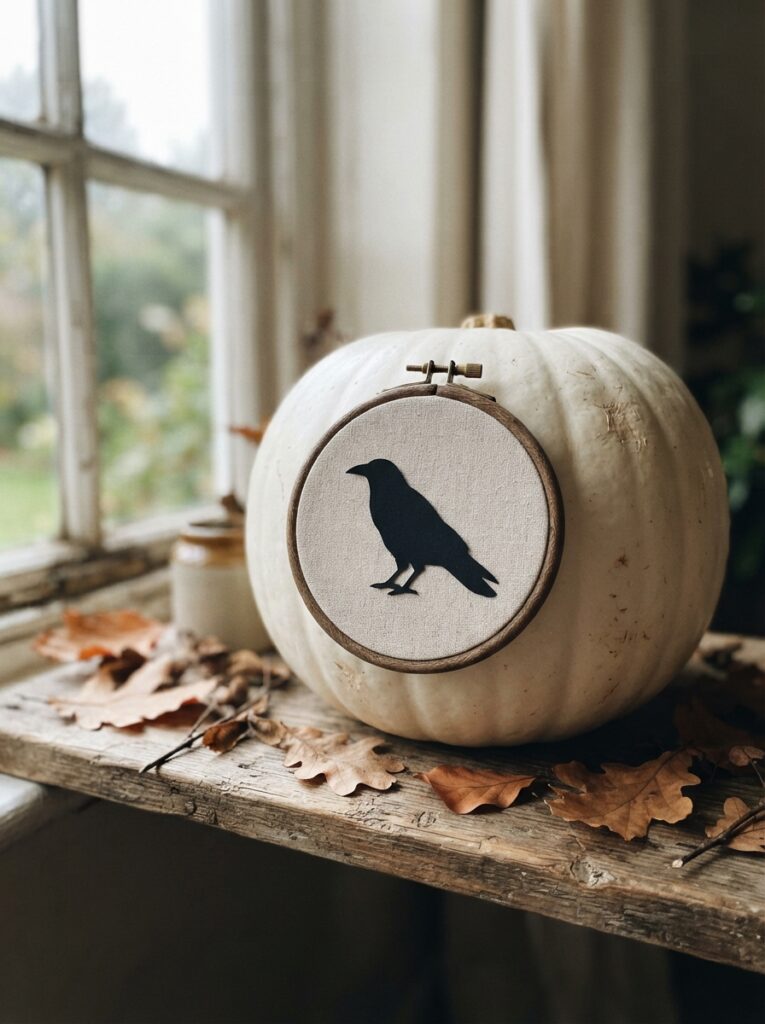
One of the more artistic DIY pumpkin decorating ideas on this list, this technique frames a single graphic silhouette, a crow, a black cat, a crescent moon, inside an embroidery hoop mounted onto the pumpkin.
Instead of decorating the whole surface, you’re creating one focal point, almost like a tiny piece of wall art sitting on top of the pumpkin.
Why it works:
Most pumpkin decorating covers the entire surface, which can start to feel busy next to other fall decor.
This idea does the opposite: a small hoop with a clean, single image gives the eye somewhere specific to land, which reads as more curated and gallery-like, especially grouped with plainer pumpkins nearby.
Materials:
- A pumpkin (real or faux)
- A small embroidery hoop (4 to 6 inches works well on a mid-size pumpkin)
- Black cardstock or paper, for the silhouette
- A craft knife or small scissors
- Hot glue
How To Do:
- Sketch or print your silhouette design onto the cardstock, keeping the shape simple and bold rather than highly detailed, fine lines get lost at a distance.
- Cut out the silhouette carefully with a craft knife.
- Center the silhouette inside the embroidery hoop and secure it in place with a small dot of glue at each edge.
- Attach the back of the hoop to the pumpkin with hot glue, pressing firmly until it sets.
How long it lasts:
Since the pumpkin itself isn’t painted or cut, it holds for the full 4 to 6 weeks.
Keep this one away from direct rain, the paper silhouette is the one material here that isn’t weather-resistant, so it does best on a covered porch or indoors.
11. Stem Detail Painting
The most understated of all the DIY pumpkin decorating ideas here: instead of decorating the whole pumpkin, you paint small, delicate details, thin vines, tiny dots, a few leaves, only around the stem.
The rest of the pumpkin stays completely bare.
Why it works:
Not every display needs a statement piece. When you’re grouping several pumpkins together, one or two with minimal detail actually help the bolder ones stand out, rather than competing with them.
It’s also the fastest idea on this list, since you’re working with a small area instead of the full surface.
Materials:
- A pumpkin (real or faux)
- A fine-tip paintbrush (a small detail brush, not a standard craft brush)
- Acrylic paint in one or two colors
- A pencil, for sketching the design lightly first
How To Do:
- Clean and dry the pumpkin fully.
- Lightly sketch your design in pencil around the base of the stem, thin vine lines, small dots, or tiny leaf shapes.
- Paint over the pencil lines with your fine-tip brush, working slowly since the detail is small.
- Let the first color dry fully before adding a second color, if you’re using one, to avoid the colors bleeding together.
How long it lasts:
This holds for the full 4 to 6 weeks, and often longer, since so little of the pumpkin’s surface is actually painted. There’s less material on the pumpkin overall, which means less for moisture or weather to affect.
After the crafts are finished, try 40 Fun Halloween Party Games for Senior Citizens That Work for Every Ability Level to keep everyone engaged.
How to Make Any No-Carve Pumpkin Last All Fall
Every technique on this list depends on one thing you do before you even pick up a paintbrush: the condition of the pumpkin itself.
These are the four steps that determine whether your DIY pumpkin decorating ideas hold up for weeks, or start softening within days.
✔ Start with a pumpkin that’s already strong
The pumpkin you choose matters more than any decorating technique you apply to it.
Look for firm skin with no give when you press it, an intact stem (a broken or missing stem is often the first place rot sets in), and no soft spots or bruising anywhere on the surface. A pumpkin that’s already weakening will fail fast no matter how well you decorate it.
✔ Give it a light bleach bath before you decorate
Pumpkins pick up bacteria and mold spores while they’re growing and sitting at the store, and that bacteria is what triggers early rot once the pumpkin is on your porch.
A light bath of one tablespoon of bleach per gallon of water, wiped over the surface and left to dry fully, kills that surface bacteria before it has a chance to spread. Do this step before any paint, glue, or fabric goes on.
✔ Seal in the moisture once you’re done decorating
A pumpkin loses moisture through its skin over time, and that moisture loss is what causes it to soften and cave in. A clear matte spray sealant, or a thin layer of petroleum jelly for techniques without paint, locks that moisture in.
This step matters even more once you’ve added paint or glue to the surface, since those materials can dry out the skin underneath faster if it’s left unsealed.
✔ Store it the right way
Even the best-decorated pumpkin won’t last if it’s sitting in direct sun or standing water.
Keep it somewhere cool and dry, out of direct sunlight, and elevated slightly off the ground, a small block of wood or a plate underneath is enough to stop moisture from building up against the base.
Under the right conditions, an uncarved pumpkin can last 8 to 12 weeks, well past the usual Halloween timeline and into Thanksgiving.
Conclusion
A fall porch doesn’t need a knife or a pumpkin that’s already caving in by mid-October.
These 11 DIY pumpkin decorating ideas cover every style: bold and textured with hot glue relief, quiet and refined with stem detail painting, cozy with a thrifted wrap, or elevated with metallic leaf. None of them involve cutting, and none of them start rotting the moment they’re finished.
Pick one technique to start with, based on how much time is available this week, not the most ambitious option on the list. Prep the pumpkin properly first, since the bleach bath and sealant step make the real difference between a pumpkin that lasts and one that doesn’t.
Faux pumpkins decorated this way don’t have to be a one-season thing either. They can be packed away and reused every fall.