This post contains affiliate links. This means I may earn a small commission if you purchase through my links at no extra cost to you.
My neighbor’s four-year-old once pointed at his elbow and told me, very confidently, that it was his “arm knee.”
And honestly? He wasn’t that far off elbows and knees do kind of work the same way. But it got me thinking about how little kids actually know about the bodies they walk around in every single day.
Skeleton crafts are one of the sneakiest ways to fix that, because kids don’t realize they’re learning anatomy when their hands are covered in glue and they’re sticking Q-tips onto black paper.
These twelve skeleton crafts cover real bone names, real body structure, and real learning wrapped inside projects that feel like play. The supplies are cheap. The instructions are doable. And no, you do not need a medical degree to pull any of this off.
Why Skeleton Crafts Are Secretly Genius for Teaching Anatomy
Flashcards don’t stick. Worksheets get shoved into backpacks and forgotten. But a kid who glues a pasta noodle where the femur goes and says the word “femur” out loud while doing it?
That kid remembers. Hands-on learning creates physical memory the brain links the word to the action to the object, and the whole thing anchors differently than reading something off a page.
Research published through the National Association for the Education of Young Children consistently shows that tactile, multi-sensory activities improve retention in early childhood, especially for abstract concepts like anatomy.
The other reason skeleton crafts work so well is timing. These projects double as Halloween crafts in October, but they’re equally useful for a homeschool anatomy unit in February or a classroom science week in April.
That makes them evergreen which means they earn traffic and saves all year long, not just during spooky season.
12 Skeleton Crafts That Teach Body Parts While Kids Craft
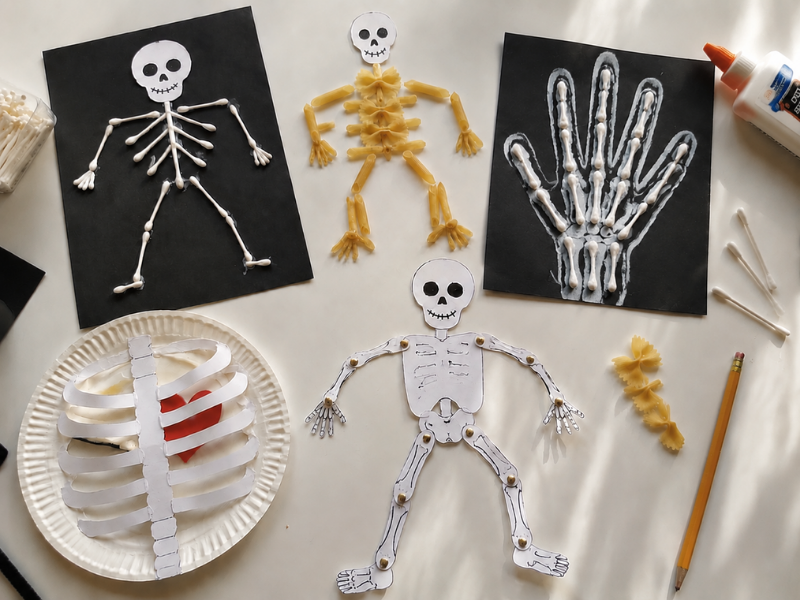
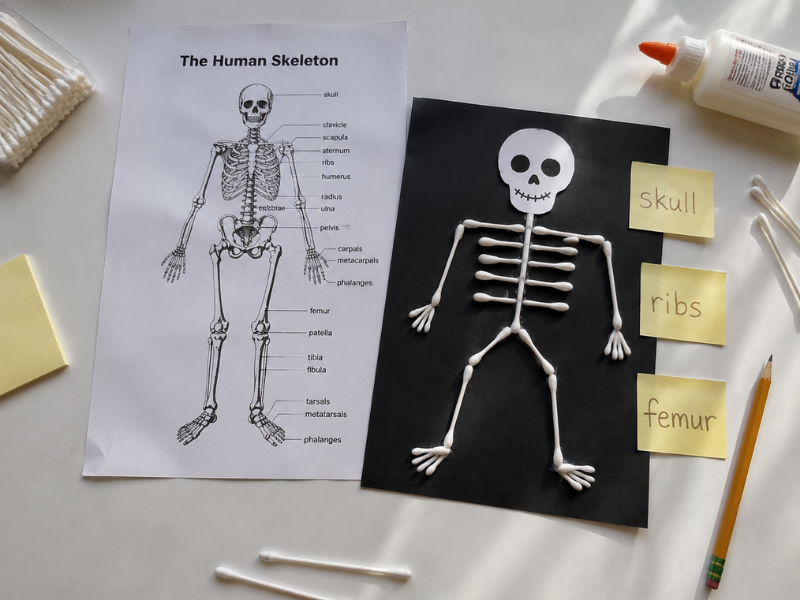
1. Cotton Swab Skeleton on Black Paper

This is the gateway. The one teachers pin on bulletin boards and parents photograph for the fridge. It’s simple, it’s visual, and it teaches more than people expect.
What kids learn: Major bone names femur, humerus, ribcage, pelvis, spine. Every time they pick up a Q-tip and place it, they’re making a decision about where that bone goes.
Supplies needed:
- Black construction paper
- Cotton swabs (Q-tips)
- White glue
- Scissors
- A skeleton reference image (printed or on a tablet)
How it works: Kids glue Q-tips onto black paper to build a full skeleton. Cut some swabs shorter for fingers, ribs, and smaller bones.
Leave others full-length for the femur and humerus. Use a reference image so they can compare as they build.
Age range: 4+
Teaching tip: Before they glue each piece, ask them to say the bone name out loud. “This one’s the femur. It goes in the leg.” That verbal repetition is where the real learning happens.
Not sure which glue gives the cleanest hold on paper projects? This guide on what type of glue to use for paper crafts breaks it down.
2. Life-Size Body Tracing Skeleton

Roll out the butcher paper, trace the kid, and draw the skeleton inside them. This one stops kids in their tracks because they suddenly realize those bones are inside ME. Right now. That specific moment of connection is what makes this craft unforgettable.
What kids learn: Where bones actually sit inside their own body. Not on a chart. Not in a textbook. Inside them.
Supplies needed:
- Butcher paper or large craft paper roll
- Markers or crayons
- Optional: Q-tips or cut paper shapes for bones
How it works: Lay the paper on the floor and trace the child’s outline. Then, using a reference poster or printout, draw the skeleton inside the tracing.
Start with the skull and spine the trunk — then branch outward to the limbs. Kids can draw the bones themselves or glue pre-cut bone shapes.
Age range: 3+ with help
Teaching tip: Start with the skull and spine, then add ribs, then limbs. This mirrors how real anatomy is taught — central structures first, extremities second.
It also keeps the project from feeling overwhelming. For more life-size, full-body creative projects with little ones, these handprint fall deer crafts use the same hands-on, body-tracing energy.
3. Paper Plate Ribcage

One paper plate. A few strips of white paper. And suddenly a child understands that their ribs aren’t just random bones they’re a cage. A cage that protects the two most important organs they’ve got.
What kids learn: The shape and function of the ribcage what it protects (heart and lungs) and how it curves around the chest.
Supplies needed:
- 1 paper plate (cut in half)
- White paper strips
- Glue
- Markers
- Optional: small red heart cut from construction paper
How it works: The half-plate becomes the chest cavity.
Kids glue curved white paper strips across the opening — those are the ribs.
Tuck a small red heart behind the ribs so it peeks through. Label it. Draw the lungs on either side.
Age range: 3+
Teaching tip: Before they start gluing, ask: “What do you think is hiding behind your ribs right now?” Let them guess. Most kids say “my tummy.”
When you tell them it’s their heart and lungs, the surprise sticks. According to KidsHealth by Nemours, children as young as three can begin understanding that bones serve a protective function the ribcage is the easiest place to demonstrate that.
4. Pasta Skeleton
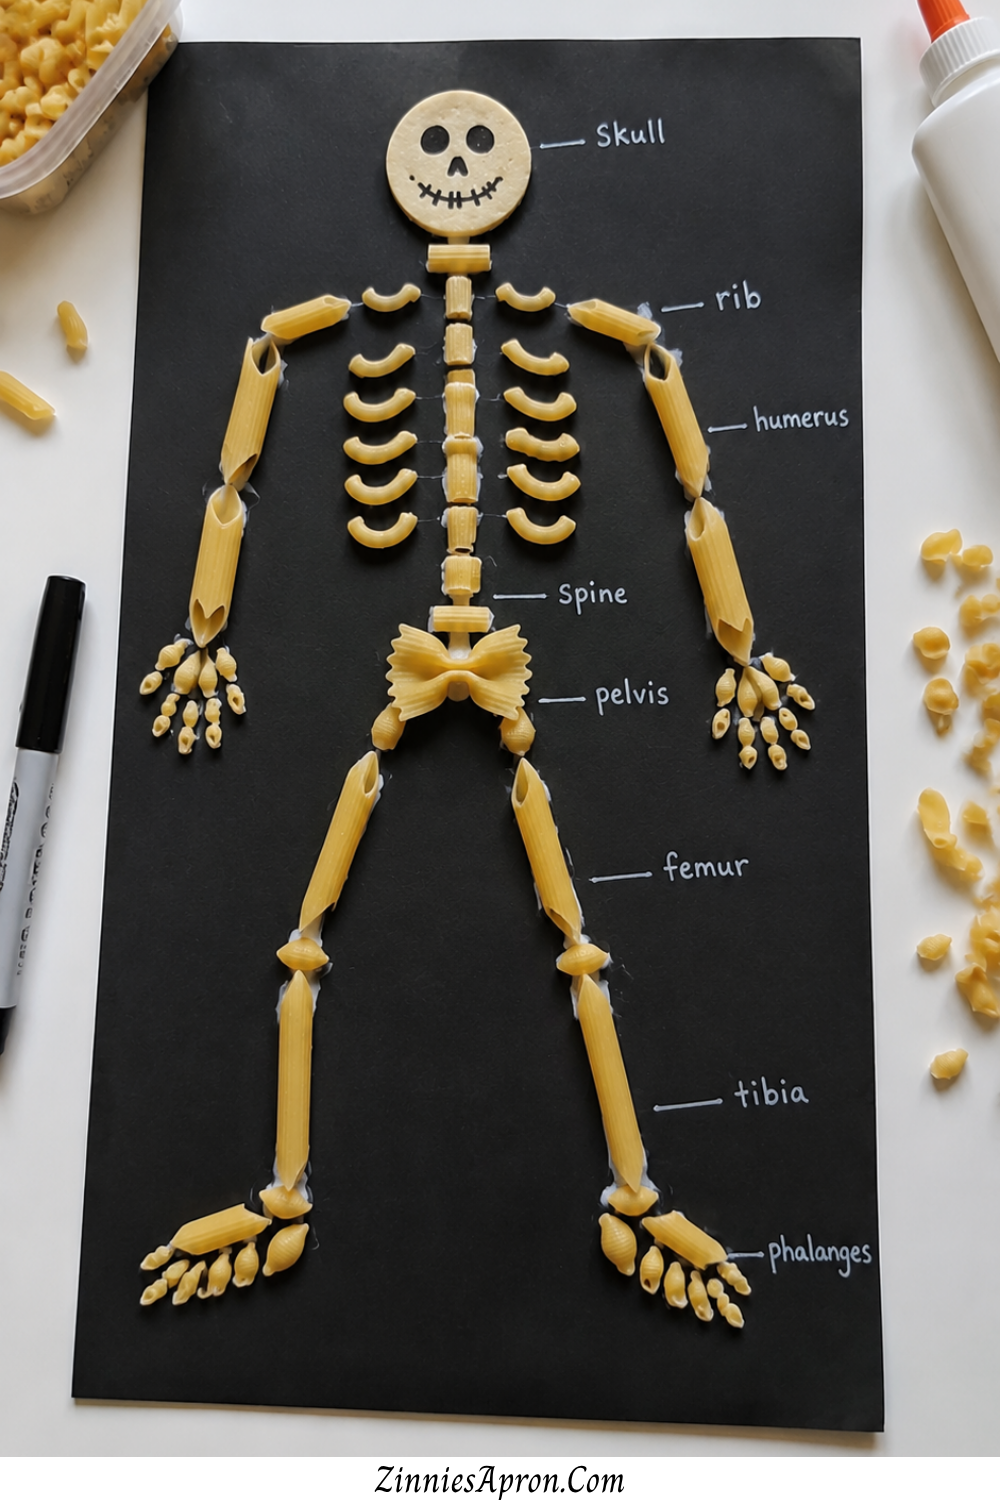
Different pasta shapes for different bones. That’s the whole concept and it works brilliantly because the matching process forces kids to really look at what bones look like. Rigatoni for the spine.
Penne for the long leg bones. Elbow macaroni for the ribs. Bow ties for the pelvis. It’s anatomy class disguised as a pantry raid.
What kids learn: That bones come in wildly different shapes depending on their job long bones for support, curved bones for protection, flat bones for coverage.
Supplies needed:
- Assorted dried pasta (penne, rigatoni, elbow, bow tie, small shells, spaghetti)
- Black construction paper or cardboard
- White glue
- A small round object for the skull (bottle cap, circular cracker, or a drawn circle)
How it works: Let kids pick which pasta “looks like” each bone before you reveal the answer. That guessing process is half the learning.
Glue pieces into skeleton formation on the dark background. Label bones once dried.
Age range: 4+
Teaching tip: Turn the pasta selection into a game. Hold up a piece of rigatoni and ask, “Where on the body do you think this one goes?” Let them reason through it.
When they realize that elbow macaroni looks like actual ribs the connection clicks hard.
5. Moveable Paper Fastener Skeleton

This is where skeleton crafts go from “look at it” to “play with it.” A skeleton with joints that actually move teaches something that static crafts can’t how bones work together.
What kids learn: Joints, how bones connect, and why certain body parts bend while others don’t.
Supplies needed:
- Cardstock or heavy paper
- Brass paper fasteners (brads)
- Scissors
- Markers
- Skeleton template (printed or drawn)
How it works: Cut out individual bone sections upper arm, lower arm, upper leg, lower leg, torso, head. Connect them at the joints using brads so they pivot. The finished skeleton moves like a puppet.
Age range: 5+
Teaching tip: Once assembled, call out a body part — “move the left knee!” — and have them find the right joint and bend it.
This turns into a game almost immediately, and the repetition is exactly what locks the names in. If your kids enjoy building things that move and respond, these popsicle stick crafts for kids include a few more projects with moving parts.
6. X-Ray Hand Art

White chalk or paint on black paper. One traced hand. And suddenly a child is staring at their own hand and seeing the invisible architecture underneath.
Twenty-seven bones. In one hand. That fact alone makes kids look at their fingers differently for the rest of the day.
What kids learn: Phalanges, metacarpals the finger and hand bone structure that most adults can’t name either.
Supplies needed:
- Black construction paper
- White chalk, white paint, or white crayon
- Pencil for tracing
How it works: Trace the child’s hand on black paper. Use white chalk or paint to draw the bones inside the outline three small segments in each finger (phalanges), longer bones in the palm (metacarpals), and the wrist bones (carpals). Label them.
Age range: 3+
Teaching tip: Wiggle each finger together and count the bones inside it. “Three in this one. Three in that one. Three here too. How many is that so far?” The counting and the wiggling make it stick.
For younger kids, simplify to just drawing lines inside the fingers the concept still lands even without perfect anatomy.
This craft pairs well with the simple flower crafts that encourage creativity — both use traced hands as the starting point for something surprising.
7. Skeleton Puzzle Craft
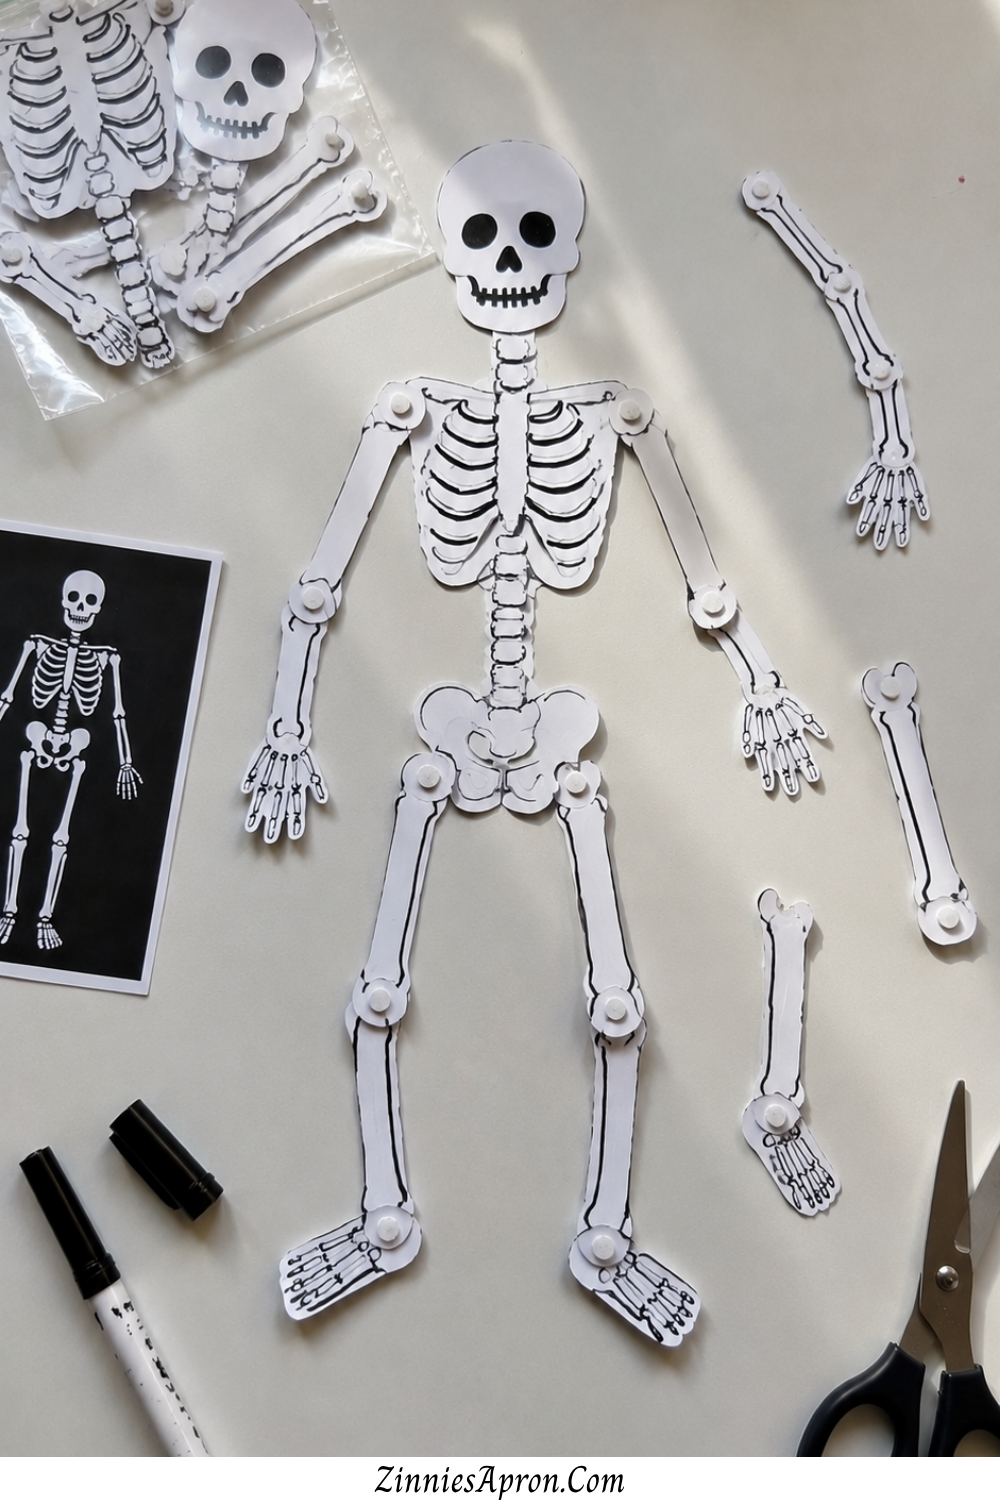
Build it once. Take it apart. Build it again. This is the skeleton craft that turns into a reusable learning tool part craft project, part game, part assessment.
What kids learn: Full skeleton layout and spatial awareness of bone placement. Where does the skull sit relative to the spine? Where do the ribs stop and the pelvis begin?
Supplies needed:
- Cardstock or foam board
- Markers
- Scissors
- A ziplock bag for storage
- Optional: magnets for a magnetic board version
How it works: Draw and cut out individual bones or bone groups — skull, ribcage, spine, pelvis, arms, legs, hands, feet. Mix them up.
Have the child assemble the full skeleton from the scattered pieces. Store in a ziplock bag for repeated use.
Age range: 5+
Teaching tip: Time them on reassembly. Kids become obsessed with beating their own record, which means they’re voluntarily practicing anatomy on repeat. That’s the goal.
The National Institutes of Health has published extensively on how game-based repetition strengthens neural pathways for learning in young children and timed puzzles hit that mechanism perfectly.
8. Spine Stacking With Egg Carton Cups
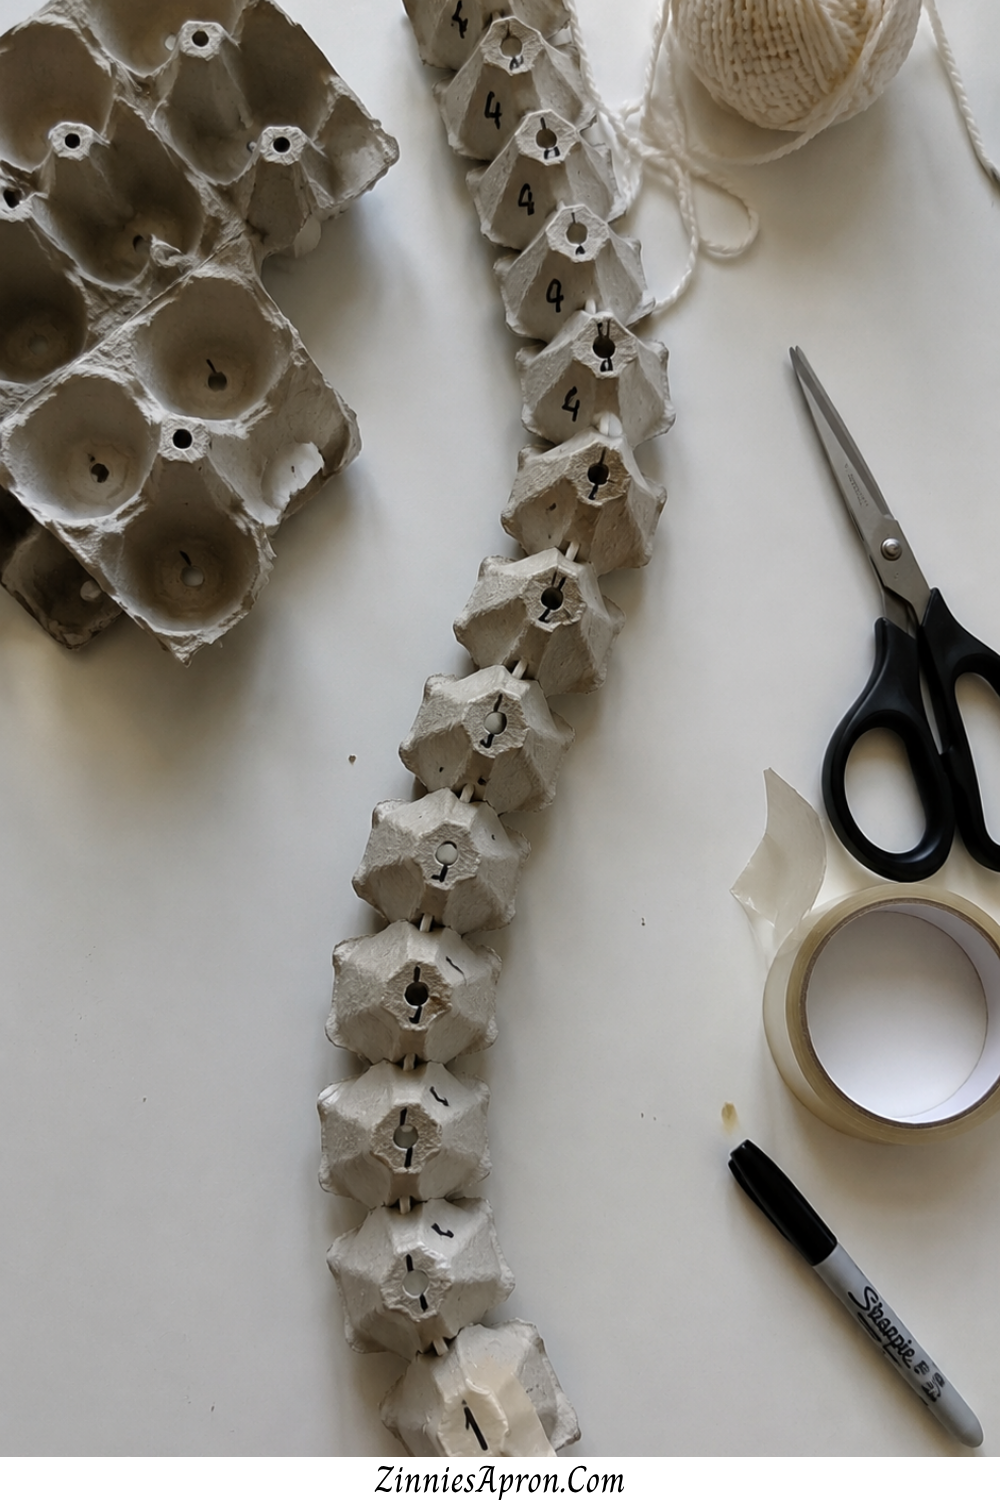
Cut an egg carton into individual cups. Stack them. Thread string through the bottom of each cup.
Pull the string tight and you’ve got a flexible spine model that bends, curves, and demonstrates vertebral structure better than any diagram in a book.
What kids learn: Vertebrae, spinal column structure, and the flexibility of the spine why your back bends instead of staying rigid.
Supplies needed:
- Cardboard egg carton
- String or yarn
- Scissors
- Tape
- Markers (to label vertebrae)
How it works: Cut each egg cup into a separate piece. Poke a hole in the bottom of each. Thread yarn through all the cups.
The cups stack into a spine shape, and the yarn holds them together while still allowing movement.
Age range: 4+
Teaching tip: Once the spine is assembled, have the child bend it — forward, backward, side to side. Then have them bend their own back the same way.
The physical comparison is the moment where it clicks: “Oh. That thing inside me works just like this.” For more building-and-stacking crafts that teach through doing, farm animal crafts for kids include several 3D projects that use the same structural thinking.
9. Handprint and Footprint Bone Art
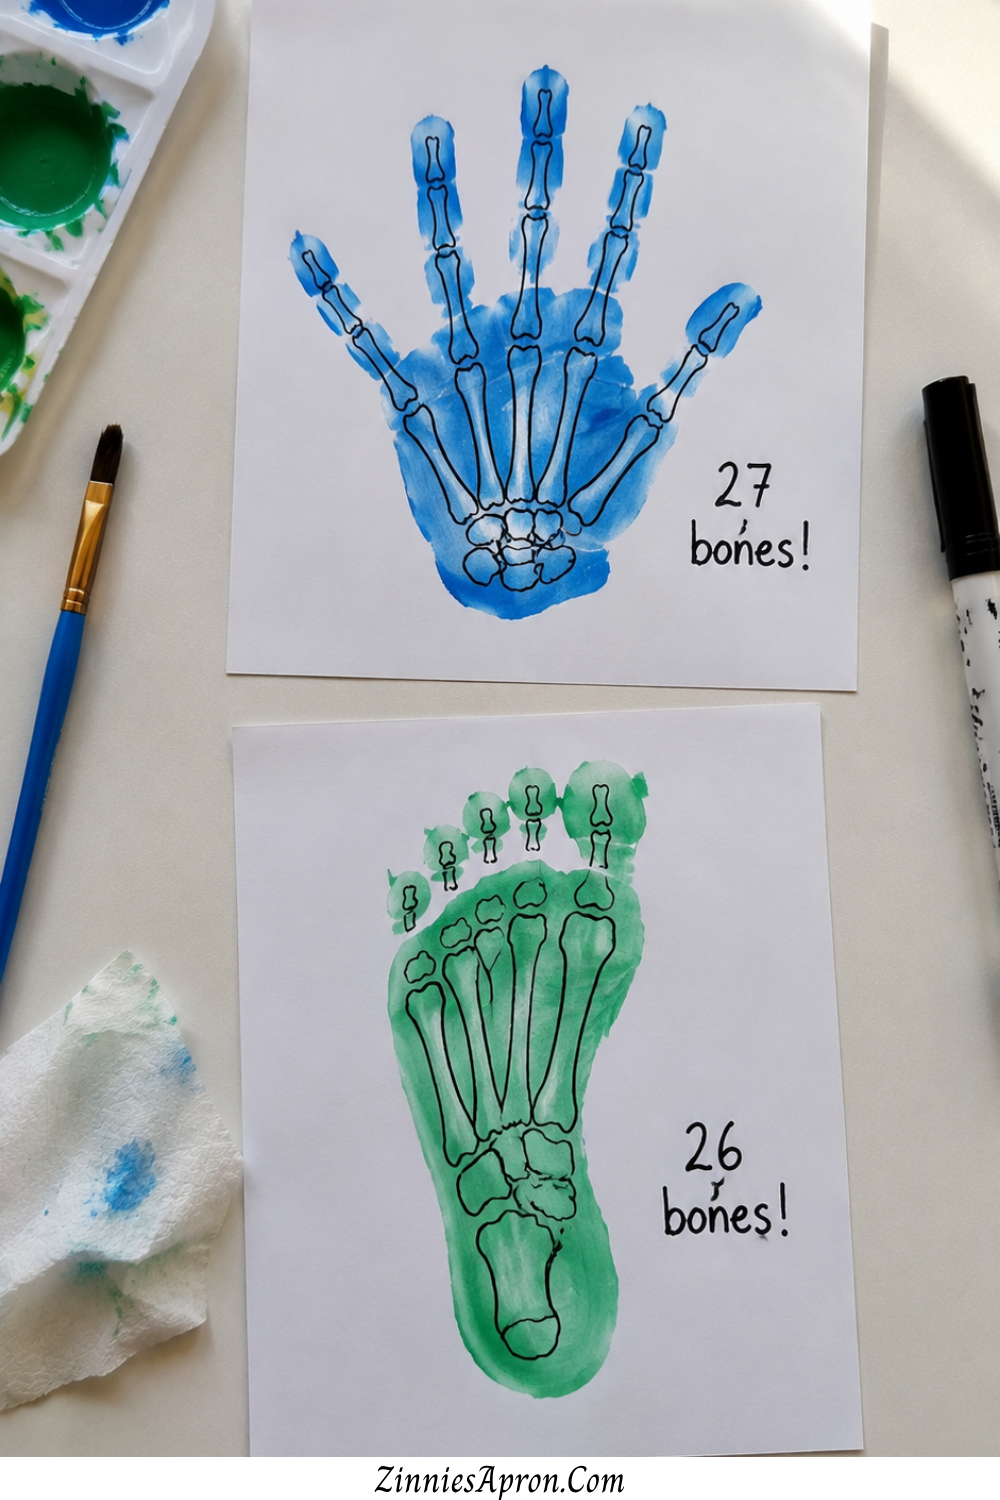
This one works for the tiniest crafters kids who still measure their age with one hand. Trace a hand or a foot, draw the bones inside, and suddenly the smallest person in the room is learning real anatomy with paint on their palm.
What kids learn: Bone structure of the hands and feet — the difference between phalanges, metatarsals, and carpals.
Supplies needed:
- White paper
- Washable paint or ink pad
- Markers or fine-tip pens
- Wet wipes for cleanup
How it works: Press the child’s hand or foot onto paper (paint or ink). Once dry, draw the bone structure inside the print using white or light-colored markers. Count the bones together.
Age range: 2+ (with adult drawing the bones)
Teaching tip: The jaw-dropper moment tell them there are 27 bones in one hand and 26 in one foot. Watch their face. Then count together. “That’s more than the whole rest of your arm.”
These prints also make beautiful keepsakes for parents, especially paired with mother-daughter crafts for Mother’s Day or tucked into a handmade card.
10. Skeleton Paper Bag Puppet
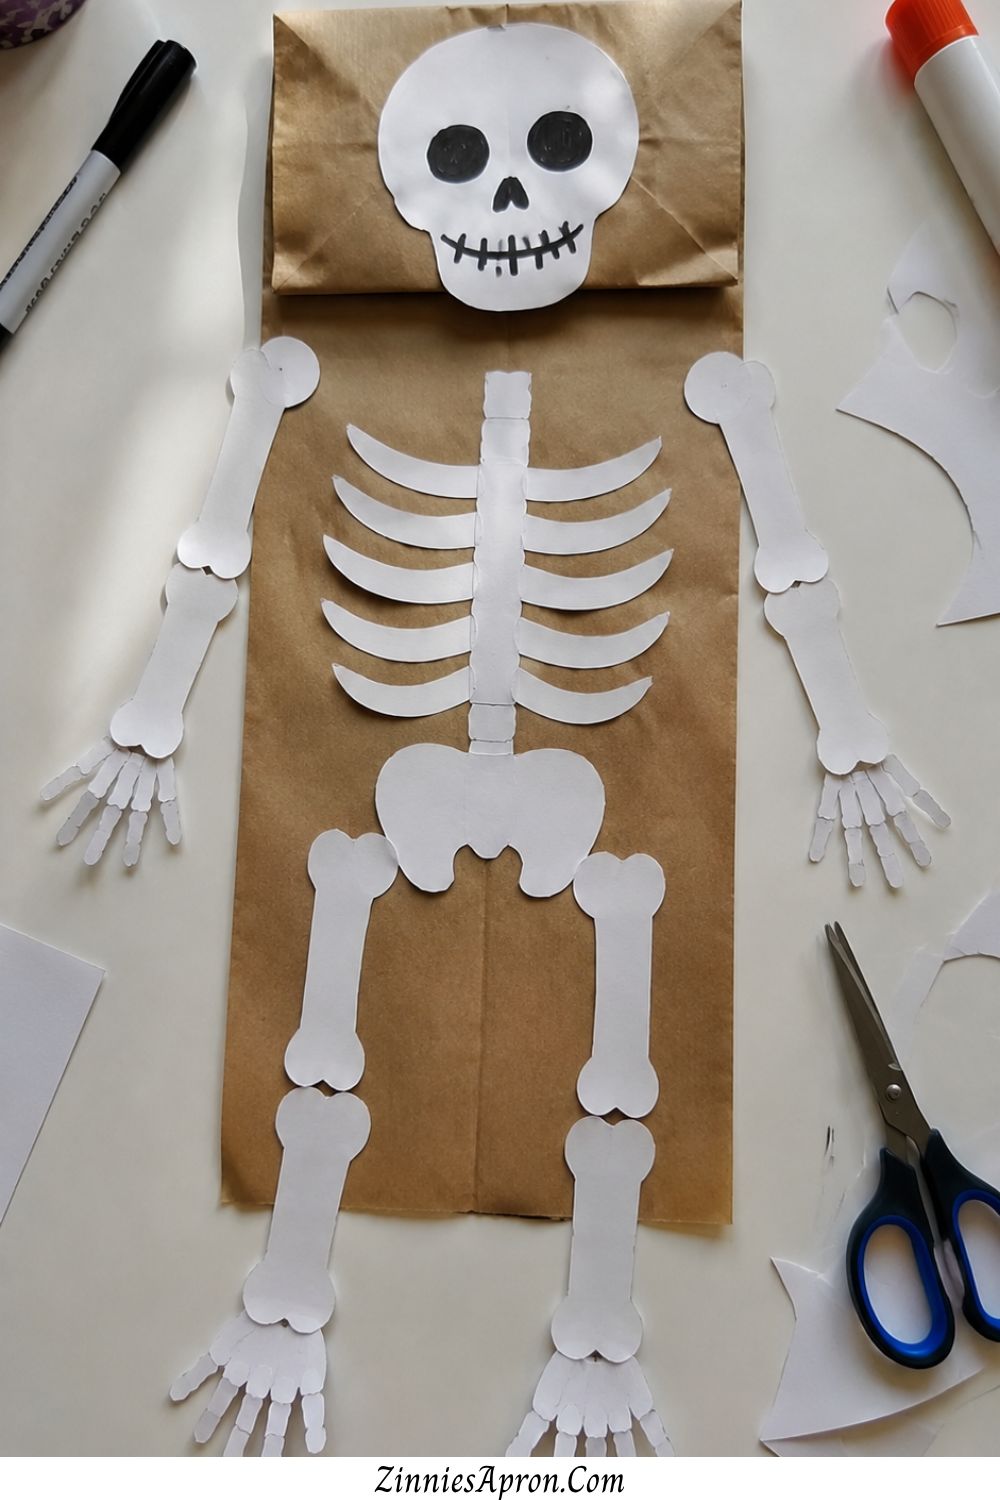
A skeleton you talk to. A skeleton that talks back. one whose puppet voice introduces its own bones by name. This is the skeleton craft where learning and play become completely indistinguishable.
What kids learn: Full-body bone names through dramatic play repetition without boredom.
Supplies needed:
- Brown paper lunch bag
- White paper or cardstock
- Scissors
- Glue
- Black marker
How it works: Cut bone shapes from white paper skull for the bag flap, ribcage and limbs for the body. Glue them to the bag. Slide a hand inside and the puppet comes alive.
Age range: 4+
Teaching tip: Have the puppet “introduce” each of its own bones. “Hello! I’m Mr. Skeleton. This is my humerus that’s my funny bone! Get it?”
Kids who would never sit through a bone-naming worksheet will happily do this for twenty minutes with a bag on their hand.
For more puppet-style crafts that build imagination, these woodland animal crafts for preschool include several bag and stick puppet options.
11. Glow-in-the-Dark Skeleton Painting
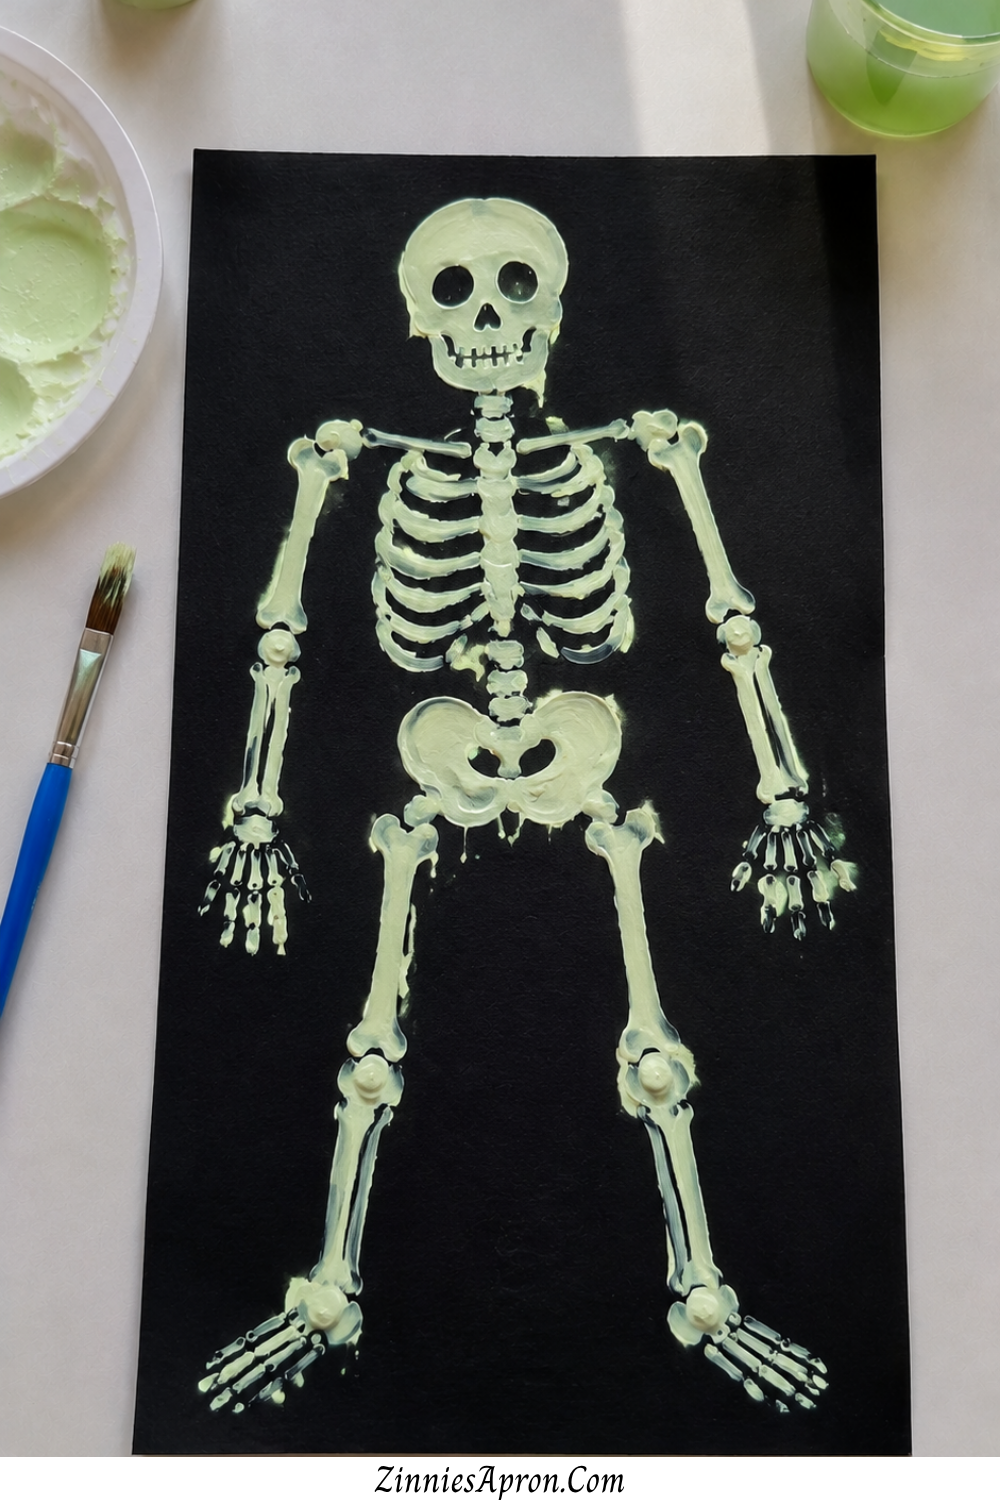
Everything changes when you turn the lights off. That’s not an exaggeration. A skeleton painted in glow-in-the-dark paint on black paper becomes a completely different experience in the dark and the visual memory it creates is the kind that sticks for years.
What kids learn: Bone names through a visual memory hook so strong that the glow effect literally burns the image into their recall.
Supplies needed:
- Black paper or cardboard
- Glow-in-the-dark paint (available at most craft or dollar stores)
- Brushes
- A dark room for the big reveal
How it works: Paint a full skeleton on black paper using glow paint. Let it dry completely. Take it into a dark closet or bathroom, charge it under a light for thirty seconds, then turn the lights off and watch it glow.
Age range: 5+
Teaching tip: Quiz them in the dark. “Point to the femur.” “Where’s the ribcage?” The glow makes it a game, not a test. And kids will beg to do it again.
This is the skeleton craft parents tell other parents about, because the moment the lights go off, every kid in the room gasps.
If you want to preserve the painting long-term, a clear coat keeps the glow paint from chipping check this guide on the best sealant for crafts for the right option.
12. Build-a-Skeleton Felt Board
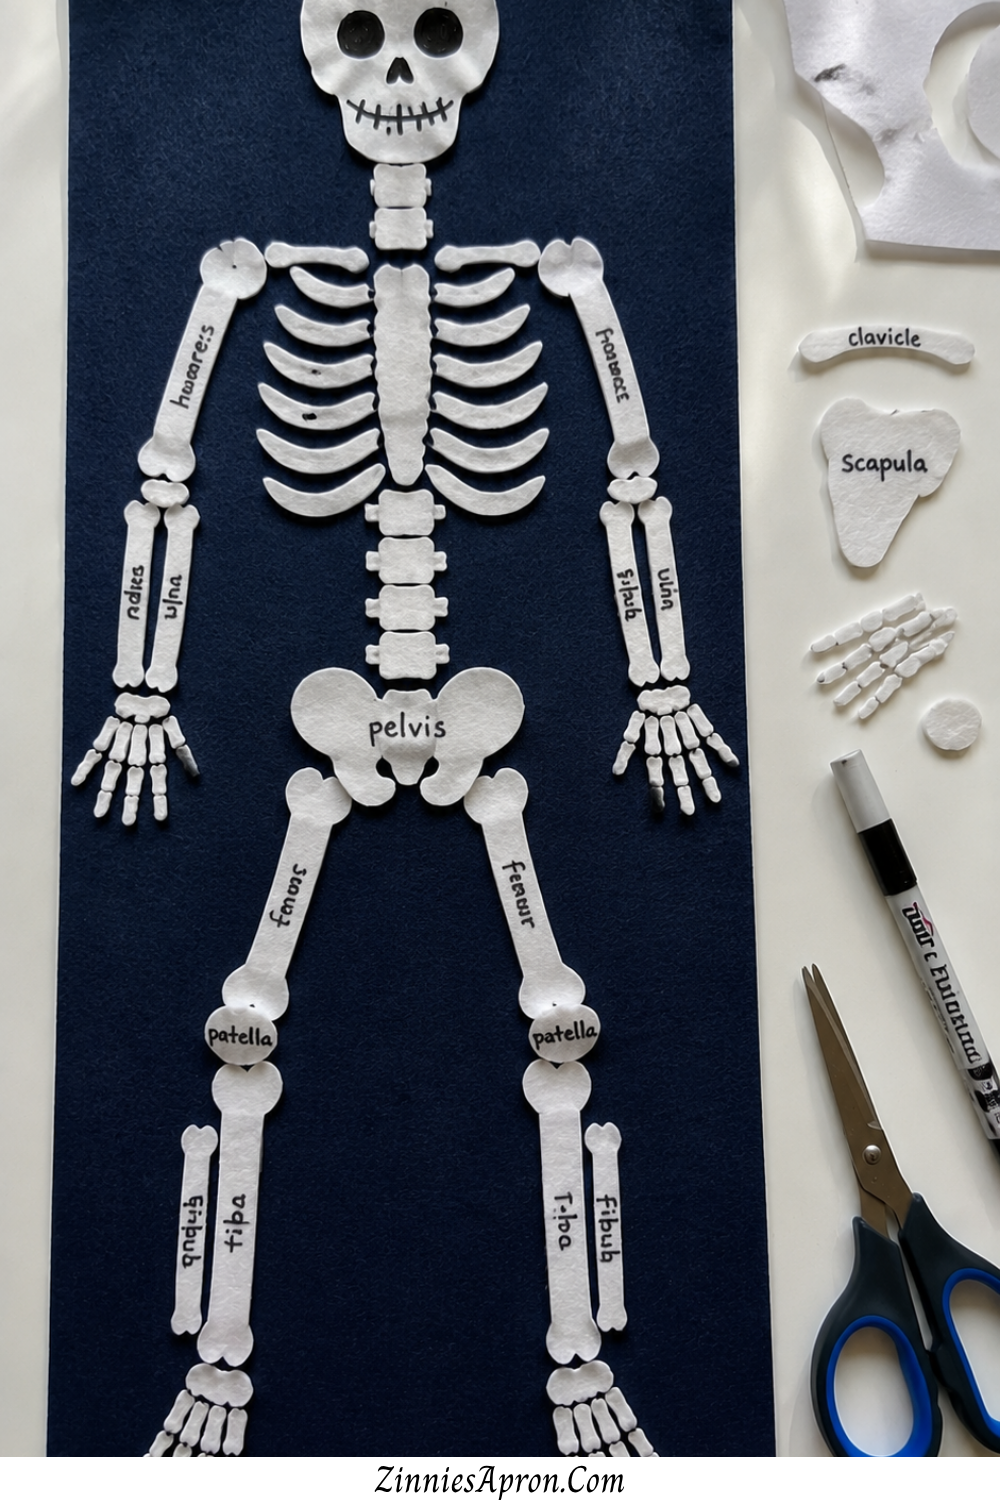
Reusable. Portable. Endlessly repeatable. This is the skeleton craft that stays in the classroom or playroom for months, getting used over and over because it turns into a game all on its own.
What kids learn: Full skeleton assembly with instant self-correction they place the bone, check the reference, and adjust. Repeat until it’s second nature.
Supplies needed:
- Large piece of felt (dark color, for background)
- White or cream felt (for bone shapes)
- Scissors
- Fabric marker for labeling
- Optional: Velcro dots for extra stick
How it works: Cut bone shapes from white felt — skull, spine segments, ribcage, pelvis, arms, legs, hands, feet. These stick to the felt background naturally (felt on felt). Kids assemble the skeleton piece by piece.
Age range: 3+
Teaching tip: Remove one bone and ask, “What’s missing?” That single question turns the felt board into an instant recall game. Start easy ,remove the skull and build toward harder pieces like the radius or the pelvis.
The reusability is what makes this one special. It’s not a one-and-done project. It’s a learning tool that keeps working.
You’ll find more open-ended, creativity-driven crafts like this in the mushroom crafts for kids collection — projects that stay out on the table and get revisited because they’re fun, not because someone assigned them.
Tips to Get the Most Learning Out of These Skeleton Crafts
The crafting is only half of it. The other half is what you say while the glue is drying. A few small habits turn any of these twelve projects from a fun activity into something that actually sticks academically.
Say the bone names out loud while crafting. Every. Single. Time. Repetition is the engine of retention, and kids absorb vocabulary fastest when it’s tied to something they’re actively doing with their hands.
“Hand me the humerus” works better than “hand me that arm bone.”
Start with the spine and skull — the trunk of the skeleton — then add limbs. This mirrors how anatomy is actually taught, and it gives kids a mental framework.
The spine is the highway. Everything else branches off it. Once they internalize that structure, the rest falls into place.
Don’t correct them immediately if they place a bone wrong. Let them look at the reference. Let them figure it out.
The self-correction process is where the deepest learning happens not the correction itself, but the moment of realizing “wait, that doesn’t look right.”
If you’re building a stocked craft space for ongoing projects like these, 10 must-have crafts tools for DIY covers every essential you’ll want within arm’s reach.
Pair with a kid-friendly anatomy book or poster. Having a reference visible during the craft makes the learning concrete.
InnerBody’s free skeletal system guide is one of the clearest visual references online — detailed enough to be useful, simple enough that a five-year-old can follow along with a parent pointing things out.
Repeat favorites. One craft session doesn’t create mastery. But doing the cotton swab skeleton three times over a month? That kid will be naming bones at the dinner table. Kids learn through repetition, not one-time exposure.
Which Skeleton Craft Should You Start With?
Youngest kids — go with #6 (X-Ray Hand Art) or #9 (Handprint Bone Art). Both are handprint-based, low-pressure, and work even for two-year-olds with an adult handling the drawing.
Older kids — start with #5 (Moveable Paper Fastener Skeleton) or #7 (Skeleton Puzzle Craft). The interactivity and the game element keep them engaged way past the initial build.
But honestly? Pick whichever one your kid would find coolest. Grab the supplies tonight, clear the kitchen table, and let them build a skeleton they can actually name.
If they love the glow-in-the-dark one (and they will), make that one first and work backward from there.
Related crafts to keep the momentum going — apple crafts kids will beg to repeat for seasonal making, or crafts to make for friends when they want to turn their finished pieces into gifts.
Save this post, pin it, and come back when it’s time to build.
Frequently Asked Questions
Are skeleton crafts only for Halloween?
Not even close. Skeleton crafts work for science units, homeschool anatomy lessons, doctor-themed weeks, and body awareness activities year-round.
Halloween gives them a seasonal boost in search traffic, but the educational value has no expiration date.
What’s the best skeleton craft for toddlers?
Handprint and footprint bone art (#9) is the most toddler-friendly because the adult handles the drawing while the child does the fun part the stamping.
X-Ray Hand Art (#6) also works well for ages three and up with minimal adult help.
Do I need to know anatomy to teach these?
You need a reference image that’s it. Print a basic skeleton diagram or pull one up on a tablet. You and the kids learn together, which honestly makes it more fun for everyone.
Nobody’s expecting you to teach like a professor. Just say the bone names out loud and let the craft do the rest.
How do I make skeleton crafts more challenging for older kids?
Add labeling. Use the correct anatomical terms instead of simplified versions — “phalanges” instead of “finger bones,” “vertebrae” instead of “back bones.”
Time the puzzle reassembly. Have them teach a younger sibling using their finished craft as a model. Teaching is the deepest form of learning.
Can these skeleton crafts be used in a classroom setting?
Absolutely — most of them were designed with classrooms in mind. The cotton swab skeleton (#1), paper bag puppet (#10), and felt board (#12) all scale easily for groups of fifteen to twenty-five kids.
The wreath-style crafts and life-size tracings work beautifully as collaborative bulletin board displays.