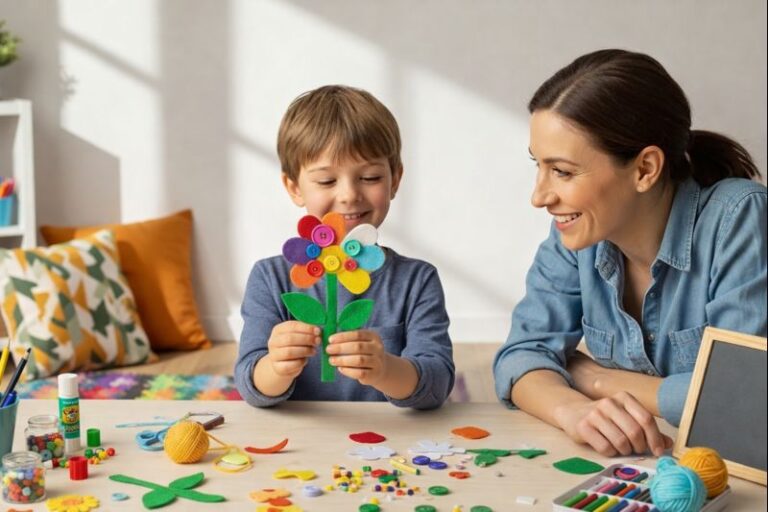
Struggling to find simple, low-cost activities that actually hold kids’ attention? paper cup crafts for kids turn everyday cups into fun, hands-on projects that spark curiosity and creativity.
One of the biggest challenges of keeping kids entertained isn’t a lack of activities, it’s finding creative projects that don’t require a special trip to the craft store.
Many parents and teachers have experienced that moment when a child says they’re bored, but the art supplies are running low and inspiration feels even lower.
That’s where paper cup crafts come in. A simple paper cup may seem ordinary, but it can become an animal, a puppet, a decoration, a toy, a learning tool, or even the starting point for an imaginative story.
Because paper cups are lightweight, inexpensive, and easy for small hands to hold, they have become a favorite material for children’s craft projects in homes, classrooms, daycare centers, and community programs around the world.
Some projects celebrate holidays and changing seasons, while others can be enjoyed any day a child wants to create something fun.
Let’s say you’re looking for a rainy-day activity, a classroom craft, a boredom buster during school breaks, or a low-cost way to encourage screen-free play, there’s a project here to match the occasion.
In this collection, you’ll discover 23 cute paper cup crafts for kids that are simple to make, engaging to create, and designed to inspire year-round creativity.
If you’re looking for a faith-based activity that helps children understand bravery through storytelling, this He Prayed Anyway — Daniel and the Lions Den Crafts for Kids Who Need to Know Courage Is Real brings scripture to life in a hands-on and memorable way.
Choosing the Right Paper Cups for Different Projects
Not all paper cups are created equal. Choosing the right type can make crafting easier, reduce frustration, and help projects turn out better.
- Small bathroom cups (3–5 oz) are ideal for preschool crafts, mini animals, finger puppets, flowers, and simple decorations. Their smaller size makes them easier for young children to hold, paint, and decorate.
- Standard paper drinking cups (8–12 oz) are the most versatile option for kids’ crafts. They work well for animals, characters, holiday decorations, rockets, bird feeders, and classroom projects because they provide enough surface area for creativity without being too large.
- Heavy-duty party cups are sturdier and hold their shape better during crafting. They’re a good choice for projects that require cutting windows, stacking cups, building structures, or creating toys that children will play with repeatedly.
- Plain white cups are often the easiest to customize because markers, paint, stickers, and crayons show up clearly on the surface.
- Colored or patterned party cups can save time when making themed crafts since the cup itself becomes part of the design. For example, green cups work well for frogs, while red cups can be transformed into ladybugs or holiday characters.
- Wax-coated cups may resist certain paints and glues, so it’s a good idea to test supplies first. Acrylic paint usually adheres better than washable paint on slick surfaces.
- Paper cups with a smooth finish are generally easier for children to decorate than heavily textured cups, especially when drawing faces, patterns, or details.
Quick Idea: If you’re unsure which type to use, standard white paper drinking cups are the safest choice because they work well for most paper cup crafts and are widely available in stores worldwide.
When kids need a simple but powerful creativity boost using everyday materials, these fun ideas in 19 Easy Pipe Cleaner Crafts for Kids That Boost Creativity are perfect for keeping little hands engaged and imaginative.
Cute Paper Cup Crafts for Kids
Animal Paper Cup Crafts
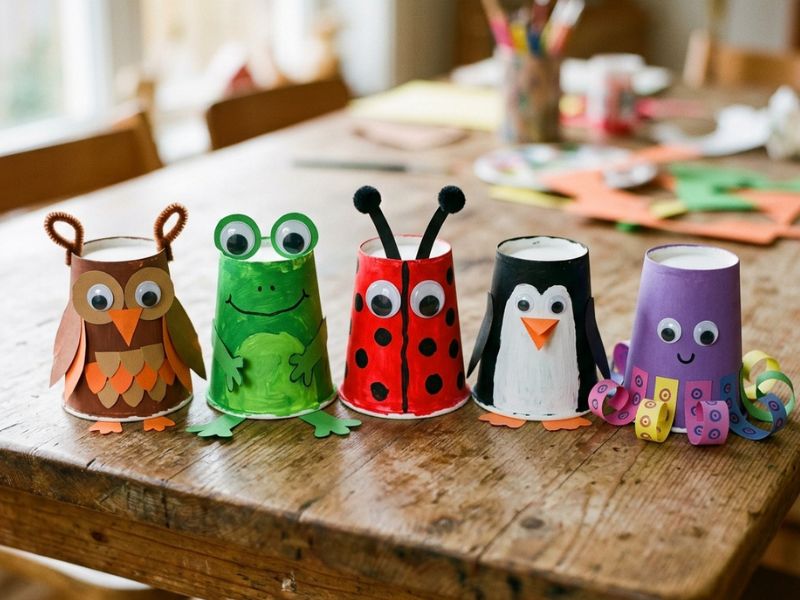
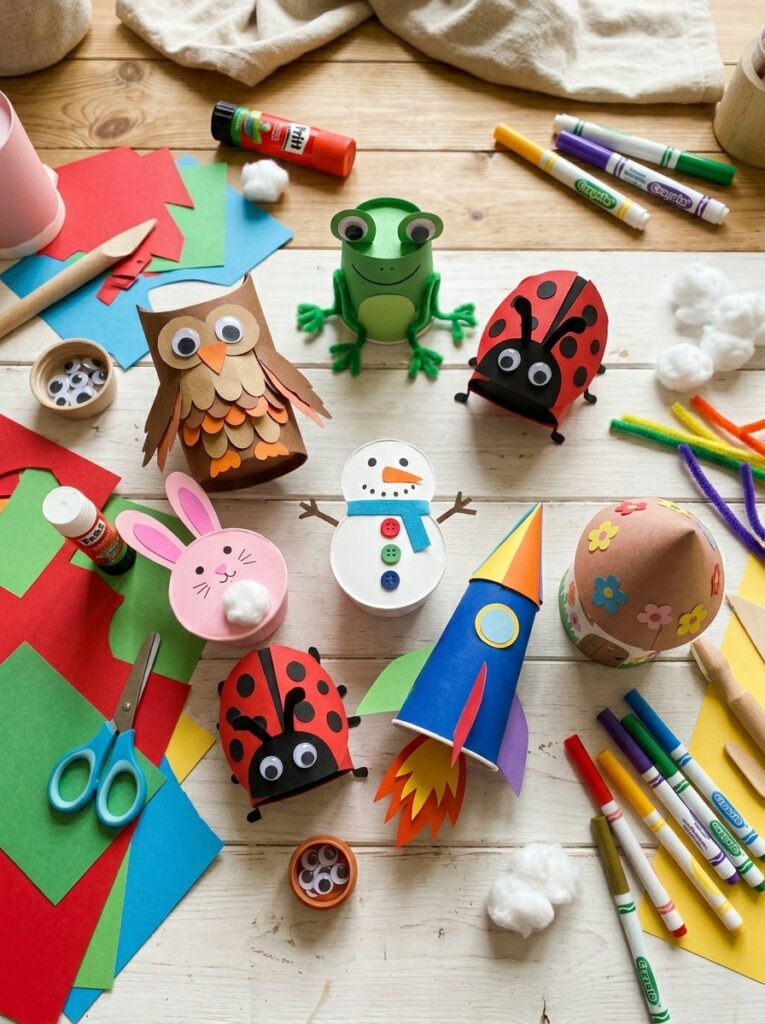
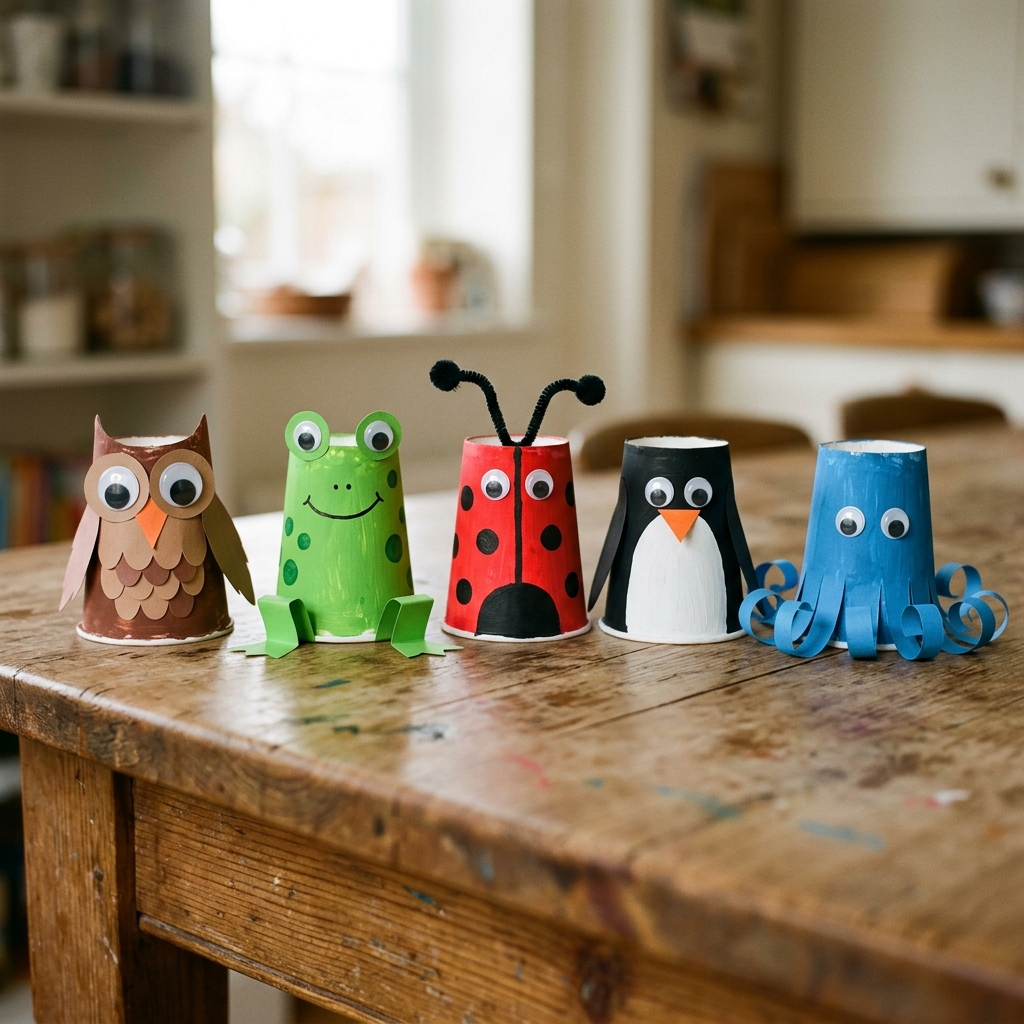
1. Paper Cup Owl
A paper cup owl is a cute animal craft that transforms an ordinary cup into a wise-looking owl with large eyes, colorful feathers, and paper wings. This project is great for teaching children about woodland animals while encouraging creativity.
Materials Needed
- 1 paper cup
- Brown paint or brown markers
- 2 large googly eyes
- Colored craft feathers
- Brown construction paper
- Glue
- Scissors
How to Make It
- Paint the outside of a paper cup brown and allow it to dry completely.
- Cut two large circles from white paper and two smaller circles from black paper. Glue the black circles onto the white circles to create the owl’s eyes.
- Glue the eyes side by side near the top of the cup.
- Cut a small triangle from orange or yellow paper and glue it between the eyes to make the beak.
- Cut two wing shapes from brown construction paper and glue one to each side of the cup.
- Glue a few craft feathers around the wings or on the front of the owl for extra texture.
- Cut two small ear tufts from brown paper and attach them to the inside rim of the cup so they stick up above the owl’s head.
- Allow the glue to dry before displaying your owl.
2. Paper Cup Frog
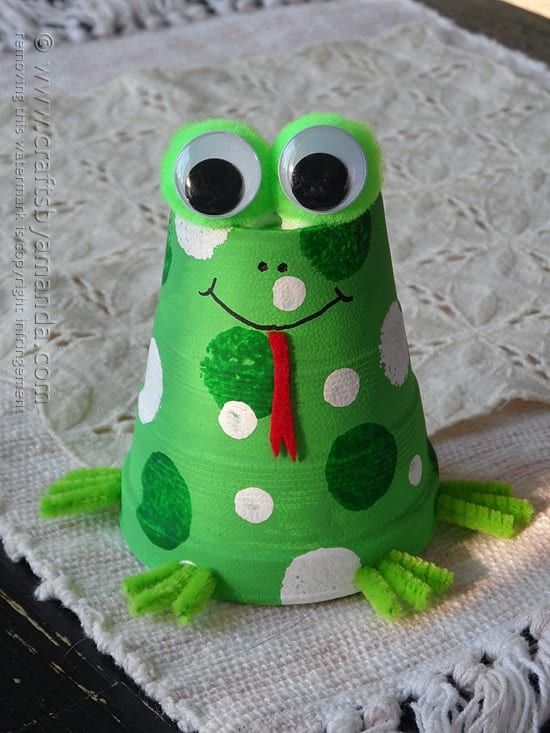
Photo credit; @ Crafts by Amanda
This playful frog craft turns a paper cup into a cheerful green amphibian complete with folded legs and a curly tongue. Kids often enjoy pretending the frog is hopping around after the project is finished.
Materials Needed
- 1 paper cup
- Green paint or green markers
- 2 googly eyes
- Green construction paper
- Red paper strip
- Glue
- Scissors
How to Make It
- Paint the entire outside of a paper cup green and let it dry.
- Cut four frog legs from green construction paper. Make the back legs slightly larger than the front legs.
- Fold the top of each leg piece about half an inch to create a flap for gluing.
- Glue the front legs near the bottom front of the cup and the larger back legs on the sides.
- Cut two circles from white paper and two smaller circles from black paper to make the frog’s eyes.
- Glue the eyes to the top rim of the cup so they stick up slightly above the head.
- Cut a thin strip of red paper and curl one end around a pencil to create a tongue.
- Glue the tongue just below the eyes and draw a smile with a black marker.
- Let everything dry before playing with your frog.
For a meaningful Sunday school session that keeps children excited while learning Bible stories, 15 Noah’s Ark Crafts for Kids Your Sunday School Class Will Actually Be Excited to Make offers engaging, story-based craft experiences.
3. Paper Cup Ladybug
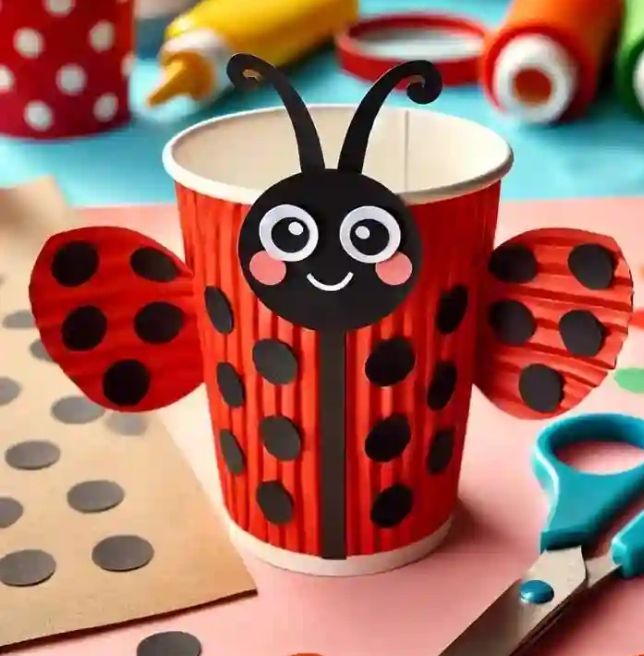
A paper cup ladybug is one of the easiest animal crafts for younger children. The bright red color and bold black spots make it instantly recognizable and fun to create.
Materials Needed
- 1 paper cup
- Red paint
- Black paint or black marker
- Black construction paper
- 2 googly eyes
- Glue
- Scissors
How to Make It
- Paint the outside of the paper cup bright red and allow it to dry.
- Use black paint or a marker to add several round spots all around the cup.
- Cut a large circle from black construction paper for the ladybug’s head.
- Glue the head to the front upper section of the cup.
- Cut two wing shapes from red paper and draw a line down the center of each wing with a black marker.
- Glue the wings onto the cup so they slightly overlap in the middle.
- Attach two googly eyes to the black head.
- Cut two thin strips of black paper, curl the ends slightly, and glue them to the top of the head as antennae.
- Allow all the glue to dry before handling the finished ladybug.
4. Paper Cup Penguin
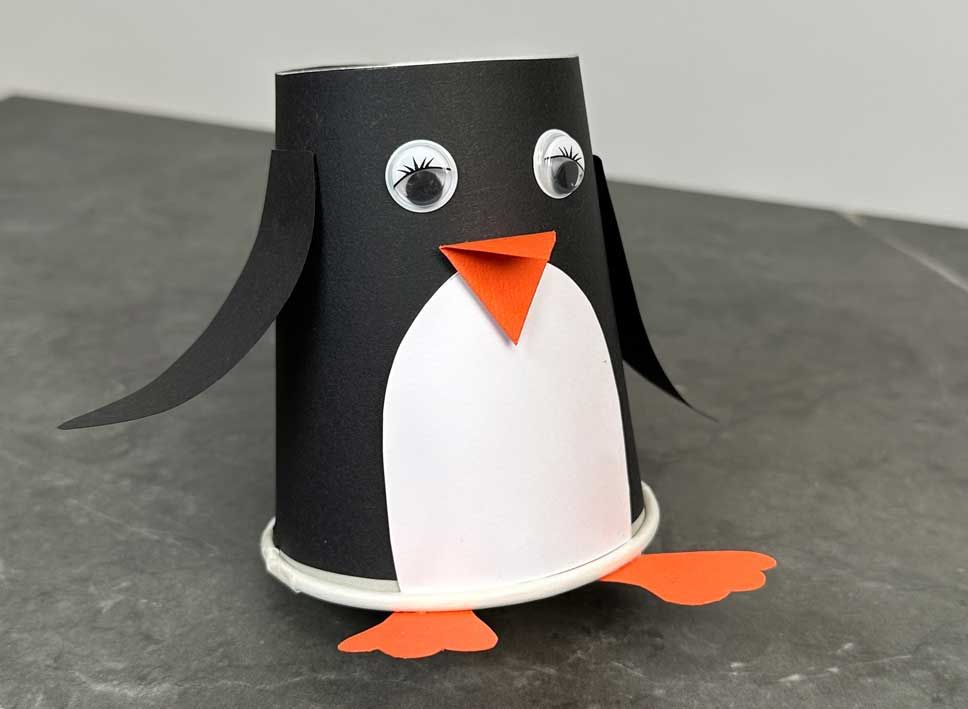
Among the most popular paper cup crafts for kids, this adorable penguin is perfect for winter-themed crafting sessions. With its black-and-white body and bright orange beak, it’s a fun way to introduce children to animals that live in colder climates.
Materials Needed
- 1 paper cup
- Black paint
- White construction paper
- Orange construction paper
- 2 googly eyes
- Glue
- Scissors
How to Make It
- Paint most of the outside of the paper cup black, leaving a large oval-shaped white area on the front for the penguin’s belly.
- Allow the paint to dry completely.
- Cut a small triangle from orange paper and glue it in the center of the white area to create the beak.
- Glue two googly eyes above the beak.
- Cut two wing shapes from black construction paper and attach one to each side of the cup.
- Cut two orange feet from construction paper and glue them to the bottom front edge of the cup.
- Use a black marker to add any extra details if desired.
- Let the glue dry fully before displaying your penguin. This is one of those paper cup crafts for kids that works especially well during winter or penguin-themed lessons.
5. Paper Cup Octopus
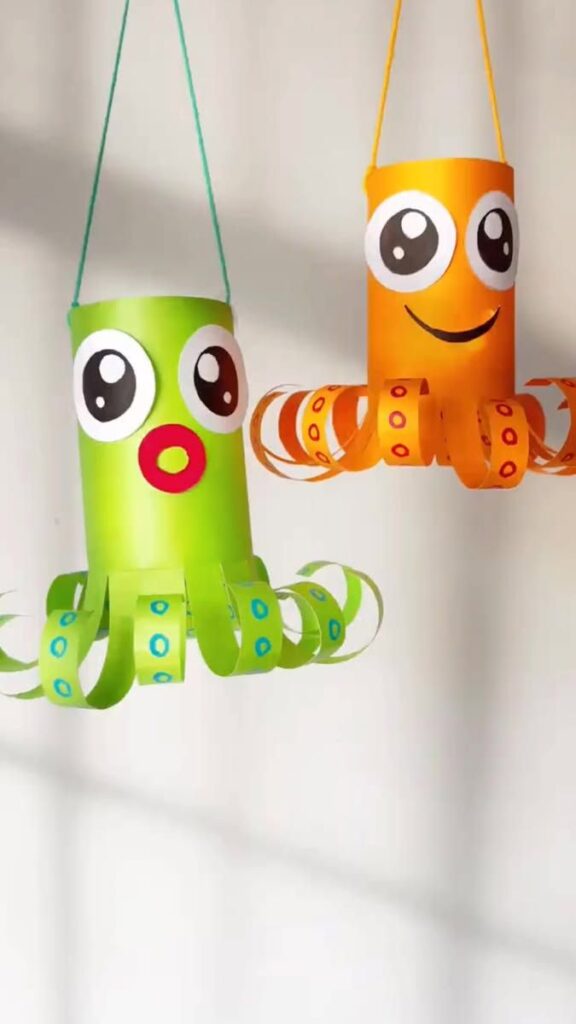
This colorful octopus is one of those paper cup crafts for kids that combines creativity with a simple introduction to ocean life. The curling tentacles make the finished craft look playful and full of movement.
Materials Needed
- 1 paper cup
- Blue, purple, or pink paint
- Googly eyes
- Marker
- Scissors
- Glue
How to Make It
- Paint the outside of the paper cup blue, purple, pink, or any ocean-inspired color and allow it to dry.
- Turn the cup upside down so the bottom becomes the octopus’s head.
- Starting at the open rim, cut 8 evenly spaced strips about 2–3 inches long to create the tentacles.
- Carefully wrap each strip around a pencil and gently release it to give the tentacles a curled shape.
- Glue two googly eyes onto the bottom of the upside-down cup.
- Draw a smile beneath the eyes with a marker.
- Add stickers, painted dots, glitter, or other sea-themed decorations if desired.
- Allow everything to dry completely before displaying your octopus.
Among paper cup crafts for kids, this one is especially fun because the curling tentacles make the finished craft look like it’s swimming through the ocean.
If summer fun and edible-inspired creativity is your goal, the colorful ideas in 19 Sweet Ice Cream Art Projects for Kids That Scream Summer Fun make art time feel like a playful seasonal treat.
Seasonal Paper Cup Crafts
6. Spring Flower Pot

A spring flower pot craft turns a simple paper cup into a bright mini garden filled with colorful paper flowers. Kids can use it as a decoration, pretend plant pot, or classroom display piece.
Materials Needed
- 1 paper cup
- Green, yellow, pink, purple construction paper
- Green pipe cleaners (or straws)
- Glue stick + liquid glue
- Scissors
- Markers or stickers (optional)
How to Make It
- Hold the paper cup upright. Decorate the outside like a flower pot using markers, stickers, or paint. Cover the lower half for a “pot effect” or decorate fully for a colorful design. Let it dry if painted.
- Cut 3–5 flower shapes from colored paper. Each flower can be a simple circle with rounded or pointed petals (about the size of a child’s palm).
- Cut green pipe cleaners into 3–5 equal pieces (about the height of the cup). These will be the stems.
- Glue one end of each pipe cleaner inside the bottom of the cup. Space them evenly so they stand upright.
- Press and hold each stem for a few seconds so it sticks firmly and doesn’t fall over.
- Attach a paper flower to the top of each stem using glue. Hold gently until secure.
- Cut small leaf shapes and glue them along the stems for extra detail.
- Let everything dry fully before moving or displaying.
7. Summer Ice Cream Cone
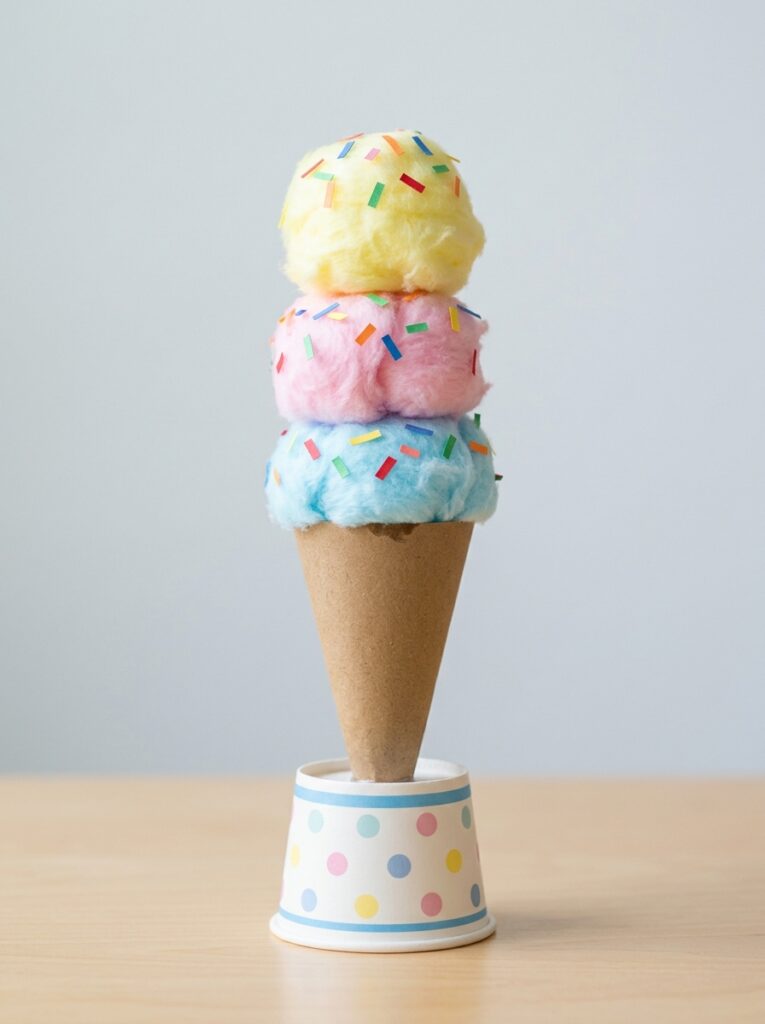
This summer ice cream cone craft is a fun pretend dessert project where kids build “ice cream scoops” using soft materials like cotton balls or pom-poms. It’s great for imaginative play and color mixing activities.
Materials Needed
- 1 paper cup
- Brown construction paper
- Cotton balls or pom-poms (multiple colors)
- Glue (strong craft glue recommended)
- Scissors
- Markers or crayons
How to Make It
- Turn the paper cup upside down so the closed bottom becomes the top of the ice cream.
- Cut a large triangle or cone shape from brown paper. The cone should be wide at the top and narrow at the bottom.
- Glue the cone shape to the bottom (now front) of the upside-down cup. Press firmly so it stays in place.
- Color or decorate the top round surface of the cup using markers or paint to represent ice cream flavor.
- Choose cotton balls or pom-poms as “scoops.” If using cotton balls, gently fluff them first for a softer ice cream look.
- Glue the cotton balls/pom-poms onto the top of the cup. Start from the bottom layer and stack upward if you want multiple scoops.
- Hold each piece for a few seconds so it sticks properly and doesn’t slide off.
- Add final details like paper sprinkles, drizzle lines, or tiny cut-out cherries for decoration.
- Let the craft dry completely before handling or displaying.
8. Autumn Scarecrow
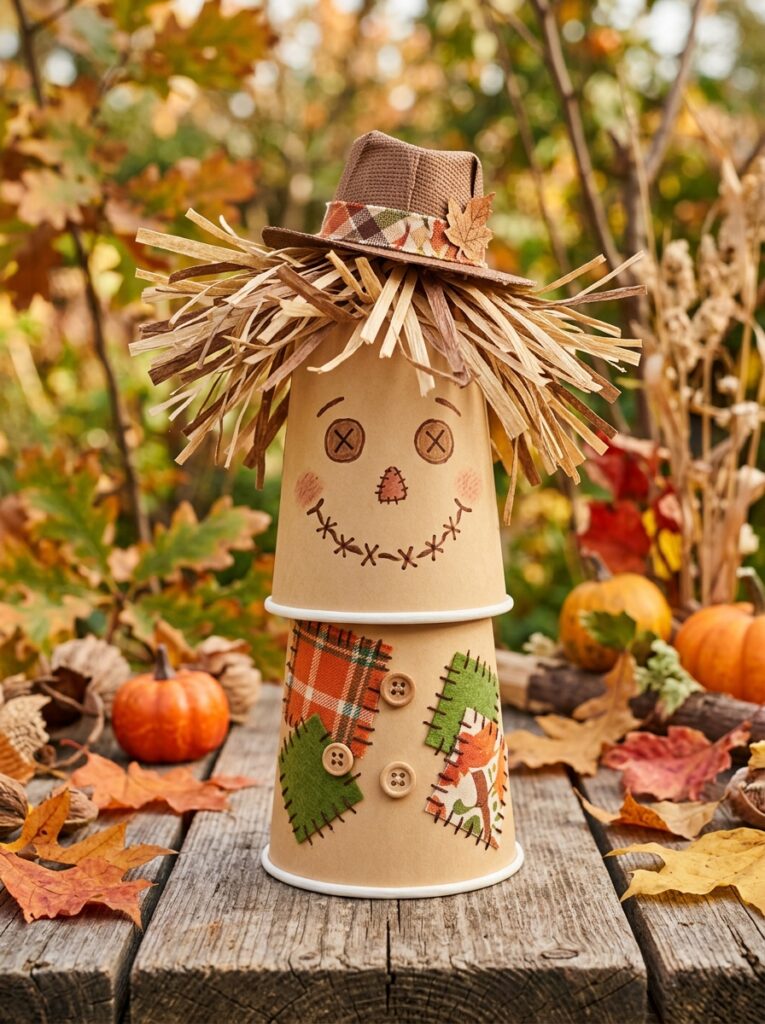
An autumn scarecrow is a seasonal paper cup craft that turns a simple cup into a friendly farm-style character using straw-colored “hair,” a drawn face, and cozy fall details.
It’s a great way to introduce kids to harvest season themes while building cutting and gluing skills.
Materials Needed
- 1 paper cup
- Yellow, orange, and brown construction paper
- Black marker
- Glue stick + liquid glue
- Scissors
- Optional: small fabric scraps or raffia (for straw effect)
How to Make It
- Hold the paper cup upright. This will be the scarecrow’s head and body.
- Cut thin strips of yellow or light brown paper to create “straw hair.” Make the strips about finger-width so they are easy for kids to handle.
- Glue the straw strips around the top rim of the cup so they stick out like hair. Press gently and let them dry slightly so they stay in place.
- Cut a simple hat shape from brown or black paper (a wide rectangle with a flat top works well).
- Glue the hat above the straw hair, slightly tilted for a fun scarecrow look.
- Draw or glue two large eyes onto the front of the cup using black marker or paper circles.
- Add a small triangle nose and a stitched smile using a marker to create a friendly face.
- Optional: Add small patches or button details on the cup to give it a “farm outfit” look.
- Let everything dry completely before displaying or playing with the scarecrow.
For children who love beach-inspired creativity, 19 Beautiful Seashell Crafts for Big Kids That Feel Beachy and Creative brings coastal textures and imagination together in a relaxing, hands-on way.
9. Winter Snowman
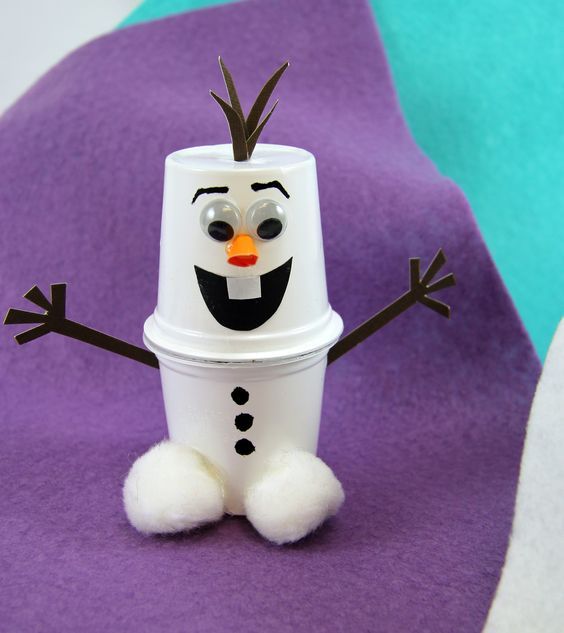
Photo credit: @ myblahblahblahg
A winter snowman is a simple and festive paper cup craft that transforms a cup into a cheerful snowman using white paint, paper accessories, and classic winter details.
It’s one of the most popular seasonal paper cup crafts for kids because it’s easy, fun, and highly customizable.
Materials Needed
- 1 paper cup
- White paint (or white paper if preferred)
- Black construction paper
- Orange construction paper
- Scissors
- Glue stick + liquid glue
- Black marker
- Optional: cotton balls, glitter, stickers
How to Make It
- Turn the paper cup upright. Paint the entire outside of the cup white. Cover evenly so no paper shows through. Let it dry completely.
- Once dry, use a black marker to draw two round eyes near the top of the cup.
- Cut a small orange triangle from construction paper to create the carrot nose. Glue it just below the eyes.
- Cut three small black circles for buttons and glue them down the front of the cup in a vertical line.
- Cut a thin strip of black paper to make a scarf or hat band. Wrap it around the cup and glue it in place.
- For extra texture, glue small pieces of cotton around the bottom or sides to create a snowy effect.
- Add any final details like a smile, rosy cheeks, or glitter snowflakes.
- Let the entire snowman dry fully before handling or displaying.
Pretend Play Paper Cup Crafts
10. Paper Cup Princess Castle
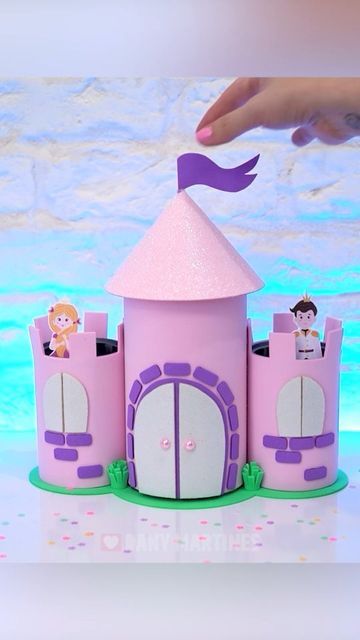
A paper cup princess castle is a pretend play craft where kids stack and decorate cups to build miniature castle towers. It encourages imaginative storytelling, role play, and basic construction skills.
Materials Needed
- 3–6 paper cups (depending on castle size)
- Colored construction paper (pink, purple, silver, gold)
- Glue stick + liquid glue
- Scissors
- Markers or stickers
- Optional: glitter, foil paper, small paper flags
How to Make It
- Decide how tall you want your castle to be and gather 3–6 paper cups.
- Decorate each cup using colored paper, markers, or stickers. You can design windows, bricks, or royal patterns.
- Cut small rectangle or triangle shapes at the top edge of some cups to create “castle tower” edges.
- Stack the cups carefully on top of each other. Use glue or tape between layers to keep them stable.
- Glue cups in a pyramid or tower shape, depending on your design.
- Add details like flags made from small paper triangles attached to toothpicks or folded paper sticks.
- Sprinkle glitter or metallic paper accents for a magical castle look.
- Let the structure dry and set completely before playing with it.
11. Paper Cup Rocket Ship
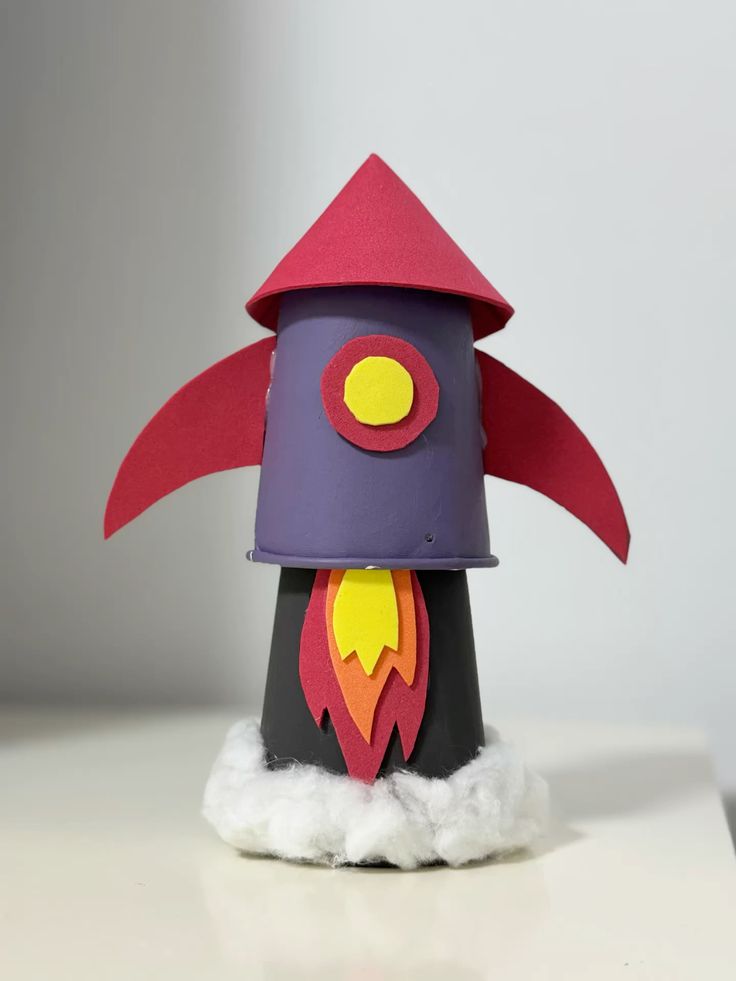
A paper cup rocket ship is a fun space-themed craft that turns a simple cup into a flying rocket for imaginative space adventures. Kids can decorate it in bright colors and use it for pretend play.
Materials Needed
- 1 paper cup
- Red, blue, silver, or black construction paper
- Aluminum foil (optional for metallic effect)
- Glue
- Scissors
- Markers or stickers
- Tissue paper (for flames)
How to Make It
- Turn the paper cup upside down so the closed bottom becomes the top of the rocket.
- Cover or decorate the cup using colored paper, markers, or foil for a spaceship look.
- Cut small circle shapes from paper to make rocket windows and glue them on the front.
- Cut two triangle shapes for rocket fins and glue them on opposite sides near the open end of the cup.
- Cut strips of red, orange, or yellow tissue paper to create fire flames.
- Glue the tissue paper inside the open end of the cup so it hangs down like rocket fire.
- Add extra details like stars, numbers, or stripes using markers or stickers.
- Let the rocket dry fully before lifting or using it for play.
To make patriotic celebrations more engaging and hands-on, 23 Easy 4th of July Flag Crafts for Kids to Make This Summer helps children connect with national holidays through creative expression.
12. Paper Cup Pirate Telescope
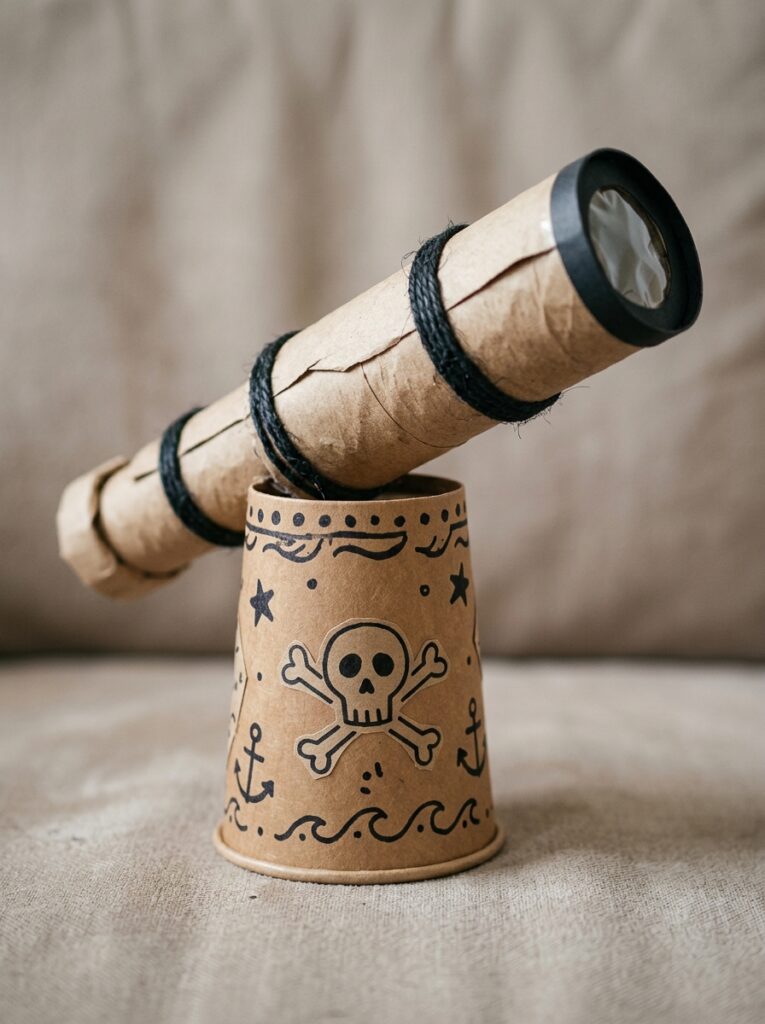
A paper cup pirate telescope is a simple pretend play craft where kids create a handheld viewing tube for imaginative pirate adventures. It helps encourage storytelling and role-playing games.
Materials Needed
- 1 paper cup
- Black or brown construction paper
- Cardboard tube or rolled paper (for telescope extension)
- Glue or tape
- Scissors
- Markers or stickers
- Optional: foil or gold paper for decoration
How to Make It
- Turn the paper cup upright and decorate it using black, brown, or themed pirate colors.
- Wrap the outside of the cup with construction paper to give it a strong pirate look.
- Roll a piece of paper tightly into a tube shape if you don’t have a cardboard tube. Secure it with glue or tape.
- Attach one end of the tube to the bottom or side opening of the cup to form the telescope body.
- Decorate the telescope with stripes, skull symbols, stars, or pirate-themed designs.
- Add foil or gold paper accents to make it look like treasure equipment.
- Allow all glued parts to dry completely before using it for pretend pirate play.
13. Paper Cup Puppet Character
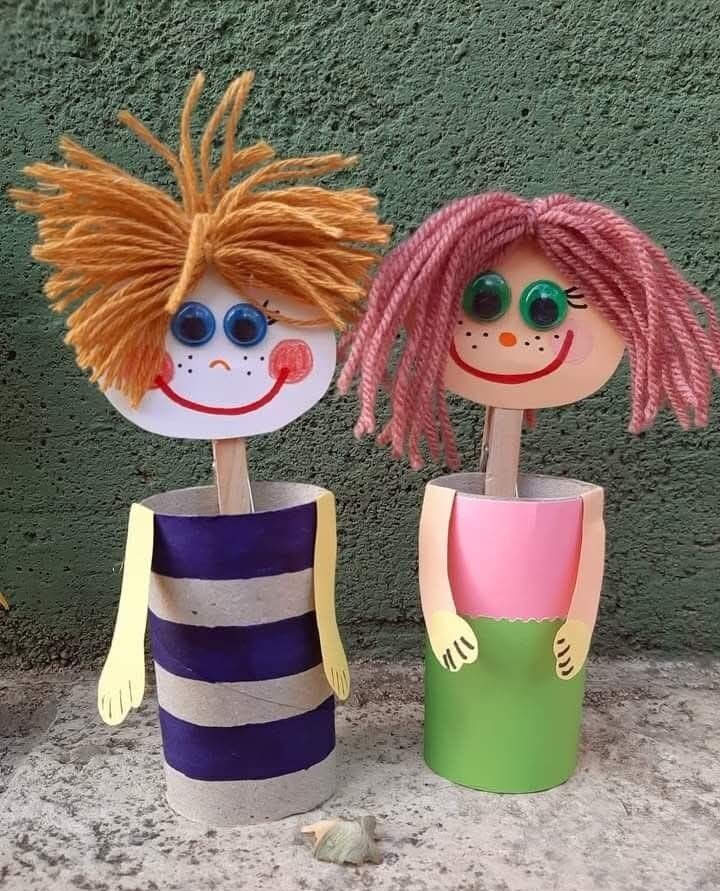
Paper cup puppet characters are fun pretend play crafts where kids transform a simple cup into people, animals, or storybook figures.
These puppets can be used for storytelling, classroom activities, or simple home puppet shows, making them both creative and interactive.
Materials Needed
- 1 paper cup
- Construction paper (various colors)
- Markers or crayons
- Glue stick + liquid glue
- Scissors
- Googly eyes (optional)
- Popsicle stick or straw (optional for holding the puppet)
How to Make It
- Choose a character to create such as an animal, superhero, princess, or cartoon figure.
- Keep the paper cup upright and use it as the main body of the character.
- Cut out body parts like arms, hair, ears, hats, or costumes from construction paper depending on your design.
- Glue facial features onto the front of the cup, including eyes, nose, and mouth. Use googly eyes if available for extra detail.
- Attach the cut-out parts to the sides or top of the cup to complete the character design.
- Draw additional details like clothing patterns, freckles, or expressions using markers.
- Attach a popsicle stick or straw to the back or bottom of the cup if a handheld puppet is needed.
- Allow the puppet to dry completely before using it for play or storytelling.
14. Paper Cup Fairy House
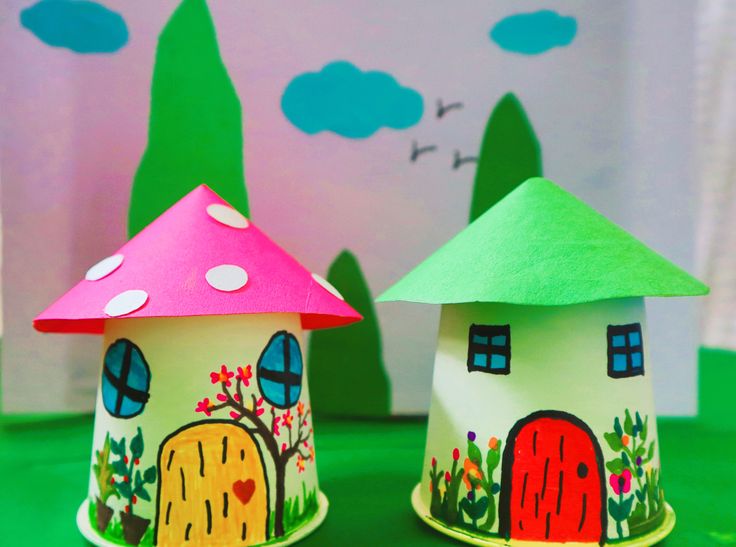
Photo credit: @ Artclub by spoorthi
Video credit: @ Joann Curtis
Paper cup fairy houses turn simple cups into tiny magical homes filled with windows, doors, and decorative details. This craft encourages imagination, storytelling, and world-building as kids design their own fairy village.
Materials Needed
- 1 paper cup
- Colored construction paper
- Markers or paint
- Glue
- Scissors
- Stickers, glitter, or sequins (optional)
- Cotton or green paper (optional for garden base)
How to Make It
- Turn the paper cup upright and decide where to place the door and windows.
- Cut a small door from construction paper or draw it directly onto the cup.
- Add windows using paper cutouts or draw them with markers in different shapes like circles or squares.
- Decorate the outside with patterns such as flowers, vines, bricks, or whimsical designs.
- Cut a cone or dome shape from paper and glue it to the top of the cup to create a roof.
- Add glitter, sequins, or stickers for a magical fairy-tale effect.
- Place small pieces of cotton or green paper around the base to create a garden or grassy surroundings.
- Let the fairy house dry completely before using it for pretend play or display.
If you want festive and simple summer crafts using household materials, 25 Easy 4th of July Popsicle Stick Crafts for Kids That Are Fun and Festive is packed with easy wins for group or classroom activities.
STEM-Inspired Paper Cup Crafts
15. Paper Cup Telephone
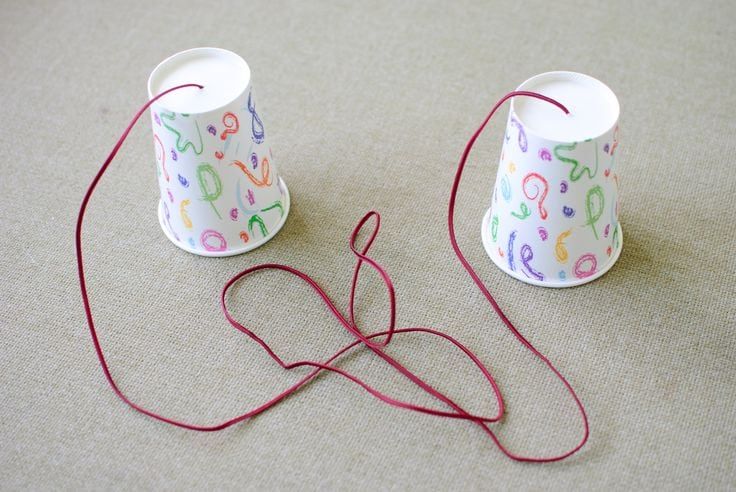
Photo credit: @ globalcallforwarding
Paper cup telephone craft is a simple STEM activity that helps kids understand how sound travels through vibrations using string and cups. It turns everyday materials into a fun communication experiment.
Materials Needed
- 2 paper cups
- String or yarn (about 1.5–3 meters)
- Scissors
- Pencil or skewer (for making holes)
- Tape or knot (to secure string)
How to Make It
- Use a pencil or skewer to carefully poke a small hole at the bottom center of each paper cup.
- Cut a long piece of string (about 1.5–3 meters depending on how far apart users will stand).
- Thread one end of the string through the hole in the first cup and tie a knot inside the cup so it cannot pull through.
- Repeat the same step with the second cup using the other end of the string.
- Pull the string tight between the two cups so it is fully stretched without touching anything in between.
- One person speaks into one cup while the other places the cup to their ear to hear the sound.
- Adjust tension in the string if the sound is unclear and test again.
16. Paper Cup Windmill
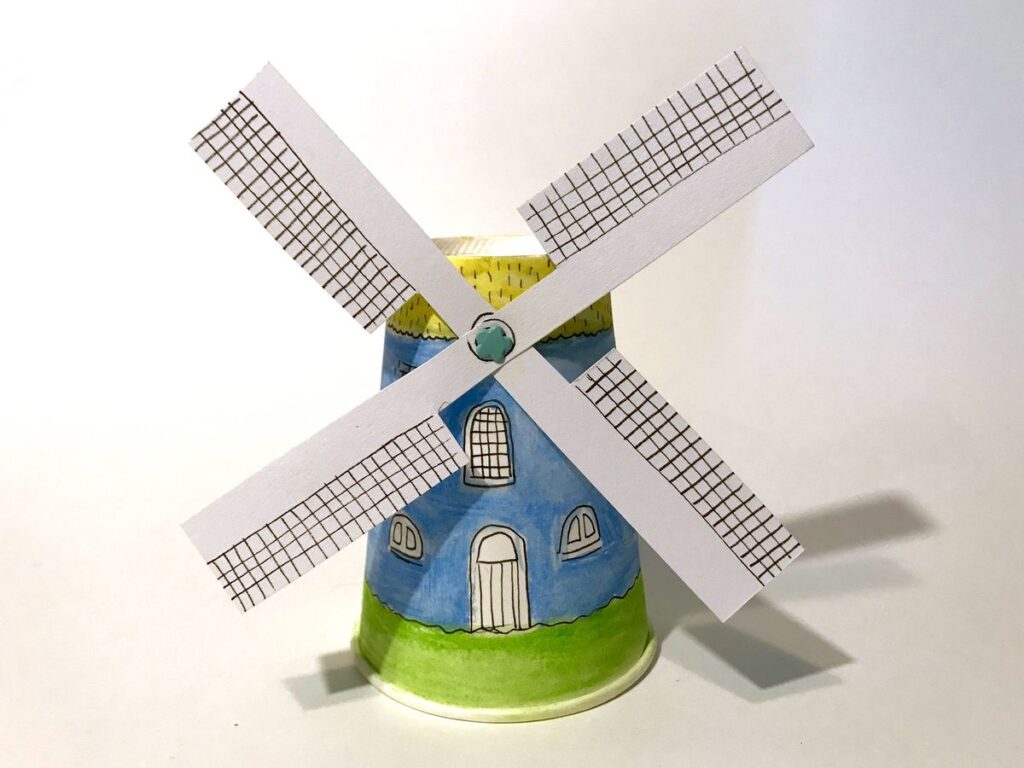
Photo credit: @ Yoors
Paper cup windmill craft introduces kids to wind energy and movement by creating a simple spinning structure that reacts to airflow.
Materials Needed
- 1 paper cup
- Colored paper or paint
- Push pin or small stick
- Straw or pencil (for handle)
- Scissors
- Glue
- Cardstock or sturdy paper (for blades)
How to Make It
- Decorate the paper cup using paint or colored paper and let it dry completely.
- Cut 4–6 equal-sized blades from sturdy paper or cardstock.
- Slightly bend each blade at the base to help it catch air more easily.
- Attach the blades evenly around the open rim of the cup using glue or tape.
- Push a pin through the center base of the cup to secure the structure.
- Attach the pin to a straw or pencil so the windmill can rotate freely.
- Blow gently or place it near a fan to test the spinning motion.
For meaningful holiday lessons that go beyond gifts, 21 Meaningful Father’s Day Sunday School Crafts for Kids helps children express gratitude in a creative, thoughtful way.
17. Paper Cup Marble Run
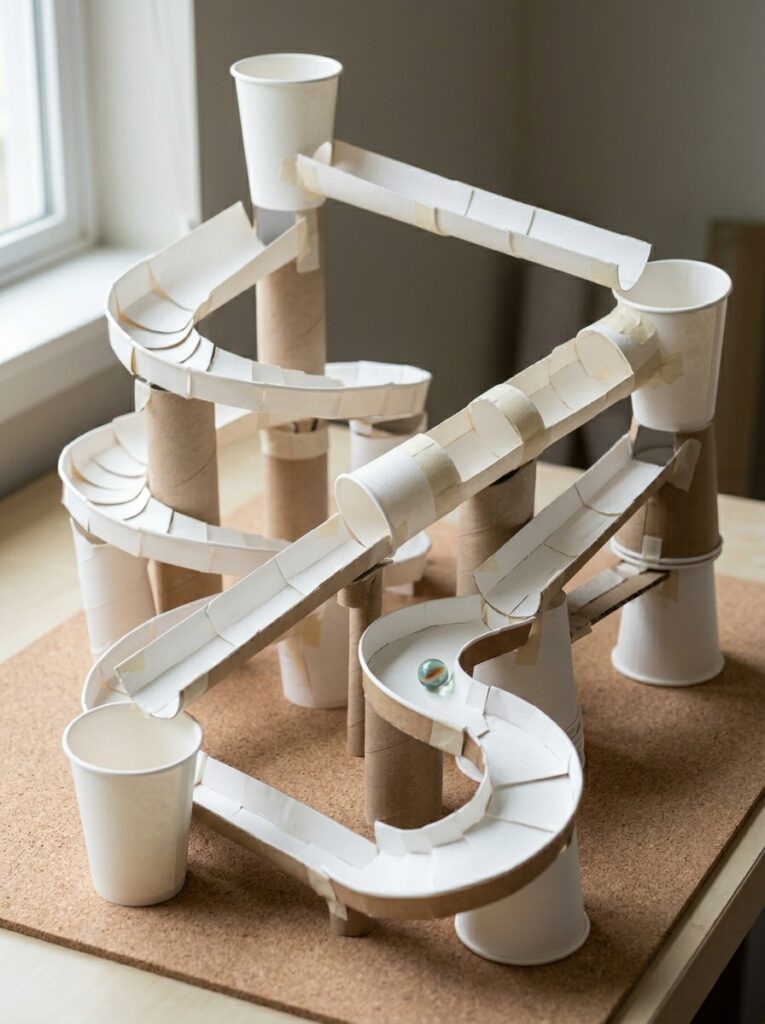
Paper cup marble run craft allows kids to explore gravity, motion, and cause-and-effect by creating a simple track system using cups as tunnels and ramps.
Materials Needed
- 3–6 paper cups
- Tape or glue
- Scissors
- Marbles or small balls
- Cardboard (optional base platform)
How to Make It
- Decide how you want your marble path to move (straight, zigzag, or sloped).
- Cut openings in the sides of some cups to create entry and exit points for marbles.
- Tape or glue cups together in a connected path or stack them at different heights using a stable base.
- Position cups so marbles can roll from one cup to another without falling out.
- Secure all cups firmly to prevent tipping during play.
- Drop a marble into the top cup and observe how it moves through the structure.
- Adjust angles or spacing if the marble stops or falls too early.
18. Paper Cup Balance Challenge
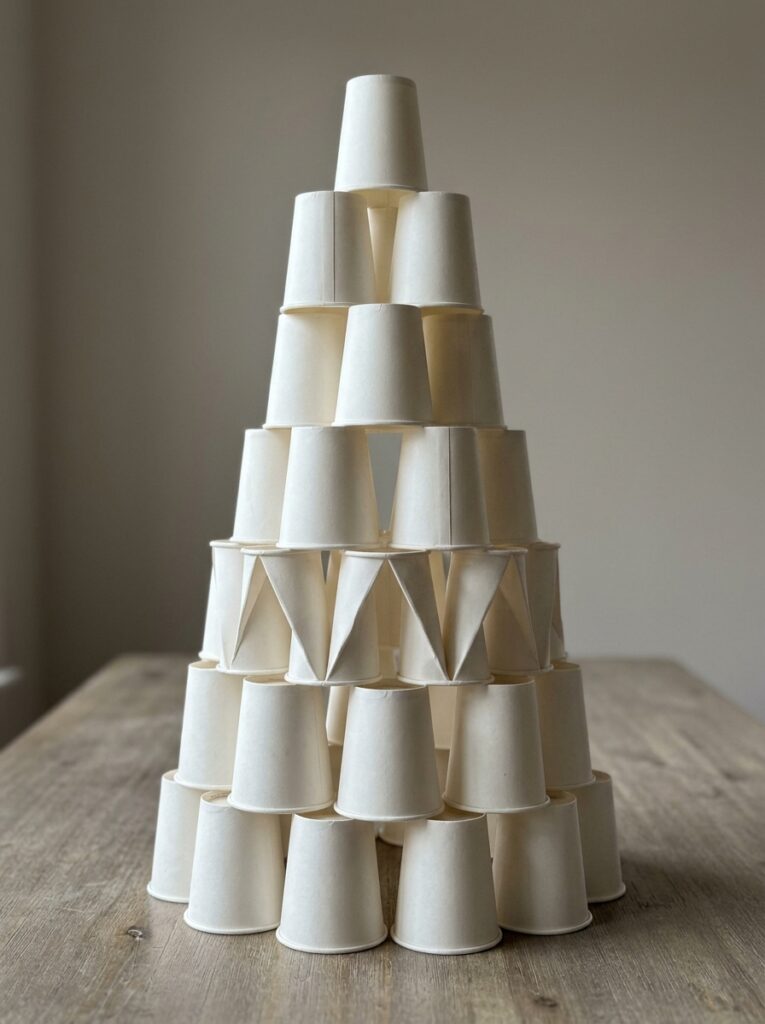
Paper cup balance challenge craft is an engineering-style activity where kids build stable structures using cups to explore balance, weight distribution, and problem-solving.
Materials Needed
- 6–12 paper cups
- Flat surface or table
- Small objects for testing weight (toys, blocks, coins)
- Tape (optional for stability)
How to Make It
- Place one paper cup upside down on a flat surface as the base.
- Stack another cup on top and test how stable the structure feels.
- Continue stacking cups in different patterns such as towers, pyramids, or bridges.
- Try balancing cups in different orientations (open side up, open side down) to test stability.
- Gently place small objects on top of the structure to test weight-bearing strength.
- Adjust the design by widening the base or changing cup positions if it becomes unstable.
- Challenge kids to build the tallest or most stable structure possible without it falling.
When you need quick and classroom-friendly ideas for younger learners, Easy Father’s Day Crafts for Kindergarten Kids to Make at School offers simple, low-prep projects that still feel special.
Holiday Paper Cup Crafts
19. Easter Bunny Cup
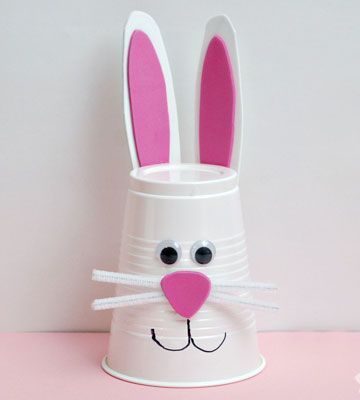
Photo credit: @ diydecorcrafts
Floppy ears, soft cotton tail, and simple facial features turn a paper cup into a cheerful Easter bunny that works well for seasonal crafting and holiday decorating.
Materials Needed
- 1 paper cup
- White and pink construction paper
- Cotton balls
- Googly eyes or black marker
- Glue
- Scissors
How to Make It
- Place the paper cup upright so the open rim is at the top.
- Cut two long ear shapes from white paper and two smaller inner ear shapes from pink paper.
- Glue the pink pieces inside the white ear shapes to create layered bunny ears.
- Attach the ears to the inside rim of the cup so they stand upright.
- Glue two googly eyes near the upper front of the cup or draw them with a marker.
- Cut a small pink circle for the nose and glue it in the center of the face area.
- Draw whiskers and a small smile using a black marker.
- Pull apart a cotton ball and glue it to the back or bottom area as the bunny tail.
- Let everything dry completely before using or displaying.
20. Halloween Bat Cup
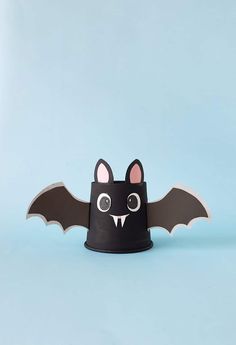
Dark colors, wide wings, and small pointed ears turn a simple cup into a friendly Halloween bat that’s spooky but still kid-friendly.
Materials Needed
- 1 black paper cup (or paint one black)
- Black construction paper
- White paper or googly eyes
- Glue
- Scissors
- Marker
How to Make It
- Keep the paper cup upright and ensure it is fully black (paint it if needed and let it dry).
- Cut two wing shapes from black construction paper, making them wide and slightly curved.
- Fold a small edge at the base of each wing so it can stick securely to the cup.
- Glue one wing on each side of the cup so they extend outward like flying wings.
- Attach two eyes near the top front of the cup using white paper circles or googly eyes.
- Cut two small triangle shapes for ears and glue them to the inside rim so they stick up.
- Draw a small smile or tiny fangs using a marker for a friendly bat face.
- Let the craft dry fully before handling or hanging.
If you’re looking for emotional keepsake-style crafts, 19 Adorable Father’s Day Footprint Craft Ideas Kids Can Make turns tiny footprints into heartfelt memories families will cherish.
21. Christmas Elf Cup
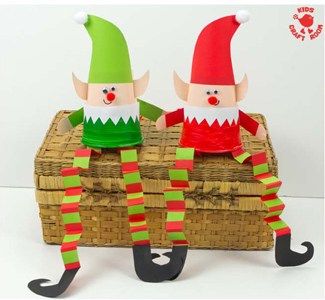
Bright colors, a pointy hat, and a cheerful face transform a paper cup into a festive elf that fits perfectly into holiday crafts and classroom activities.
Materials Needed
- 1 paper cup
- Red, green, and skin-tone construction paper
- Marker
- Glue
- Scissors
- Cotton or pom-poms (optional)
How to Make It
- Place the cup upright and choose a skin-tone paper to cover the front of the cup.
- Cut and glue the skin-tone paper onto the front section to create the elf’s face area.
- Draw eyes, a nose, and a smile using a marker.
- Cut a triangle shape from red or green paper to form a tall elf hat.
- Glue the hat to the top rim of the cup so it points upward.
- Add a small pom-pom or cotton ball at the tip of the hat for decoration.
- Cut small strips of green or red paper for hair or collar details and glue them around the sides if desired.
- Let everything dry before using or displaying.
22. Valentine’s Day Love Bug
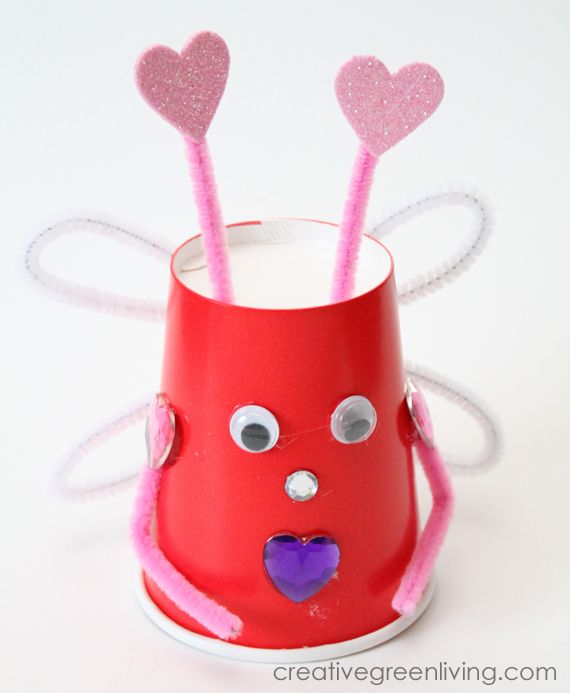
Photo credit: @ creativegreenliving
Hearts, bright colors, and playful antennae turn a paper cup into a cute love bug perfect for Valentine-themed crafting sessions.
Materials Needed
- 1 paper cup
- Red, pink, and purple construction paper
- Googly eyes or marker
- Pipe cleaners (for antennae)
- Glue
- Scissors
How to Make It
- Keep the paper cup upright and choose a base color like red or pink for decorating.
- Cut small heart shapes from colored paper and glue them around the cup body.
- Attach two googly eyes near the top front of the cup.
- Cut a small heart for the nose and glue it in the center below the eyes.
- Twist two pipe cleaners into curved antennae and glue them inside the rim of the cup so they stick upward.
- Add small paper hearts at the tips of the antennae for extra detail.
- Draw a smile and tiny cheek dots using a marker.
- Allow the craft to dry completely before displaying.
If you want Bible lessons that actively teach courage through making, 15 David and Goliath Bible Crafts for Kids That Teach Courage and Faith turns storytelling into an engaging hands-on experience.
Room Decoration Paper Cup Crafts
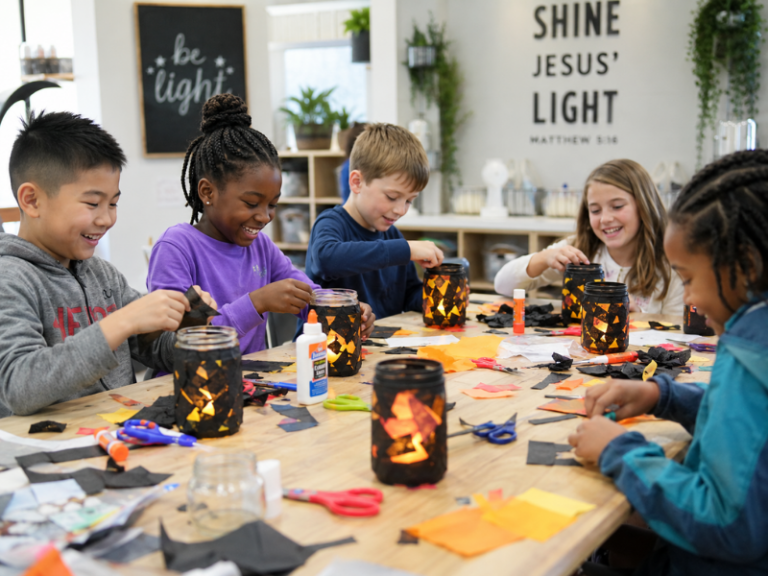
23. Paper Cup Hanging Lantern
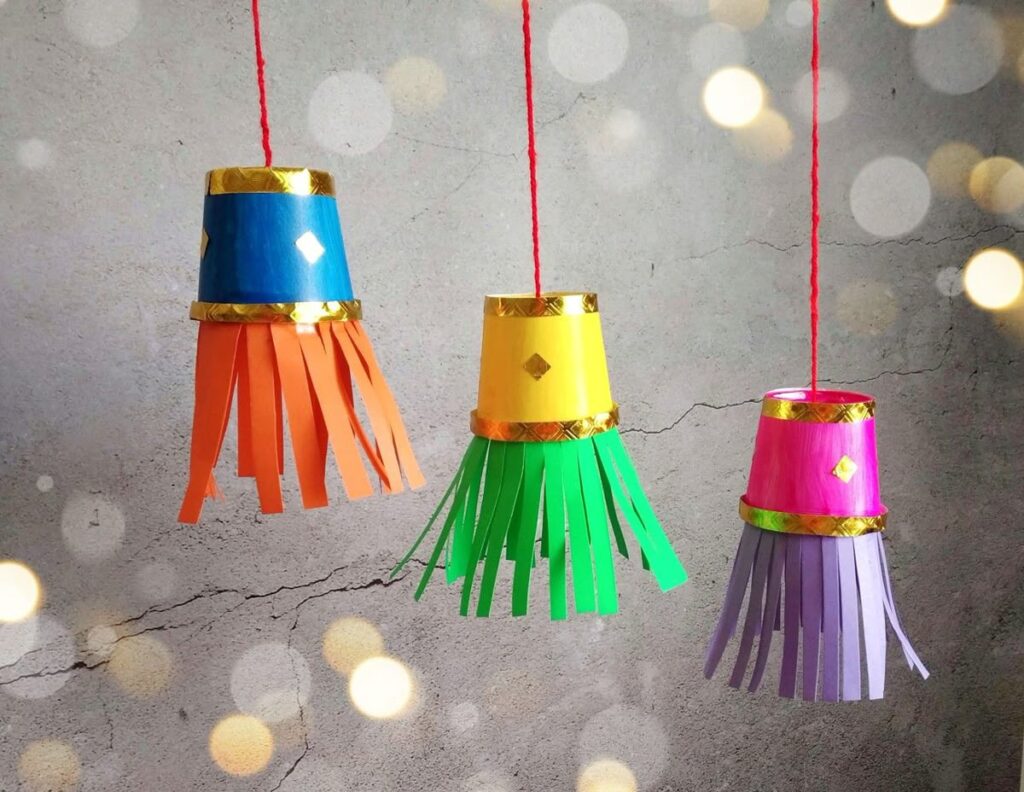
Photo credit: @ Kalakar supriya
Paper cup hanging lanterns turn simple cups into colorful room decorations that can be used for bedrooms, classrooms, parties, or festive displays.
This craft focuses on layering color, light patterns, and string assembly to create a hanging decorative piece.
Materials Needed
- 3–8 paper cups
- Colored tissue paper or cellophane
- Paint or markers
- Glue stick + liquid glue
- Scissors
- String or yarn
- Hole punch or sharp pencil
- Optional: LED tea light (battery-powered only)
How to Make It
- Choose how many cups you want to use depending on how long or full you want the lantern to look.
- Decorate each paper cup individually using paint, markers, or stickers. You can create patterns like stars, stripes, or dots for a more decorative effect.
- Cut small shapes (circles, stars, hearts) into the sides of some cups carefully using scissors. These openings will allow light or color to show through.
- Cover the inside of the cut-out shapes with colored tissue paper or cellophane and glue it neatly in place.
- Allow all decorated cups to dry completely before assembling.
- Use a hole punch or pencil to make two small holes on opposite sides near the rim of each cup.
- Thread string or yarn through the holes, linking each cup one after another in a vertical or horizontal chain depending on your design.
- Tie knots securely between each cup to keep spacing even and prevent slipping.
- If using light decoration, place a battery-powered LED tea light inside one or two cups for a soft glow effect.
- Hang the finished lantern string on a wall, ceiling, window area, or party backdrop.
For quick, budget-friendly classroom crafts that always turn out well, 15 Easy Popsicle Stick Crafts for Kids That Turn Out So Cute is a go-to list for stress-free creativity sessions.
How Teachers Can Use Paper Cup Crafts for Kids in the Classroom
-
Quick “early finisher” activities
Paper cup crafts for kids work well for students who finish assignments early. Teachers can keep a small “craft station” ready so learners stay productively engaged instead of becoming distracted. -
Low-cost group art projects
These crafts use inexpensive materials like paper cups, glue, and paper, making them ideal for large classrooms where budgets are limited but creativity is encouraged.
-
Themed lesson reinforcement
Paper cup crafts for kids can be tied to subjects like science (animals, weather), literacy (story characters), or social studies (community helpers), helping students remember concepts through hands-on learning. -
Classroom seasonal displays
Finished crafts can be used to decorate bulletin boards, reading corners, or classroom walls for seasons and holidays, creating a more engaging learning environment. -
Fine motor skill development
Cutting, gluing, folding, and decorating paper cup crafts for kids helps strengthen hand coordination, especially for early learners and preschool students. -
Storytelling and speaking activities
Students can use their finished paper cup characters as puppets to retell stories or create group presentations, improving confidence and communication skills. -
STEM learning support
Simple paper cup builds can introduce basic engineering and science ideas like balance, structure, motion, and sound in a fun, practical way.
If your child enjoys butterfly-themed activities, 10 Fun Butterfly Crafts for Kids That Will Keep Little Hands Busy All Afternoon offers more creative ways to extend the same love for nature-inspired crafting.
Conclusion
Paper cup crafts for kids are a simple, affordable, and creative way to keep children engaged throughout the year.
From animals and seasonal projects to STEM activities and holiday designs, these crafts encourage imagination while building important skills through hands-on play.
With just a few basic materials, everyday paper cups can turn into meaningful learning and fun experiences that children actually enjoy.
If you found these ideas helpful, try a few with your child or students this week and see how quickly simple supplies can turn into something creative and fun.
Frequently Asked Questions About Paper Cup Crafts for Kids
-
What age is best for paper cup crafts?
Paper cup crafts can be adapted for a wide range of ages. Toddlers (3–5) do best with simple tearing, sticking, and coloring activities with close supervision, while older kids (6–12) can handle cutting, shaping, and more detailed designs with less assistance.
-
Can paper cup crafts be used in classrooms?
Yes, paper cup crafts work very well in classrooms. They are affordable, easy to prepare in bulk, and can support lessons in art, science, storytelling, and seasonal themes. Teachers often use them for group projects, early finishers, and creative learning activities.
-
What glue works best on paper cups?
Liquid school glue or strong craft glue works best because it bonds well with the curved surface of paper cups. Glue sticks are good for light paper decorations, but liquid glue holds heavier items like pom-poms, feathers, and layered paper more securely.
-
Are paper cup crafts good for preschoolers?
Yes, they are especially good for preschoolers when kept simple. Activities like sticking pre-cut shapes, coloring, and adding stickers help develop fine motor skills, hand-eye coordination, and creativity without overwhelming them.
-
How do I make paper cup crafts less messy?
To reduce mess, prepare materials in advance by pre-cutting shapes, using washable paints, and covering work surfaces with newspaper or plastic sheets. Giving each child a small tray of supplies also helps keep materials organized and contained.